-
![]()
Sofia Albert
Sofia has been involved with tech ever since she joined the EaseUS editor team in March 2011 and now she is a senior website editor. She is good at solving various issues, such as video downloading and recording.…Read full bio -
![]()
Melissa Lee
Melissa Lee is a sophisticated editor for EaseUS in tech blog writing. She is proficient in writing articles related to screen recording, voice changing, and PDF file editing. She also wrote blogs about data recovery, disk partitioning, data backup, etc.…Read full bio -
Jean has been working as a professional website editor for quite a long time. Her articles focus on topics of computer backup, data security tips, data recovery, and disk partitioning. Also, she writes many guides and tutorials on PC hardware & software troubleshooting. She keeps two lovely parrots and likes making vlogs of pets. With experience in video recording and video editing, she starts writing blogs on multimedia topics now.…Read full bio
-
![]()
Gorilla
Gorilla joined EaseUS in 2022. As a smartphone lover, she stays on top of Android unlocking skills and iOS troubleshooting tips. In addition, she also devotes herself to data recovery and transfer issues.…Read full bio -
![]()
Rel
Rel has always maintained a strong curiosity about the computer field and is committed to the research of the most efficient and practical computer problem solutions.…Read full bio -
![]()
Dawn Tang
Dawn Tang is a seasoned professional with a year-long record of crafting informative Backup & Recovery articles. Currently, she's channeling her expertise into the world of video editing software, embodying adaptability and a passion for mastering new digital domains.…Read full bio -
![]()
Sasha
Sasha is a girl who enjoys researching various electronic products and is dedicated to helping readers solve a wide range of technology-related issues. On EaseUS, she excels at providing readers with concise solutions in audio and video editing.…Read full bio
Content
Dawn Tang
Updated On 03/27/2025
0 Views |
0 min read
Slow Down Videos in After Effects
▶️To slow down videos in After Effects, add your clip, right-click, choose "Time," then "Time Stretch." Adjust the "Stretch Factor" to a value below 100% for slower motion. Preview to confirm the desired speed.
Adobe After Effects is a useful tool that offers robust capabilities. It creates captivating motion graphics and integrates visual effects to enhance your projects. One particularly useful feature is the ability to slow down video footage. You can slow down your videos to enhance their overall reach. This article mentions the effective ways for After Effects to slow down video.
Here, we'll explore various methods and techniques to achieve stunning slow-motion effects. Moreover, we'll suggest the best free tool to speed up MP3 and elevate the overall quality of your video compositions.
1. Time Stretch-Slow Down an Entire Layer
- Suitable for: Slowing down entire video clips or layers.
- Effectiveness: Provides a simple and straightforward way to slow down footage, but may result in choppy motion if slowed significantly.
Slowing down a clip can add a dramatic effect to better absorb the content. Adobe After Effects offers a straightforward method to accomplish this task using the Time Stretch feature. Time Stretch allows users to slow down MP3 in Adobe After Effects by adjusting the duration of the footage.
This method is simple and accessible to beginners. However, it may result in choppy or unnatural motion, especially when slowing down the whole footage. It merely extends the duration without generating additional frames to maintain smoothness.
Follow these steps to slow down an entire layer to your desired speed.
Step 1. Add your video to Adobe After Effects.
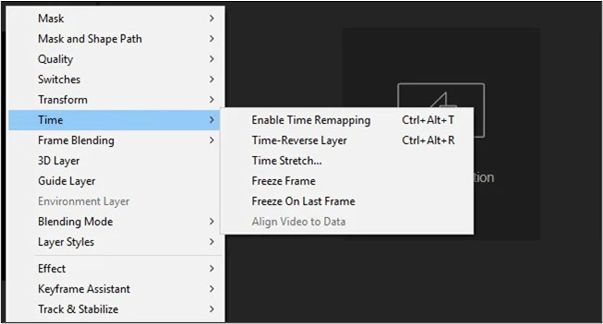
Step 2. Right-click on the clip to see the menu.
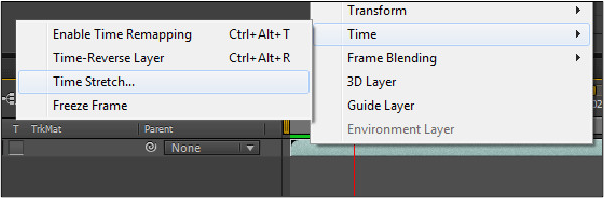
Step 3. Go to the "Time" submenu.
Step 4. Select "Time Stretch." It provides the necessary controls to adjust the speed of the clip.
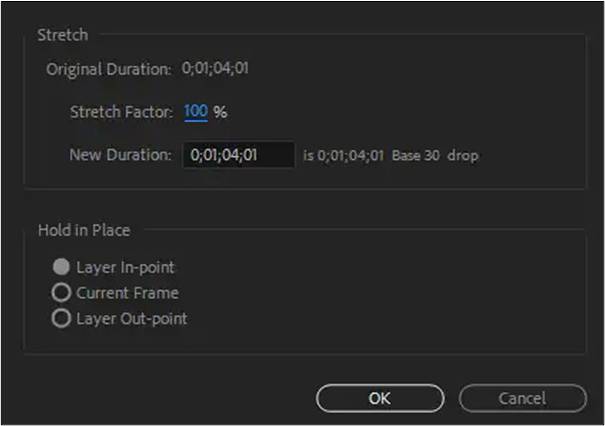
Step 5. Click on "Stretch Factor." Set a value below 100% to slow down the clip. The lower the value, the slower the motion of the clip will be.
Step 6. Preview the clip to ensure that the speed is as desired. Playback the clip within the After Effects interface to observe how the slowed-down motion affects the overall composition.
If you want to extract audio from a video, you can find it in how to remove audio from a video in After Effects.
How to Speed up Video in After Effects 2024 in 2 Ways
You can easily change the speed of a video clip in Adobe After Effects by using multiple methods. If you don't know about them, read this blog till the end to learn how to speed up video in After Effects.
2. Time Remapping-Slow Down Keyframes
- Suitable for: Fine-tuning the speed of specific segments within a video clip.
- Effectiveness: Offers precise control over timing and intensity for smooth transitions between different speeds.
Time Remapping offers a more effective way to slow down footage by enabling users to manipulate keyframes and adjust the speed of specific segments within a clip.
This method provides greater control over the timing and intensity of the slow-motion effect. It allows smoother transitions and more precise editing. Compared to other methods, it requires a more hands-on approach.
Utilizing Time Remapping in Adobe After Effects provides an advanced approach to slowing down clips. It offers greater flexibility and helps users answer a common question: how to speed up a song.
Follow these steps to slow down keyframes using Time Remapping effectively:
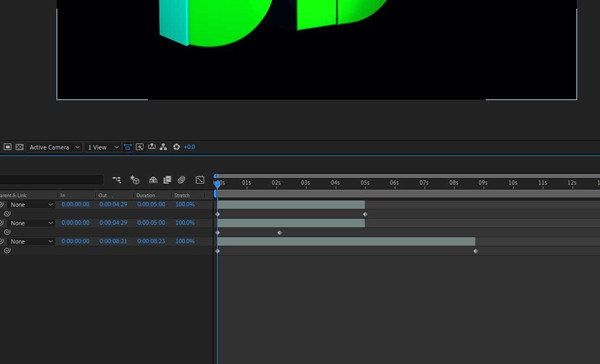
Step 1. Open your composition in Adobe After Effects and go to the timeline where your clip is located.
Step 2. Identify the specific clip you wish to slow down and select it within the composition timeline.
Step 3. Go to the "Time" submenu, and then select "Enable Time Remapping." It activates the time-remapping feature for the chosen clip.
Step 4. Once Time Remapping is enabled, keyframes will automatically appear at the beginning and end of the clip's time range.
Step 5. Set a new keyframe by right-clicking on the timeline
Step 6. Select "Keyframe Assistant" > "Easy Ease In." It converts the keyframe to an Easy Ease In keyframe.
Step 7. Repeat this process.
Step 8. Adjust the position of keyframes to achieve the desired speed.
See also:
3. TimeWarp-Create Slow Motion
- Suitable for: Generating slow-motion effects with advanced pixel motion interpolation.
- Effectiveness: Produces high-quality slow-motion footage by analyzing and generating intermediate frames.
TimeWarp uses advanced algorithms to create slow-motion effects with pixel motion. By analyzing the movement between frames, TimeWarp generates additional frames to enhance smoothness and maintain visual fidelity.
This method is effective in producing high-quality slow-motion footage. However, it may require more computational resources and processing time. It offers flexibility in adjusting the speed of your footage. However, it doesn't help you speed up a video on iPhone.
Follow these steps to use the TimeWarp effect:
Step 1. Add the video clips in Adobe After Effects.
Step 2. Click on the selected video clip.
Step 3. Choose the "Effect" option. This action will open a submenu where you can access various effects to apply to your footage.
Step 4. Go to the "Time" and locate the TimeWarp effect. Click on the TimeWarp effect to apply it to the selected video clip.
Step 5. Select "Pixel Motion." This setting allows for smoother motion interpolation, enhancing the quality of the slow-motion effect.
![]()
Step 6. Adjust the speed of the video clip freely. By default, a speed value of 50 represents the original speed of the footage. To slow down the video, simply reduce the speed value accordingly.
4. Frame Blending-Smooth Slow Motion
- Suitable for: Enhancing the smoothness of slow-motion effects by blending adjacent frames.
- Effectiveness: Helps eliminate artifacts and maintains visual continuity.
Frame Blending enhances the smoothness of slow-motion effects by blending frames. When combined with the Pixel Motion option, Frame Blending can produce seamless slow-motion sequences with fluid motion interpolation.
This method excels in eliminating artifacts and maintaining visual continuity. However, additional adjustments may be required to achieve optimal results. Frame Blending in Adobe After Effects enhances the smoothness of slow-motion effects. It can produce high-quality slow-motion sequences with fluid motion.
Follow these steps to use Frame Blending and its Pixel Motion effect for creating smooth slow-motion effects:
Step 1. Import your video clip into the composition timeline.
Step 2. Right-click on the clip and go to the "Frame Blending" option.
Step 3. Choose "On" to enable Frame Blending for the selected clip.
Step 4. Select the Pixel Motion option within the After Effects interface.
Step 5. Select the Pixel Motion option to utilize advanced motion interpolation algorithms for smoother slow-motion effects.

Step 6. Preview the slow-motion effect within the After Effects interface to evaluate the smoothness and quality of the motion.
Step 7. Make any necessary adjustments to the Pixel Motion settings or composition properties to achieve the desired result.
5. Twixtor Plugin-Create Slow-Motion Footage
- Suitable for: Achieving professional-grade slow-motion effects with advanced retiming capabilities.
- Effectiveness: Offers unparalleled control and flexibility, producing smooth and natural-looking slow-motion footage even with standard frame rate footage.
Twixtor is a video effects plugin that manipulates the time in your footage. It excels in tasks like retiming and creating fast and slow-motion effects. It offers advanced speed change capabilities for creating slow-motion footage.
You can analyze video footage on a frame-by-frame basis and generate interpolated frames. Twixtor can produce smooth and natural-looking slow-motion effects even with standard frame rate footage. You can import videos to slow down or speed up YouTube videos.
Step 1. Import the desired video clip from "File" > "Import" > "File."
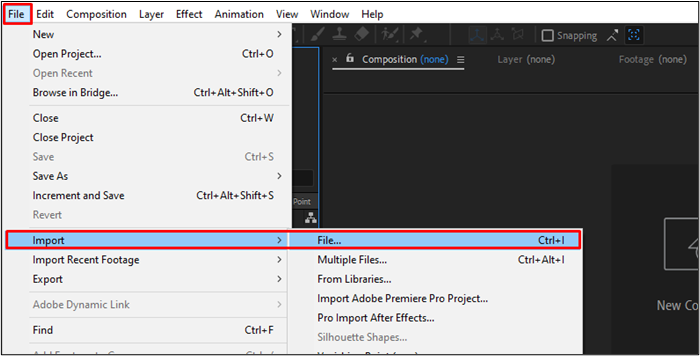
Step 2. Drag the video clip onto the new composition icon to create a new composition and add the clip to the timeline.
Step 3. Go to the Effects menu.
Step 4. Search for "RE: Vision Plugins" and select "Twixtor/Twixtor Pro."
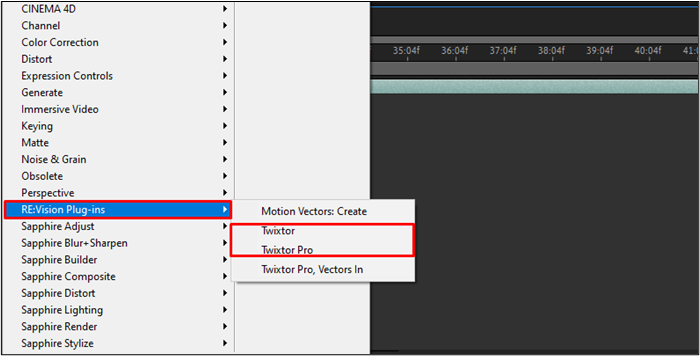
Step 5. Ensure the video clip layer is selected to activate the Effect menu.
Step 6. Access the Effect Controls panel to view Twixtor settings.
Step 7. Select "Time Remap Mode" as Speed.
Step 8. Modify the speed percentage to achieve the desired slow-motion effect. For instance, setting it to 50% halves the original speed while increasing it speeds up the footage.
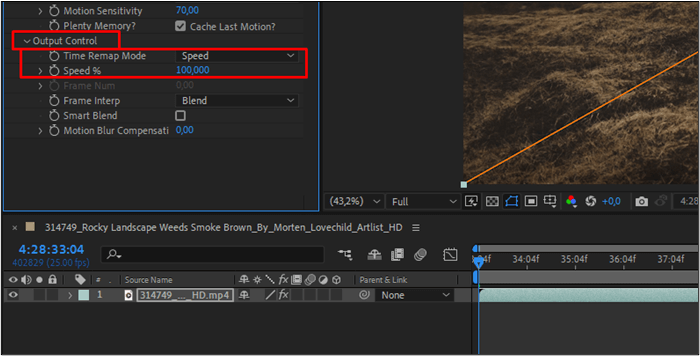
Step 9. Utilize keyframing to create dynamic speed variations across your video.
Step 10. Set keyframes for the Speed % parameter by clicking the stopwatch icon next to it.
Forward the post to others if you find it helpful!
Slow Down Audio/Video Speed Easily Online
EaseUS Online Speed Changer is a versatile tool designed to slow down audio/video speed online. It empowers users to adjust the tempo and change the pitch of a song. The tool caters to a wide range of users and helps them find the key of a song.
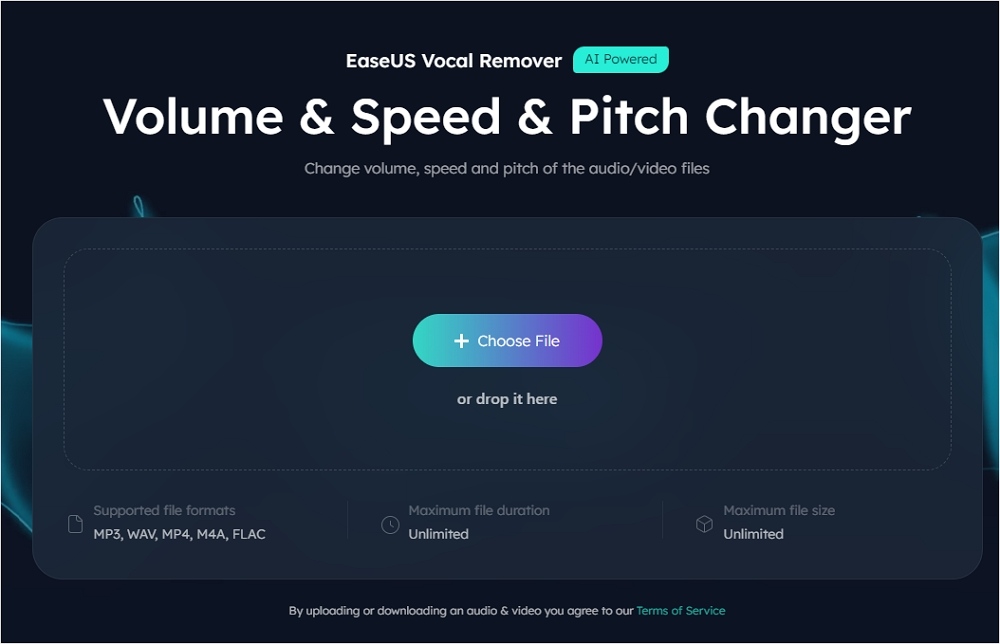
Its advanced algorithms ensure high-quality results. Users can preserve the integrity of the audio/video while slowing down the speed to the desired tempo. The MP3 volume booster offers flexibility in adjusting the speed settings to achieve the perfect balance between tempo and clarity. It provides a seamless and efficient solution for slowing down audio/video speed easily and precisely.
- Effortless Speed Adjustment: Simplifies the process of slowing down audio/video speed. Users can achieve their desired tempo with just a few clicks.
- High-Quality Results: The tool's advanced algorithms ensure that slowing down the speed does not compromise the quality of the audio or video. It preserves clarity and fidelity.
- Customizable Speed Settings: It allows users to customize the speed settings according to their specific requirements. You can make precise adjustments for optimal results.
- Online Accessibility: Offers the convenience of accessibility from any internet-connected device. It eliminates the need for software installation or downloads.
Visit it now:
Powered by Advanced AI
Step 1. Enter the main interface of EaseUS Online Speed Changer. The left sidebar shows new functions of this online tool. Find "Pitch changer" and click it.

Step 2. Then, drop the audio/video file in the blank. It supports multiple file formats, including MP3, MP4, WAV, M4A, and FLAC.
Step 3. The website will analyze your file with AI. You can drag the little dot in the "Speed" section to slow down or speed up with a range of 0.5X to 1.5X.
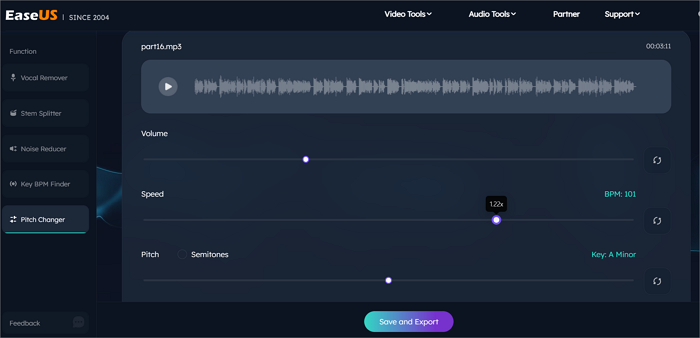
Step 4. Click "Save and Export" to download the processed file to your local file location.
Final Words
Adobe After Effects offers multiple techniques to enhance visual storytelling. This article explored the effective ways for After Effects to slow down video. We've listed multiple ways, from Time Stretching and Time Mapping to Frame Blending and the Twixtor Plugin. Each method offers unique advantages in achieving captivating slow-motion effects.
If you're looking for a convenient online solution, consider using EaseUS speed changer. With its intuitive interface and advanced features, EaseUS offers a seamless way to slow down audio/video speed effortlessly.
Powered by Advanced AI
FAQs About How to Change the Speed of a Video in After Effects
While looking for ways to change the speed of video, you might have some confusion. Here are some insights to help you.
1. Why does my video slow down in After Effects?
The slows down in After Effects due to insufficient system resources such as RAM or CPU power. Optimizing your project settings to fix the issue. Close unnecessary applications running in the background or upgrade your hardware components.
2. How to make a video slow motion after recording?
Follow these steps to make a video in slow motion after recording:
- Step 1. Go to the EaseUS Speed Changer website.
- Step 2. Go to "Pitch Changer."
- Step 3. Upload or drop your video.
- Step 4. Select speed to create a slow-motion video.
- Step 5. Preview the video to ensure the desired slow-motion effect is achieved.
- Step 8. Export the slow-motion video.
3. How do I reduce the time of a video in After Effects?
Follow these steps to reduce the video time in After Effects:
- Step 1. Open After Effects.
- Step 2. Go to "File" > "Import" > "File."
- Step 3. Select the video.
- Step 4. Drag the imported footage into a new composition.
- Step 5. Select "Time" > "Time Stretch."
- Step 6. Adjust the "Stretch Factor" to a value less than 100% to slow down the video.
- Step 7. Preview the video to ensure the desired effect is achieved. Make further adjustments to the stretch factor if necessary.
- Step 8. Export the composition to save the slowed-down video.
4. How do you slow down the camera in After Effects?
Follow these steps to slow down the camera in After Effects:
- Step 1. Create a new composition and add a camera layer to the composition.
- Step 2. Click on the stopwatch icon next to each property.
- Step 3. Move the play head to a later point in the timeline where you want the camera movement to end.
- Step 4. Adjust the scale properties to the desired values.
- Step 5. After Effects will automatically create motion between the keyframes. Adjust the keyframes or apply easing techniques to refine the motion as needed.
- Step 6. Preview the camera movement to ensure the desired slow-motion effect is achieved. Make further adjustments if necessary.
- Step 7. Export the composition to save the slow-motion camera movement.