-
![]()
Sofia Albert
Sofia has been involved with tech ever since she joined the EaseUS editor team in March 2011 and now she is a senior website editor. She is good at solving various issues, such as video downloading and recording.…Read full bio -
![]()
Melissa Lee
Melissa Lee is a sophisticated editor for EaseUS in tech blog writing. She is proficient in writing articles related to screen recording, voice changing, and PDF file editing. She also wrote blogs about data recovery, disk partitioning, data backup, etc.…Read full bio -
Jean has been working as a professional website editor for quite a long time. Her articles focus on topics of computer backup, data security tips, data recovery, and disk partitioning. Also, she writes many guides and tutorials on PC hardware & software troubleshooting. She keeps two lovely parrots and likes making vlogs of pets. With experience in video recording and video editing, she starts writing blogs on multimedia topics now.…Read full bio
-
![]()
Gorilla
Gorilla joined EaseUS in 2022. As a smartphone lover, she stays on top of Android unlocking skills and iOS troubleshooting tips. In addition, she also devotes herself to data recovery and transfer issues.…Read full bio -
![]()
Rel
Rel has always maintained a strong curiosity about the computer field and is committed to the research of the most efficient and practical computer problem solutions.…Read full bio -
![]()
Dawn Tang
Dawn Tang is a seasoned professional with a year-long record of crafting informative Backup & Recovery articles. Currently, she's channeling her expertise into the world of video editing software, embodying adaptability and a passion for mastering new digital domains.…Read full bio -
![]()
Sasha
Sasha is a girl who enjoys researching various electronic products and is dedicated to helping readers solve a wide range of technology-related issues. On EaseUS, she excels at providing readers with concise solutions in audio and video editing.…Read full bio
Content
Dawn Tang
Updated On 03/20/2025
0 Views |
0 min read
Achieving consistent audio quality is a vital part of video post-production. Audio normalization plays a significant role in improving audio quality. DaVinci Resolve is a powerful tool on how to remove clicking noise from audio and refine audio levels with precision.
This guide on "Normalize Audio DaVinci Resolve" helps you create a professional and immersive listening experience for your audience. Whether you're a content creator or podcaster, you might be thinking of choosing a better option among Davinci Resolve vs. Premiere Pro. Here, we'll suggest a free best vocal remover to help you enhance your projects.
| Method📑 | Ease of Use🔍 | Effectiveness🪄 |
| DaVinci Resolve with Keyframes | Learning curve required. | Precise audio adjustment. |
| DaVinci Resolve without Keyframes | Learning curve required. | Basic audio adjustment. |
What Is Audio Normalization and Why You Need It
Audio normalization is a significant process in audio production and post-production. Normalization means adjusting the audio levels to a standard and consistent volume. The main purpose of normalization is to ensure that the audio doesn't have too quiet or too loud segments. It aims to remove distortion from audio and create a more enjoyable listening experience.
DaVinci Resolve is a powerful audio editing and color correction tool. It is the most widely used software for audio normalization and removing echo from audio in post-production processes.
Audio Normalization in DaVinci Resolve ensures that dialogue, music, and sound effects are smooth throughout a project. Moreover, you can remove background noise in DaVinci Resolve.
An inconsistent audio can distract viewers and diminish the overall quality of the content. Normalization is your solution to enhance audio quality issues. Audio normalization is particularly useful in cases where you have multiple audio clips with varying volume levels. It helps you create a more polished and professional video, enhancing the viewer's experience.
Share this valuable information on enhancing audio quality with your friends on social media!
How to Normalize Audio in DaVinci Resolve in 2 Ways
DaVinci Resolve has options to ensure well-balanced and consistent audio levels. It also has features for how to isolate vocals in DaVinci Resolve. Here are the two key methods for Davinci Resolve normalizing audio relative vs independent.
Method 1: Normalize Audio in DaVinci Resolve with Keyframes
Keyframes provide complete control over audio normalization. Follow these steps to normalize audio in DaVinci Resolve with Keyframes.
Step 1. Open DaVinci Resolve and select your audio in the edit tab.
Step 2. Right-click on the audio clip, and you'll see a white normalization line in your peaks.
Step 3. Click on the multiple areas of the line with extra lower or higher peaks. Each click will create a keyframe.

Step 4. Drag the keyframes upside or downside to change your normalization level.
Step 5. Set the normalization level between -10 and -15 dBFS for a normal voice.
Step 6. If the voice is lower than the music, you can set it to –20 dB.
Step 7. If someone is shouting, you can set the normalization level to –3dB.
(The ideal level for YouTube and Netflix videos is –16dB.)
Step 8. Click the "OK" to normalize the audio.
You can also learn about how to remove audio from video DaVinci Resolve.
Method 2: Normalize Audio in DaVinci Resolve without Keyframes
Normalizing audio in DaVinci Resolve without using keyframes is a more straightforward method. It is suitable for situations where perfect control over audio levels is not necessary. This DaVinci Resolve voice isolation method can be applied when you have audio clips with relatively consistent volume levels throughout. Here are the steps to normalize audio DaVinci Resolve without keyframes:
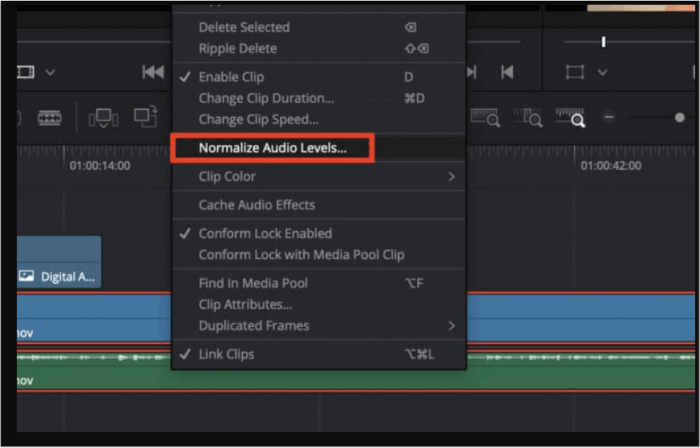
Step 1. Open your DaVinci Resolve project and select the audio.
Step 2. Right-click and a menu will appear. Select Normalize audio levels.
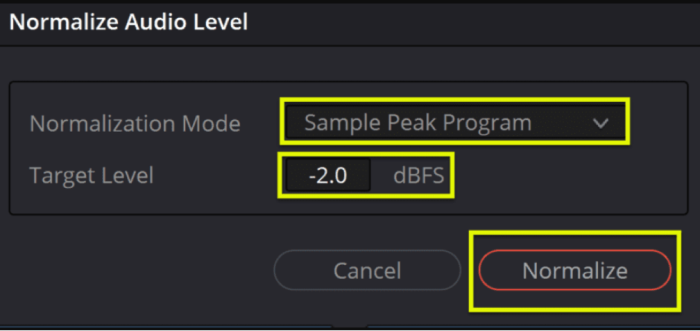
Step 3. Choose the Sample peak and adjust the normalization level to –16dB.
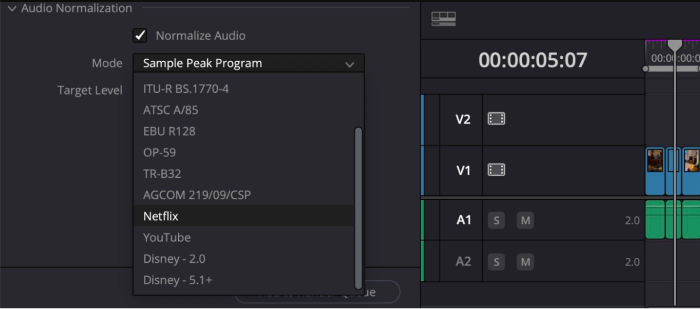
- To Davinci Resolve normalize audio for YouTube, a target level of -16 dBFS is recommended in Sample Peak Normalization mode.
- The target level for Davinci Resolve normalized audio Netflix and other streaming services is –16dBFS in Sample Peak mode.
- The ideal normalization level for TV and radio broadcasting is -23 dBFS in True Peak DaVinci Resolve Normalization mode.
Step 4. Click "Normalize" to apply the normalization effect to the entire audio.
Watch the YouTube video for a detailed visual guide on the process of Audio Normalization in Davinci Resolve📺.
Fix DaVinci Resolve Audio Normalization Not Working
DaVinci Resolve's audio normalization feature maintains consistent audio levels in video projects. You can also use the normalization feature to convert MP3 to karaoke. However, sometimes, you may encounter issues leading to inconsistencies in your audio.
Here are the troubleshooting steps on how to enhance whispering in audio:
- Check Project Settings: verify that your project settings are configured correctly. Ensure that your project's audio format is compatible with the audio you're working with.
- Use Dynamic Range Processing: If the "Normalize" option doesn't work, consider using the "Dolby Media Processor" for loudness normalization.
- Check Software Updates: Ensure that you're using the latest version of DaVinci Resolve. Sometimes, updating the software can resolve compatibility issues.
- Manually Adjust Levels: If all else fails, you can manually adjust the audio levels by adding keyframes or using the Gain control in the Inspector panel.
If the problem still persists, go for a free yet effective Davinci Resolve alternative.
Eliminate Audio Noise Online for Free
EaseUS Online Vocal Remover is an effective and user-friendly solution to eliminate unwanted noise from your audio files. This free online tool has AI audio enhancer features to make your audio clean and professional. Some of the key advantages include its simplicity, accessibility, and the ability to work with various audio formats.
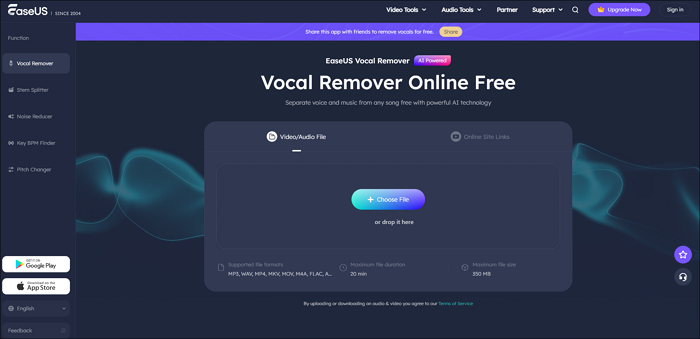
It allows users to remove background music from videos online free. With this tool, you can easily separate vocals from instrumentals without the need for complex software or costly solutions.
You can process as many files as you want with a size limit of 350 MB for each file. Moreover, it will soon add features to extract music elements from YouTube and SoundCloud links.
- It offers a straightforward and user-friendly interface.
- With its free web availability, you don't need to install any software.
- Multiple audio file formats compatibility, including MP3, WAV, and FLAC.
- Designed to effectively eliminate background noise, resulting in cleaner and professional sound.
Powered by Advanced AI
Final Words
Audio Normalization in DaVinci Resolve 18 can enhance the audio quality in video projects. It ensures that your audio not only sounds professional but also meets the loudness standards of the platform. Using the steps mentioned above, you can normalize audio in DaVinci Resolve to create captivating audio.
If you're looking for a free yet effective method to enhance audio, EaseUS Online Vocal Remover can help. It is an excellent tool for eliminating unwanted noise and audio elements to enhance audio clarity in your recordings.
Frequently Asked Questions About Normalize Audio in DaVinci Resolve
While exploring audio normalization in DaVinci Resolve, you might need more guidance. Here are further solutions to problems in audio normalization:
1. What should I Normalize audio to?
Determining the right audio normalization level is crucial to ensure that your audio meets the desired standards. Normalize audio to –16dB for streaming platforms like YouTube, Netflix, and more. If you're normalizing audio for TV or radio broadcasting, set the level at –23 dB.
2. How do I equalize sound in DaVinci Resolve?
Step 1. Equalizing sound involves balancing different audio frequencies to improve overall audio quality.
Step 2. Open Davinci Resolve.
Step 3. Select the audio clip you want to equalize.
Step 4. Click the EQ button in the Inspector window.
Step 5. Adjust the gain of each frequency band to 2-4Hz.
Step 6. Select "OK" to save your changes.
3. How do I fix unbalanced audio in DaVinci Resolve?
If you're dealing with audio with inconsistent volume levels, you can fix unbalanced audio using these steps.
Step 1. Select the audio clip(s) you want to balance.
Step 2. Click the Balance slider in the Inspector window.
Step 3. Drag the slider to adjust the balance at 0.0.
Step 4. Select "Apply" to save your changes.