-
![]()
Sofia Albert
Sofia has been involved with tech ever since she joined the EaseUS editor team in March 2011 and now she is a senior website editor. She is good at solving various issues, such as video downloading and recording.…Read full bio -
![]()
Alin
Alin is a sophisticated editor for EaseUS in tech blog writing. She is proficient in writing articles related to screen recording, voice changing, and PDF file editing. She also wrote blogs about data recovery, disk partitioning, data backup, etc.…Read full bio -
Jean has been working as a professional website editor for quite a long time. Her articles focus on topics of computer backup, data security tips, data recovery, and disk partitioning. Also, she writes many guides and tutorials on PC hardware & software troubleshooting. She keeps two lovely parrots and likes making vlogs of pets. With experience in video recording and video editing, she starts writing blogs on multimedia topics now.…Read full bio
-
![]()
Gorilla
Gorilla joined EaseUS in 2022. As a smartphone lover, she stays on top of Android unlocking skills and iOS troubleshooting tips. In addition, she also devotes herself to data recovery and transfer issues.…Read full bio -
![]()
Rel
Rel has always maintained a strong curiosity about the computer field and is committed to the research of the most efficient and practical computer problem solutions.…Read full bio -
![]()
Dawn Tang
Dawn Tang is a seasoned professional with a year-long record of crafting informative Backup & Recovery articles. Currently, she's channeling her expertise into the world of video editing software, embodying adaptability and a passion for mastering new digital domains.…Read full bio -
![]()
Sasha
Sasha is a girl who enjoys researching various electronic products and is dedicated to helping readers solve a wide range of technology-related issues. On EaseUS, she excels at providing readers with concise solutions in audio and video editing.…Read full bio
Content
0 Views |
0 min read
Quick Tips
▶️To speed up specific parts of a video in Premiere Pro, add your clip to the timeline, select "Layer," then "Time" > "Time Stretch." Adjust the "Stretch Factor" and choose the specific point from "Layer In-point," "Current Frame," or "Layer Out-point." Tap "OK" to finish.
▶️To speed up keyframes, first, navigate to the "Layer Panel" in your editing software. Then, examine the "Motion Path" to gauge the spatial gap between two keyframes. Finally, drag their positions from one another to increase the speed of the motion.
Adobe After Effects is widely used worldwide for various editing tasks. The main reason for its excessive use is that it provides multiple methods for the same task. For example, you can increase or decrease the speed of the video using various approaches.
Some users are still unaware of the methods for speeding up MP3 in this software. If you are also one of those editors, keep reading this blog about how to speed up video in After Effects. This guide will teach you about different methods.
Time Stretch- Speed up Certain Parts of a Video
The most suitable way to speed up video in After Effects is to use the Time Stretch option. This advanced option will help you speed up or slow down MP3 without impacting the quality.
In this section, we have divided the process into different parts to help you understand it properly.
1️⃣From a Specific Time
💡Effectiveness: Increase the speed of the clip from a specific point on the timeline.
If you want to stretch time or speed up the video from a specific point or time, you should move with this method. It will help you speed up YouTube videos from a specific point of the video.
Step 1. Add your clip in the "Timeline" and select "Layer".
Step 2. From the list, choose "Time" and then "Time Stretch".
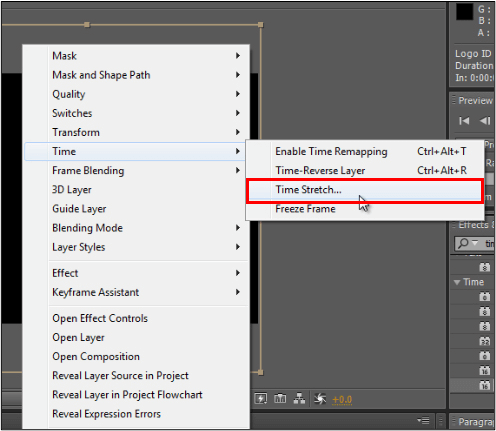
Step 3. Set the "Stretch Factor" by clicking on the default setting.
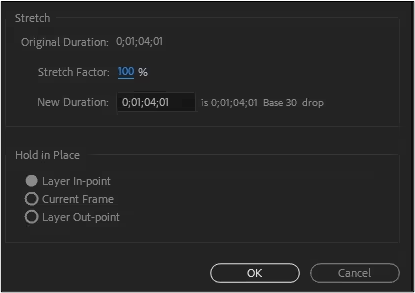
Step 4. Choose from the options "Layer In-point," "Current Frame," and "Layer Out-point" from the list available below the "Hold in Place" section to stretch time from the specific point.
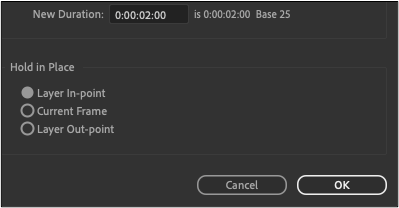
Step 5. Tap on the "OK" button to complete the process.
You should choose the option from "Hold in Place" carefully as it will decide the expected outcomes. By making a mistake in the selection, the output will be changed completely.
After Effects Slow Down Video 2024 in 5 Ways
Discover the effective ways for After Effects slow down video. Here are the detailed steps to achieve captivating slow-motion effects.
2️⃣To a Specific Time
💡Effectiveness: Increase the speed within a specific range of the video.
Adobe After Effects also enables you to speed up a video to a specific point in the video. You don't need to learn how to speed up a song by following these simple steps that we have mentioned below.
Step 1. Add your project to the "Timeline".
Step 2. Take the indicator from where you want to begin to speed up the video.
Step 3. Go to "Columns" and choose "In" and then "Out" to set these specific time points.
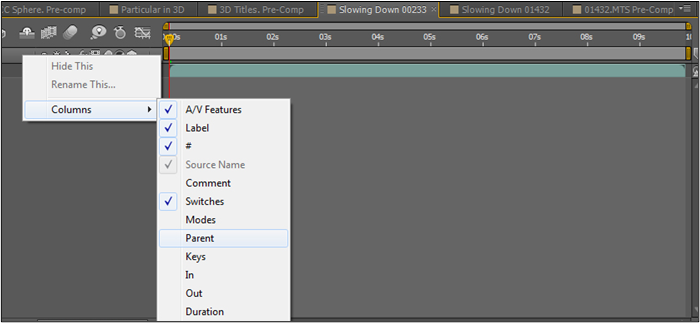
Step 4. Use the "Windows" or "Mac OS" key to stretch the time from "In point" or "Out point" to the current time while adding the time in the specific column.
3️⃣Avoid Affecting Keyframes
💡Effectiveness: Keep the keyframes protected from the change in video speed.
Only a few users know the hidden changes in the clip by following the time-stretch feature. The most impactful among those is the keyframes stretching with this particular layer. The keyframe stretching will impact the overall output of the clip.
To keep it protected, we are here with the steps that you can follow to keep it same as original.
Step 1. Add the project to the software and note the first keyframe time.
Step 2. Look for the "Layer" from the "Timeline" panel for which you want to keep the keyframe the same.
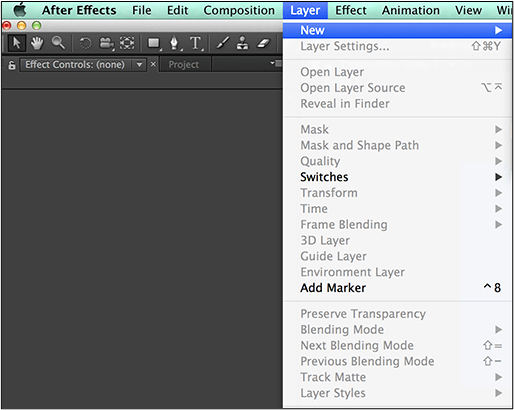
Step 3. Tap the "Edit" option and choose "Cut" from the list.
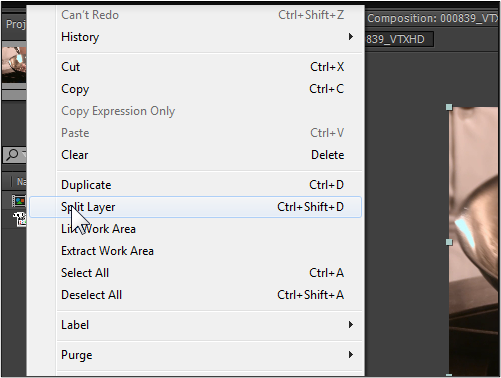
Step 4. Stretch the layer to the new "In" & "Out" points.
Step 5. Drag the current-time indicator to the time when the first keyframe appears.
Step 6. Again, go to "Edit" and then "Paste".
It will help you add the same keyframe in the layer that will help you protect the original keyframes.
See also:
Time Remapping-Speed up Keyframes
Undoubtedly, the method of speeding up video in After Effects using the time-stretch option is pretty simple. However, it is also basic, making it hard to change the speed of a specific portion of the clip.
In this regard, the best way is to switch to another option called "Time Remapping." It enables you to adjust the timeline of the clip seamlessly and adjust the speed of any part of the video. Here, we have listed the two ways to accomplish this task from this particular section.
1️⃣Move Keyframe Dots Far Apart
Keyframe dots can be seen in the Adobe After Effects that display the speed of the video. By setting them apart, you can increase the speed of your video. It will be pretty simple to do this if you are aware of the interface.
For your assistance, we have also listed the steps that you can follow here.
Step 1. Go to "Layer Panel".
Step 2. Look at the "Motion Path" to check the spatial distance between two keyframes.
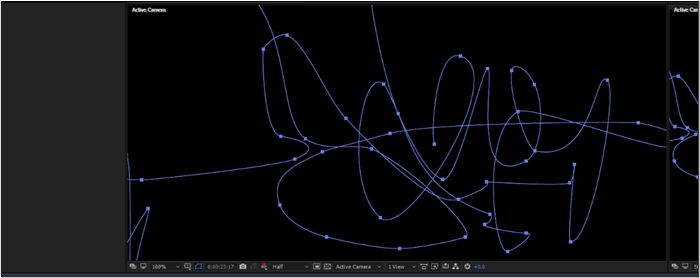
Step 3. Drag one keyframe position far from the other to increase the speed.
If you want to slow the speed, you can also drag them closer together. This allows you to quickly change the speed of any particular portion of the video in Adobe After Effects.
2️⃣Use Speed Graph Editor
It is a specific graph that indicates the speed of the video with time and lets you make simple changes to it. If you don't know the method to follow for this, you should read this section.
Step 1. Add your video to the "Timeline" and expand the outline from the panel.
Step 2. Tap on the "Graph Editor" button and choose "Edit Speed Graph" from the menu.
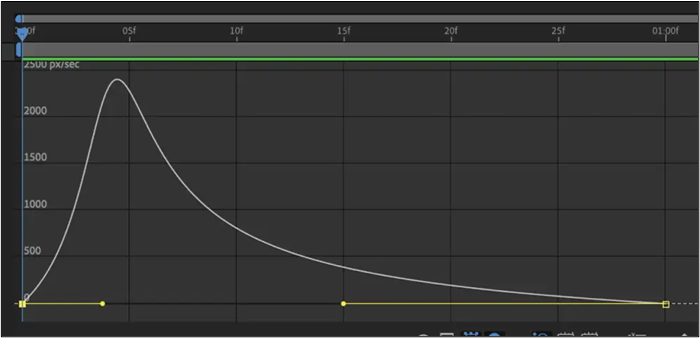
Step 3. Click on the keyframe to adjust it.
Step 4. Drag the keyframe joined handles up to increase the speed.
You can drag it down to decrease the speed seamlessly without making other changes.
We hope you have learned how to speed up video in After Effects from this blog. Please share it on different social platforms to help your friends find this masterpiece.
Adjust Video Speed Easily Online
If you don't want to download Adobe After Effects and are looking for some online resource to change pitch of song or its speed, you should try the following online tool-EaseUS Speed Changer. Keep reading to learn more about this advanced online speed changer.
It is the best online speed changer or MP3 volume booster available online. EaseUS Speed Changer enables you to adjust the speed of audio or video files according to your project's requirements. You can increase the speed of the clip up to 1.5 times the original speed.
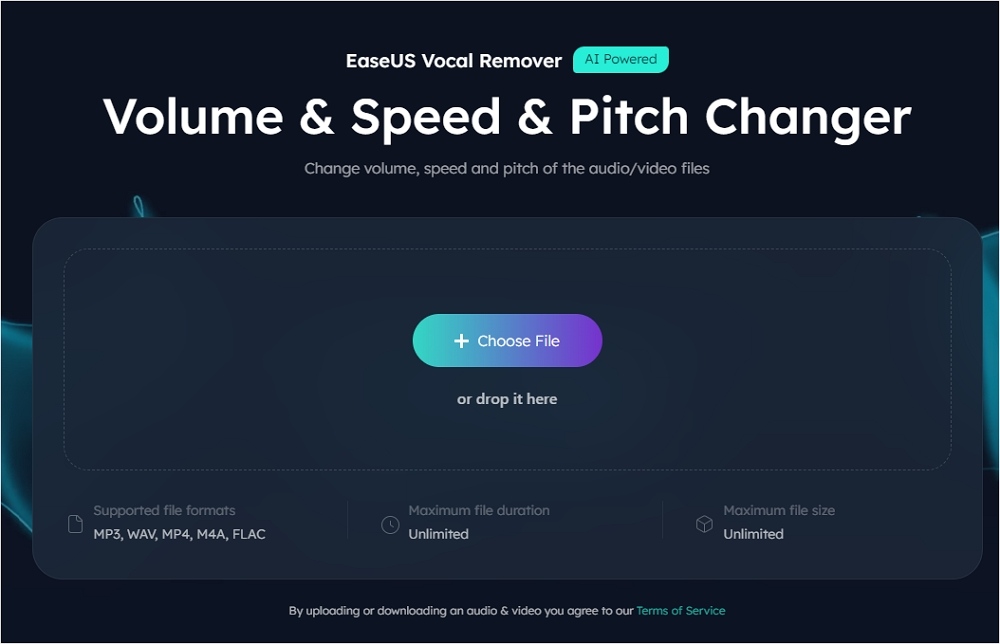
Moreover, it enables you to adjust the pitch of the sound and make it more suitable for your project. This tool also allows you to find the BPM of the song so that you can use it further in your work.
The best thing about this tool is that you don't need to learn how to find the key of a song using this or perform any other tasks. It is because the software has a pretty simple interface that enables everyone to perform well while using it.
Key Features
- It allows the users to increase the volume and speed of the videos.
- You can upload the audio/video file up to 350 MBs in size.
- This online tool is compatible with multiple file formats.
- You don't need to register with the platform to use it.
- It can also fetch the video directly from the internet.
With such advanced features, you will not find any other online speed changer available on the internet. That's why we suggest you browse this tool and use it to change the speed of your videos without downloading heavy software.
Step 1. Enter the main interface of EaseUS Online Speed Changer. The left sidebar shows new functions of this online tool. Find "Pitch changer" and click it.
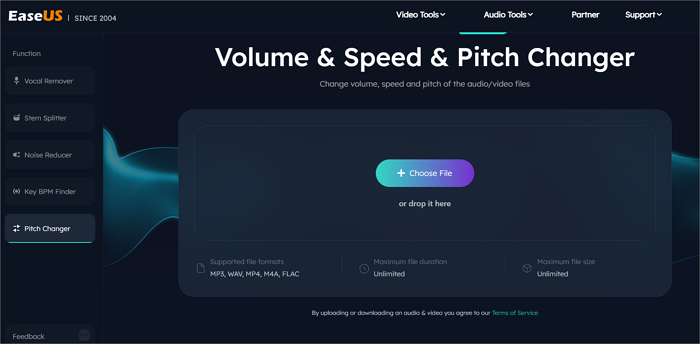
Step 2. Then, drop the audio/video file in the blank. It supports multiple file formats, including MP3, MP4, WAV, M4A, and FLAC.
Step 3. The website will analyze your file with AI. You can drag the little dot in the "Speed" section to slow down or speed up with a range of 0.5X to 1.5X.
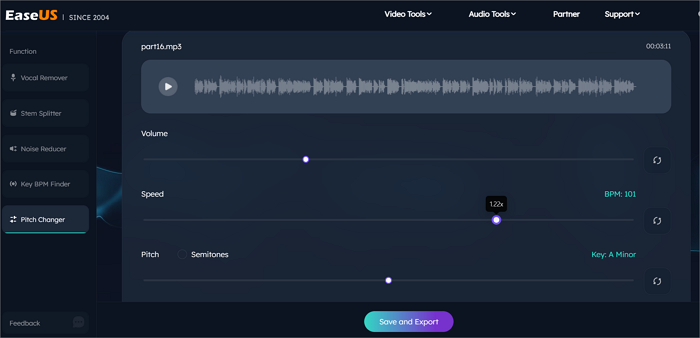
Step 4. Click "Save and Export" to download the processed file to your local file location.
Final Words
By reading this comprehensive blog, we hope you have learned how to speed up video in After Effects. We have discussed different methods to help you choose the most suitable one for your task.
However, if you don't want to get this heavy software on your device or are looking for some easy resource, we suggest choosing EaseUS Speed Changer. Using this, you can easily accomplish this task with higher efficiency.
FAQs About How to Change the Speed of a Video in After Effects
Here, we have listed the questions related to the main topic. You can find them with their brief answers here.
1. How to split a clip in After Effects?
Splitting a clip in After Effects is easy when you are following these simple steps.
- Take the time indicator to the point from where you want to split.
- Use "Ctrl + Shift + D" (Windows) and "Cmd + Shift + D" (Mac) to split the layer.
2. How to stabilize video in After Effects?
After Effects has a specific option named "Stabilizer" that you can use to remove the shaking effect from the videos.
3. How to cut video in After Effects?
Follow these shortcut keys to cut the video in After Effects.
- Alt + [ (on Windows)
- Option + [ (on MacOS)
You can also read many other ways to learn how to cut audio smoothly in After Effects.
4. How do I change the time speed in After Effects?
You can change the time speed in After Effects using Speed Graph and Time Stretching options.


