-
![]()
Sofia Albert
Sofia has been involved with tech ever since she joined the EaseUS editor team in March 2011 and now she is a senior website editor. She is good at solving various issues, such as video downloading and recording.…Read full bio -
![]()
Melissa Lee
Melissa Lee is a sophisticated editor for EaseUS in tech blog writing. She is proficient in writing articles related to screen recording, voice changing, and PDF file editing. She also wrote blogs about data recovery, disk partitioning, data backup, etc.…Read full bio -
Jean has been working as a professional website editor for quite a long time. Her articles focus on topics of computer backup, data security tips, data recovery, and disk partitioning. Also, she writes many guides and tutorials on PC hardware & software troubleshooting. She keeps two lovely parrots and likes making vlogs of pets. With experience in video recording and video editing, she starts writing blogs on multimedia topics now.…Read full bio
-
![]()
Gorilla
Gorilla joined EaseUS in 2022. As a smartphone lover, she stays on top of Android unlocking skills and iOS troubleshooting tips. In addition, she also devotes herself to data recovery and transfer issues.…Read full bio -
![]()
Rel
Rel has always maintained a strong curiosity about the computer field and is committed to the research of the most efficient and practical computer problem solutions.…Read full bio -
![]()
Dawn Tang
Dawn Tang is a seasoned professional with a year-long record of crafting informative Backup & Recovery articles. Currently, she's channeling her expertise into the world of video editing software, embodying adaptability and a passion for mastering new digital domains.…Read full bio -
![]()
Sasha
Sasha is a girl who enjoys researching various electronic products and is dedicated to helping readers solve a wide range of technology-related issues. On EaseUS, she excels at providing readers with concise solutions in audio and video editing.…Read full bio
Content
To Speed up Videos in Premiere Pro
How to Speed up Video in Premiere Pro in 3 Ways
How to Speed up Video in Premiere Rush
How to Speed up Video in Premiere Elements
Change Audio/Video Speed Free Online
Final Words
FAQs About How to Change the Speed of a Video in Premiere
Dawn Tang
Updated On 03/10/2025
6615 Views |
5 min read
To Speed up Videos in Premiere Pro
▶️Import your clip into the timeline, then right-click to select it and choose "Speed/Duration." Increase the "Percentage" value to your desired speed, then click "OK" to finish. Alternatively, you can select the clip and press "Ctrl/Cmd + R" to speed up videos in Premiere.
A professional editor commonly uses Adobe Premiere Pro for video editing. Many people use it to create rhythm in their video previews and make them perfect. However, they don't know how to speed up or slow down the videos.
This is because such software has multiple options to speed up MP3 and make the video perfect for its purposes. In this blog, we will help you learn how to speed up video in Premiere in different ways.
How to Speed up Video in Premiere Pro in 3 Ways
For a professional, it may not be difficult to speed up a song in Premiere Pro. However, it can be difficult for a beginner to choose the right method to do this. Here, we have listed the 3 most effective methods to learn how to speed up a song using this without damaging the quality.
1. Speed/Duration Command
- Suitable for: Entire video or specific portions
- Effectiveness: Increase speed by percentage
It is the easiest way to speed up YouTube videos or other content in Adobe Premiere Pro. Using the speed/duration command, you can increase the video's playback speed by percentage. It works like an Adobe Audition playback speed changer.
The best thing about this method is the ease of use. It can be followed by a beginner or learner because they have to follow the simple steps only.
Step 1. Import your clip using the "Timeline" of Adobe Premiere Pro.
Step 2. Right-click on the clip to select it and click on "Speed/Duration."
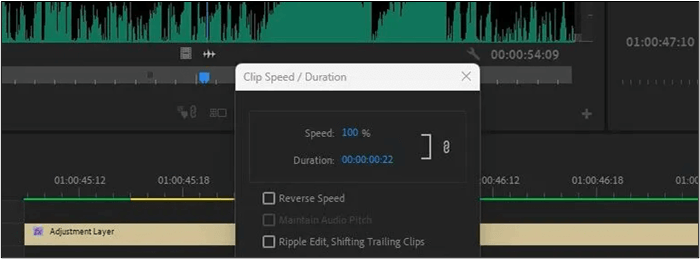
Step 3. Increase the "Percentage" value at the speed you want to increase it.
Step 4. Click on the "Ok" button to complete the process.
This is how to speed up the video in Premiere using the Speed/Duration command. You can also select "Speed/Duration" after selecting the clip and hitting the "Ctrl/Cmd + R" shortcut key.
How to Slow Down a Video in Premiere Pro in 3 Ways
How to slow down a video in Premier Pro? You can use the speed shortcut, time remapping, and rate stretch tool of Adobe to that end. Keep reading for the details.
2. Use Time Remapping
- Suitable for: Video portion
- Effectiveness: Increase speed with extensive control
Another option to slow down MP3 or increase the speed with extensive control in Premiere Pro is Time Remapping. As the name shows, this feature allows the users to remap the time for a clip. It is a good method because it enables you to change the speed of a specific part of the video.
Its responsive slider will also enable you to adjust the speed as per your project's requirements. Using its advanced options, you can also create a smooth transition for speed changes in the video. But the problem is it can't be used on mobile, and you have to learn how to speed up a video on iPhone for quick processing.
Step 1. Import the clip and expand the track.
Step 2. Right-click on the clip and then choose "Show Clip Keyframes."
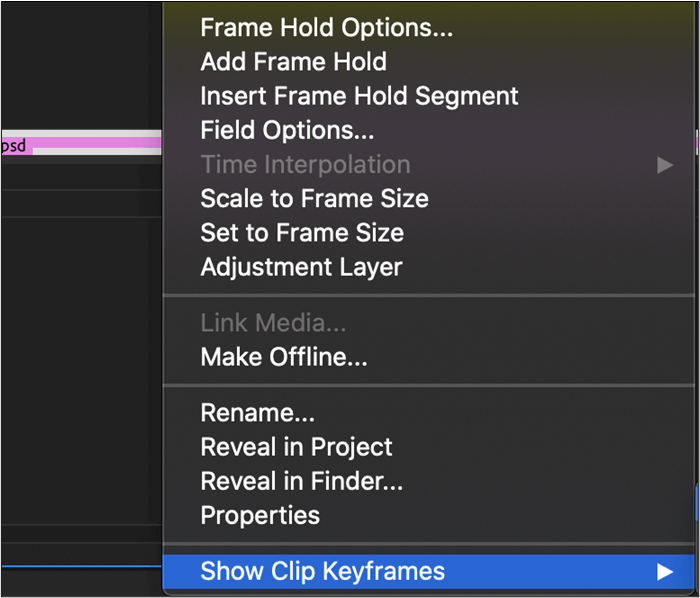
Step 3. Now, click on the "Time Remapping" and choose "Speed" from the options.

Step 4. Drag the "Playhead" to the point where you want to increase the speed.
Step 5. Add keyframes at the beginning and end of the video portion you want to speed up.
Step 6. Drag the bar upward to increase the speed.
3. Use the Rate Stretch Tool
- Suitable for: Video portion only
- Effectiveness: Increase the speed freely without your adjustment
This method of speeding up video in Premiere Pro is different from the above ones. In this method, you will not have any control over how much speed you are going to increase. The software will automatically speed up the video without your requirements.
This is the only drawback of this method. You can also control it, but you need to be a technical or extraordinary professional to do this.
Step 1. Add your clip to the timeline.
Step 2. Tap on the third option given in the left toolbar and choose "Rate Stretch Tool." (You can also use the keyword shortcut "R" for this purpose).
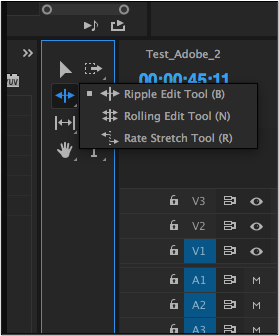
Step 3. Drag the "Inward icon" to speed up the clip.
The tool will automatically increase the speed of the video clip.
How to Speed up Video in Premiere Rush
Adobe Premiere Rush can also help you speed up the video without changing the quality. This software can also help you remove background noise from video Premiere Pro because of its similar interface. Follow these steps to increase or decrease the speed of the clip.
Step 1. Import your clip into the timeline and select it.
Step 2. Tap on the "Speed" button given in the right bar to expand the options.
Step 3. Use the "Speed Range" bar to increase or decrease the speed by moving right or left, respectively.
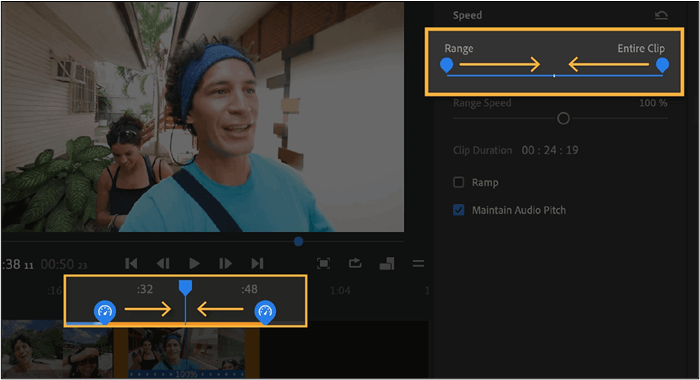
Keep in mind that if your video has audio, this change will alter the pitch of the audio. To maintain the pitch, you need to check the box "Maintain Audio Pitch" given beside the speed options.
How to Speed up Video in Premiere Elements
If you have learned the method to speed up video in Premiere Pro, you can understand it via Premiere Elements, too. The reason is both have almost similar methods to accomplish this task.
Unlike other software, you can also learn how to remove audio from video in Premiere Pro and use it in Elements.
From multiple methods, we have shared the one here using which you can easily speed up the video in this specific version of the software. You can use it easily because of the simple procedure and easy steps included.
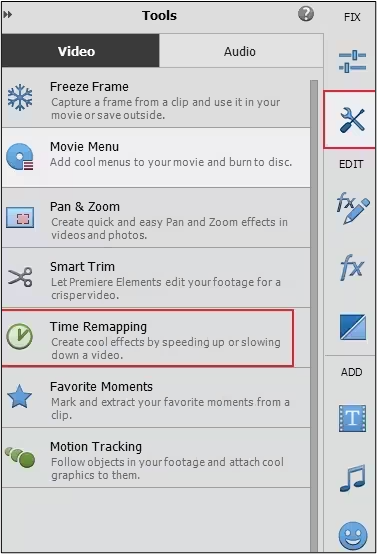
Step 1. Go to "Expert Mode" in Premiere Elements and import your clip.
Step 2. Add it to the timeline and click on the "Action Bar" to find "Tools."
Step 3. Choose from the "Time Remapping" from the list.
Step 4. Take the Playhead to the point from where you want to speed up the video and click on "Add TimeZone."
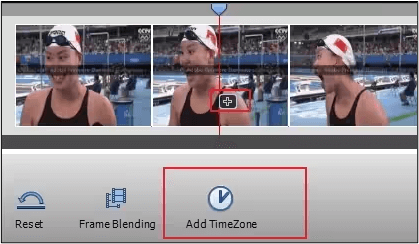
Step 5. Use the slider to speed up the video.

You can increase the speed of the video in both forward and reverse directions. You can understand the process more easily as it is similar to Audacity playback speed adjustment. You can easily follow the above methods to adjust the speed to meet your requirements.
We hope you have learned the method to speed up video in Premiere Pro from this blog. Please share it on social media for the benefit of your friends and colleagues.
Change Audio/Video Speed Free Online
Changing the speed of any audio or video file online can help you save a lot of time and effort. However, the problem is selecting a tool to accomplish such basic tasks.
In this section, we have listed an effective tool for changing the pitch of a song and making other basic changes. Let's read about it.
Whether you are looking for an MP3 volume booster or a quick speed changer, you will find EaseUS Speed Changer an effective online tool. Its advanced features allow you to edit audio/video files without downloading heavy software.
The best feature of this online tool is its compatibility with various file formats. You can also create a rhythm in the audio and video preview by using its key finder. Also, because of its simple interface, you don't need to learn how to find the key of a song using this.
Let us share a few features that this online tool has to offer:
- The tool has a simple interface that is suitable for every user.
- You can upload files in different formats like MP3, MP4, and others.
- The tool has been made fast for quick processing.
- It has advanced tools like a speed changer, voice controller, and pitch changer.
We suggest you use this all-in-one speed changer to change the speed of your video quickly. With its free working mode, you will not need to worry about investing or using other resources.
Powered by Advanced AI
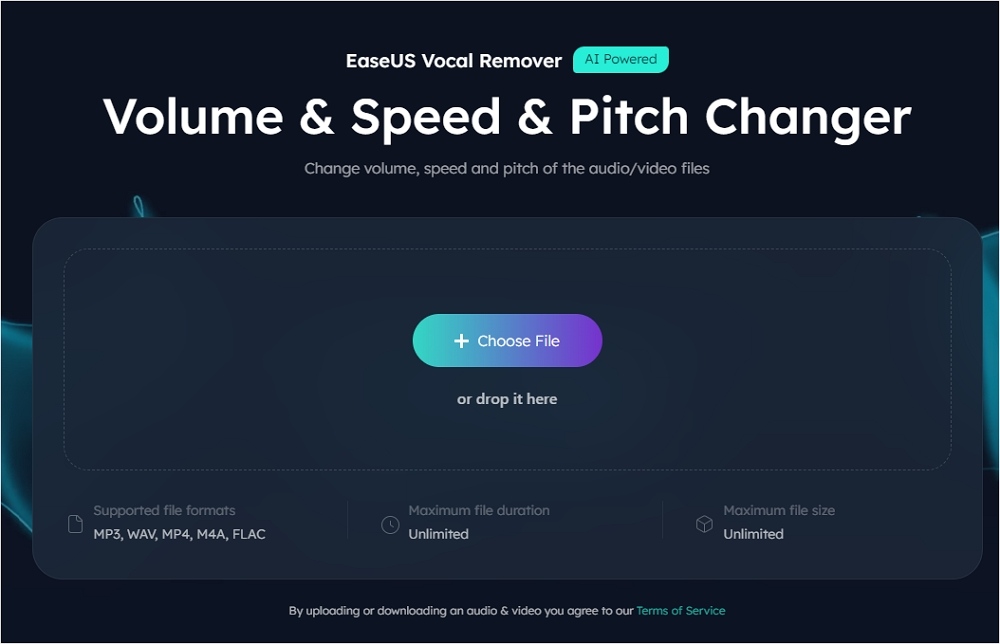
Step 1. Enter the main interface of EaseUS Online Speed Changer. The left sidebar shows new functions of this online tool. Find "Pitch changer" and click it.

Step 2. Then, drop the audio/video file in the blank. It supports multiple file formats, including MP3, MP4, WAV, M4A, and FLAC.
Step 3. The website will analyze your file with AI. You can drag the little dot in the "Speed" section to slow down or speed up with a range of 0.5X to 1.5X.
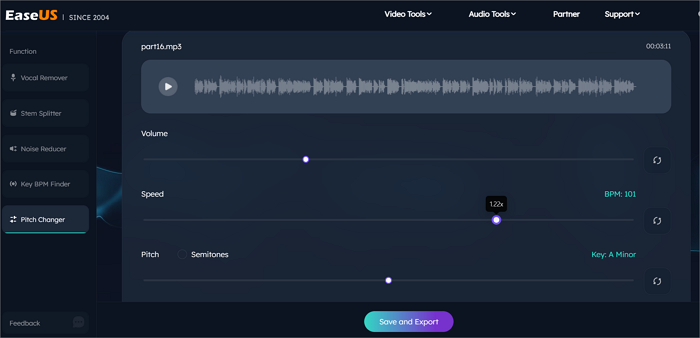
Step 4. Click "Save and Export" to download the processed file to your local file location.
Final Words
From the above blog, you must have learned how to speed up the video in Premiere because we shared multiple methods. You can use any of the above methods to change the speed of the video and make it suitable for your particular project.
However, we suggest you use EaseUS Speed Changer for such simple tasks. The reason why we are recommending this is its effective working and advanced tools. Additionally, its free and online working mode will help you be comfortable while using it.
Powered by Advanced AI
FAQs About How to Change the Speed of a Video in Premiere
For queries about this topic, please explore the following collection of questions and their brief answers.
1. Why is Premiere Pro's playback speed too fast?
There can be multiple reasons for the extra fast processing of Premiere Pro's playback speed. One of the most common reasons is the hardware preferences. It is recommended that the hardware settings be changed to streamline the speed of the video.
2. What is the shortcut to speed up a video in Premiere Pro?
The shortcut key to speed up the video in Premiere Pro is "Ctrl/Cmd + R," which will take you to the "Speed/Duration" settings.
3. How do you speed up a project in Premiere Pro?
You can speed up a project in Premiere Pro using the "Speed/Duration Command," "Time Remapping," and "Rate Stretch Tool." All these options can be used for this specific change.
4. How do you speed up the view in Premiere Pro?
To increase the playback speed in Premiere Pro, you can use the "Speed/Duration" option using the shortcut key of "Ctrl/Cmd + R."