-
![]()
Sofia Albert
Sofia has been involved with tech ever since she joined the EaseUS editor team in March 2011 and now she is a senior website editor. She is good at solving various issues, such as video downloading and recording.…Read full bio -
![]()
Melissa Lee
Melissa Lee is a sophisticated editor for EaseUS in tech blog writing. She is proficient in writing articles related to screen recording, voice changing, and PDF file editing. She also wrote blogs about data recovery, disk partitioning, data backup, etc.…Read full bio -
Jean has been working as a professional website editor for quite a long time. Her articles focus on topics of computer backup, data security tips, data recovery, and disk partitioning. Also, she writes many guides and tutorials on PC hardware & software troubleshooting. She keeps two lovely parrots and likes making vlogs of pets. With experience in video recording and video editing, she starts writing blogs on multimedia topics now.…Read full bio
-
![]()
Gorilla
Gorilla joined EaseUS in 2022. As a smartphone lover, she stays on top of Android unlocking skills and iOS troubleshooting tips. In addition, she also devotes herself to data recovery and transfer issues.…Read full bio -
![]()
Rel
Rel has always maintained a strong curiosity about the computer field and is committed to the research of the most efficient and practical computer problem solutions.…Read full bio -
![]()
Dawn Tang
Dawn Tang is a seasoned professional with a year-long record of crafting informative Backup & Recovery articles. Currently, she's channeling her expertise into the world of video editing software, embodying adaptability and a passion for mastering new digital domains.…Read full bio -
![]()
Sasha
Sasha is a girl who enjoys researching various electronic products and is dedicated to helping readers solve a wide range of technology-related issues. On EaseUS, she excels at providing readers with concise solutions in audio and video editing.…Read full bio
Content
Dawn Tang
Updated On 03/10/2025
0 Views |
0 min read
Quick Answer
▶️To change Audacity playback speed without changing the pitch, locate "Change Tempo" under "Effect" > "Pitch and Tempo." Then, adjust parameters like percent change and BPM. Use high-quality stretching for precise control over tempo changes. For extreme slowdown effects, utilize the Paulstretch effect found in "Effect" > "Pitch and Tempo."
Picture this: You've recorded an interview or lecture intending to write an article about it, only to discover that the speech is unclear or difficult to transcribe. Or, you are a music enthusiast or a video creator trying to practice a piece at different tempos or adding the faster BGM.
Either way, you need to change the playback speed to get a faster or slower version of the audio. Audacity is an open-source audio editing software that allows users to speed up a song without changing the pitch. Now, let's get into it.
| Methods📝 | Effectiveness🔎 |
|---|---|
| Change Speed | Change speed while preserving pitch. |
| Time Track | Change speed and pitch over time. |
| Change Speed and Pitch | Change speed and pitch concurrently. |
| Change Tempo/Sliding Stretch | Change tempo without changing pitch. |
| Play-at-Speed toolbar | Preview your audio at altered speeds without changing the final output. |
1. Using Change Speed
The first way of speeding up MP3 is a basic, manual way where you apply a time-stretch cursor and keep the pitch using the clip starching. However, repeatedly rendering clip stretching results in a gradual loss of quality over time.
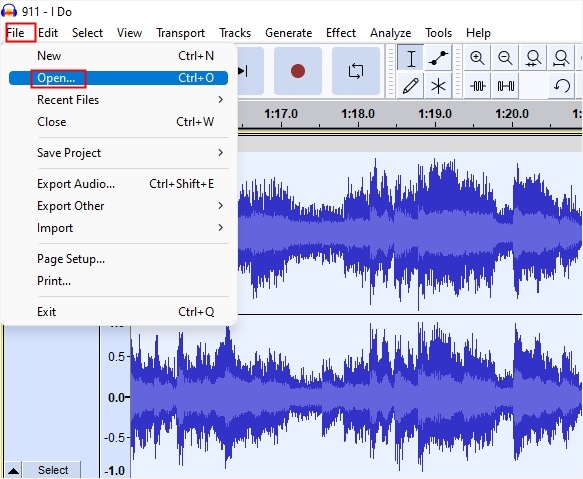
Step 1. Open Your Audio File in Audacity.
Go up to the "File" menu, select "Open…" or "Import" > "Audio" to upload your audio file.
Step 2. Change Speed Manually.
In Audacity 3.4 and later versions, pressing Alt (Option on macOS) while hovering over a clip's edge reveals a clock cursor. Dragging the edge inwards or outwards allows you to adjust the clip's speed. This action can be repeated as desired.

Step 3. Render Time Stretching.
For precise speed adjustments, simply right-click the clip header and choose "Change Speed." A dialog box will appear, allowing you to input your desired value. If you want to keep the pitch, you can find the time-stretching within the same right-click menu.

Step 4. Preview and Export.
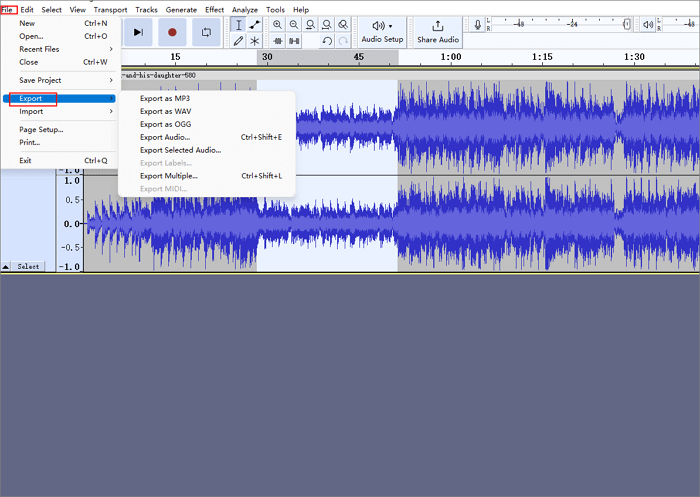
Play the sped-up or slow-down song, export it from the "File" menu once you are satisfied with the result.
See also:
2. Using Time Track
A Time Track is used with one or more audio tracks to dynamically change the playback speed and pitch over time. You can only have one-time track per project. Adding the blue control points to change the speed. Dragging the blue line above the horizontal speeds up audio playback, while dragging it below slows it down.
The Time Track is always active and affects audio speed during playback or export when visible in the project. To prevent unwanted speed changes, click the "Close" button ([X]) next to the Time Track after rendering.
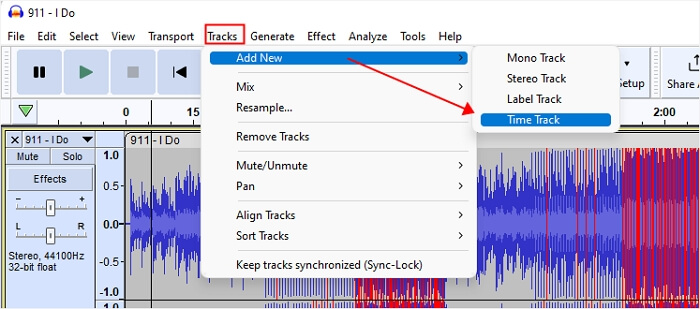
Step 1. Add a Time Track.
Move up to "Tracks" > "Add New" > "Time Track."
Step 2. Change the Speed.
Click on the blue line, then drag it up or down to adjust the speed at that point. Each click adds a new control point, enabling you to modify the speed gradually over time.

To remove a control point, use "Edit" > "Undo" to reverse the change. By default, you can speed up playback by up to 200 on the vertical scale) or slow it down by 50 on the vertical scale. To adjust speed beyond these limits, click the Time Track name in the panel with the downward arrow and select "Range."

From here, you can set the lower and upper speed limits on the vertical scale to suit your needs. Set the lower speed limit first; then, you'll see the upper speed limit. You can always press the spacebar at any time to play the song.
Step 3. Play and Save.
Select "File" > "Export Audio" and customize the output.

3. Using Change Speed and Pitch
Use Change Speed and Pitch effect to change the tempo, pitch, and frequency of a selection. Frequencies become lower when slowing down MP3 and vice versa. If you do not want to change the pitch of a song, you can move to the subsequent method.
Step 1. Access Change Speed and Pitch.
Go to "Effect" > "Pitch and Tempo" > "Change Speed and Pitch" to find the effect.

Step 2. Apply Change Speed and Pitch.

- Speed Multiplier: This sets the playback speed adjustment between 0.010 and 50.000 (50 times faster).
- Percent Change: Enter the value or drag the slider between -99.000 % to 4900.000 % (50 times faster).
- Standard Vinyl rpm: To correct a recording played back at the wrong speed, use the two dropdown menus. In the "From" menu, select the speed the record was played at, and in the "To" menu, choose the correct playback speed.
Step 3. Preview and Apply.
Press the preview button to listen to the audio and apply it if you like it.
4. Using Change Tempo/Sliding Stretch
The Change Tempo effect changes the audio duration without changing the pitch in Audacity. But it can introduce some distortions at extreme settings and leave a short silence at the end of audio when using the fast algorithm. For percussive music, it may sound echoey.
Step 1. Locate Change Tempo.
Go to "Effect" > "Pitch and Tempo" > "Change Tempo."

Step 2. Use Change Tempo.
Changing one value changes others, too.

- Percent Change: Enter the value or drag the slider to change the amount.
- Beats per minute (BPM): Change the BPM of your selection.
- Length: Change the length of a narration that is much longer or shorter than where you want.
- Use high quality stretching (slow): Keep the complete content while process slower. Useful for percussive music with small tempo changes.
Step 3. Use the Paulstretch Effect.
Use the Paulstretch effect for extreme slowdown. Find the effect via "Effect" > "Pitch and Tempo" > "Paulstretch."

The stretch factor determines how much you want to slow down your audio. The time resolution choice determines whether the algorithm prioritizes frequencies and pitch (high time resolution) or rhythm (low time resolution). A value of 0.25 is a good balance for most music, providing a compromise between these factors.

Sliding Stretch lets you smoothly adjust the tempo and/or pitch of a selection by setting initial and/or final change values. When making tempo changes without selecting pitch changes, the original pitch is preserved, and vice versa.
Step 1. Locate Sliding Strech.
Access the effect by going to "Effect" > "Pitch and Tempo" > "Sliding Strech."

Step 2. Apply Sliding Strech.
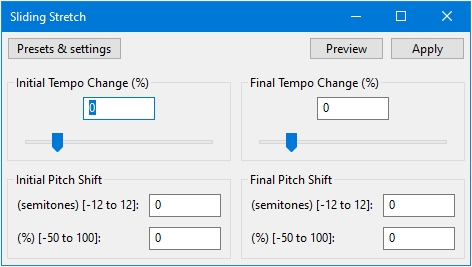
- Tempo Change: Percentage of the original rate required for the beginning and end of the audio. Positive values speed it up, while negative ones slow it down.
- Pitch Shift: Enter the pitch shift in semitones or percentages of the beginning and end of the audio. The two initial values are interdependent.
5. Using Play-at-Speed toolbar
You can play the audio at a faster or slower rate without changing the speed. Note that it changes both the tempo and pitch at the same time.
Step 1. Make Play-at-Speed Toolbar Show.
If your Audacity play-at-speed toolbar is missing, go up to the "View" menu and check the option in the "Toolbar."

Step 2. Preview Audacity Playback Speed.
At the right bottom of your Audacity, find the slider and drag it to left and right for adjustment. Click on the green play button next to it to listen.

Audacity Playback Speed Not Working
This mainly refers to the broken play-at-speed in 3.1.0 and 3.1.1. And there is a regression on 3.0.5.
To fix Audacity playback speed not working, you can try:
- Update Audacity to the latest version (3.4.2);
- Close Audacity and reopen it.
- Reboot your computer or refresh system settings.
- Check play-at-speed from "View" > "Toolbar" if it's missing.
- Clear cache and temporary files.
- Update audio drivers and disable conflicting audio enhancements.
If you find your Audacity vocal remover not working, read through the article.
Change Playback Speed Online for Free
The complexity of adjusting playback speed in Audacity may deter users from seeking a simpler solution. Opting for an online speed changer that offers convenience and ease of use like EaseUS speed changer.

This free tool allows you to speed up or slow down songs from 0.5x to 1.5x, boost and lower video volume, and change the pitch of a song. It supports multiple file formats including MP3, WAV, M4A, FLAC, AC3, MP2, MP4, etc.
This MP3 volume booster also enables noise removal and acapella extraction, providing comprehensive audio editing features. Backed by the AI algorithm, the separation of drums, guitar, and bass is also effective and fast.
Key Features
- Change audio/video playback speed easily.
- Increase or decrease the volume and pitch of a song.
- Find the key of a song.
- Support file size of 150MB within 20 minutes.
Visit the free speed changer now:
Powered by Advanced AI
Step 1. Enter the main interface of EaseUS Online Speed Changer. The left sidebar shows new functions of this online tool. Find "Pitch changer" and click it.
Step 2. Then, drop the audio/video file in the blank. It supports multiple file formats, including MP3, MP4, WAV, M4A, and FLAC.
Step 3. The website will analyze your file with AI. You can drag the little dot in the "Speed" section to slow down or speed up with a range of 0.5X to 1.5X.
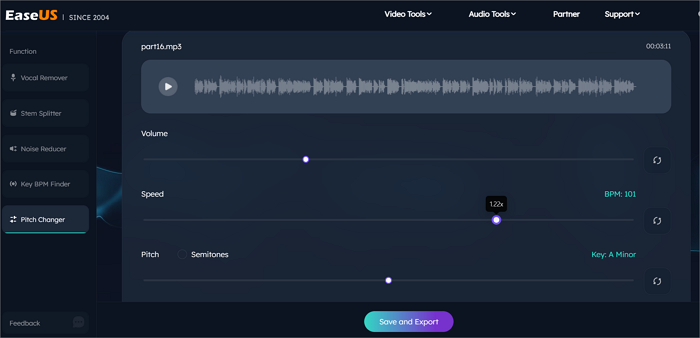
Step 4. Click "Save and Export" to download the processed file to your local file location.
Wrapping up
In short, mastering how to change Audacity playback speed offers versatility and creativity in audio editing. Whether you prefer adjusting speed using keyboard shortcuts, manipulating tempo with the Change Speed effect, or employing the Sliding Stretch feature for gradual changes, Audacity provides various methods to suit your needs.
Additionally, for users seeking a convenient online solution, EaseUS Online Speed Changer offers a user-friendly interface and efficient speed adjustment capabilities.
Powered by Advanced AI
Audacity Playback Speed FAQs
1. How do I change the playback rate in Audacity?
To modify the playback rate in Audacity 3.4 and later versions, simply hold down the Alt key (Option key for macOS) while hovering over the edge of a clip. This action reveals a clock cursor, indicating that you can adjust the speed of the clip by dragging its edge inward or outward. You can repeat this action as many times as necessary to achieve the desired playback rate for your clip.
2. Is there a way to speed up audio in Audacity?
Using the Change Tempo effect in Audacity to speed up audio. Open Audacity and open your audio file, select the track and go up to the menu for "Change Tempo…," toggle the slider to right and check "Use high quality stretching."
3. How do I change playback in Audacity?
Extra > Device menu allows for altering playback and recording devices and settings.
4. What is the play-at-speed shortcut in Audacity?
In Audacity, you can customize keyboard shortcuts for play-at-speed controls. Navigate to "Edit" > "Preferences," select "Keyboard," and search for "play-at-speed." Click on "Play-at-Speed," assign your desired shortcut, and click "Set." You can also assign shortcuts for decreasing and increasing playback speed controls.