-
![]()
Sofia Albert
Sofia has been involved with tech ever since she joined the EaseUS editor team in March 2011 and now she is a senior website editor. She is good at solving various issues, such as video downloading and recording.…Read full bio -
![]()
Alin
Alin is a sophisticated editor for EaseUS in tech blog writing. She is proficient in writing articles related to screen recording, voice changing, and PDF file editing. She also wrote blogs about data recovery, disk partitioning, data backup, etc.…Read full bio -
Jean has been working as a professional website editor for quite a long time. Her articles focus on topics of computer backup, data security tips, data recovery, and disk partitioning. Also, she writes many guides and tutorials on PC hardware & software troubleshooting. She keeps two lovely parrots and likes making vlogs of pets. With experience in video recording and video editing, she starts writing blogs on multimedia topics now.…Read full bio
-
![]()
Gorilla
Gorilla joined EaseUS in 2022. As a smartphone lover, she stays on top of Android unlocking skills and iOS troubleshooting tips. In addition, she also devotes herself to data recovery and transfer issues.…Read full bio -
![]()
Rel
Rel has always maintained a strong curiosity about the computer field and is committed to the research of the most efficient and practical computer problem solutions.…Read full bio -
![]()
Dawn Tang
Dawn Tang is a seasoned professional with a year-long record of crafting informative Backup & Recovery articles. Currently, she's channeling her expertise into the world of video editing software, embodying adaptability and a passion for mastering new digital domains.…Read full bio -
![]()
Sasha
Sasha is a girl who enjoys researching various electronic products and is dedicated to helping readers solve a wide range of technology-related issues. On EaseUS, she excels at providing readers with concise solutions in audio and video editing.…Read full bio
Content
Sasha
Updated On 03/10/2025
0 Views |
0 min read
How do you remove the sound of breath? I tried using the noise reduction effect, it removed the background noise and now the breath is much clearer.
--Jackxxx from Audacity Forum
Whether you are working on a podcast, voiceover, or music production, unwanted breaths can detract from the overall quality of your audio. Luckily, with the help of Audacity, you can easily eliminate those pesky breathing sounds and achieve a clearer and more professional sound. In this step-by-step guide, we'll tell you how to remove breathing from audio in Audacity.
Introduction to Audacity
Audacity is a free and open-source audio editor and recording application software that allows users to record and edit clips. It is available for Windows, Mac, and Linux operating systems. Users can use it to trim audio, remove background noise, adjust volume, etc. It can be used by both beginners and advanced users.
How to Remove Breathing from Audio in Audacity
In this part, we will present three ways to remove breathing sounds in Audacity and explain to you when to use a certain method. Let's read on.
Here is a quick navigation of the three ways.
Method 1: Using Noise Reduction
If your audio contains multiple segments of breathing sounds, and you wish to handle most of the breathing noise at once, using the Noise Reduction feature is a better choice. This tool can even handle breathing noise occurring in the middle of a sentence. However, this tool may also eliminate some frequencies from the human voice, resulting in audio artifacts and decreased audio quality.
Now, follow the steps below to begin.
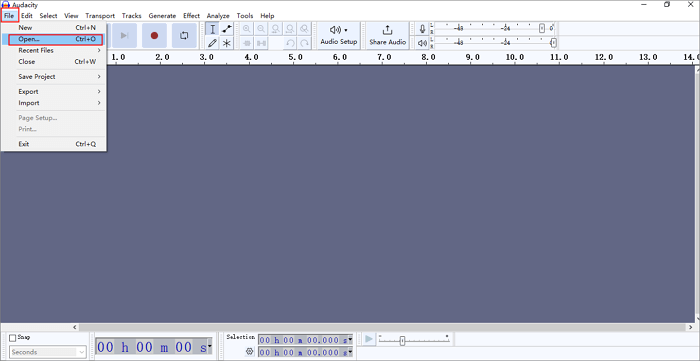
Step 1. Import Audio File
Select "Click" in the menu bar and choose "Open" to import the audio file that contains the breathing sounds.
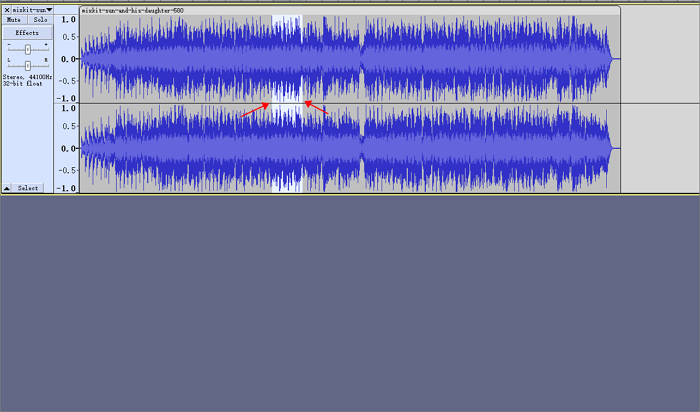
Step 2. Select Breathing Sounds
Once you have imported the audio, a visual representation of the audio track in the form of a waveform will be displayed. Utilize the selection tool (resembling an "I") to mark and highlight the portion of the audio that encompasses the breathing sounds. Make sure to select the section of the audio that specifically contains the breathing sounds.
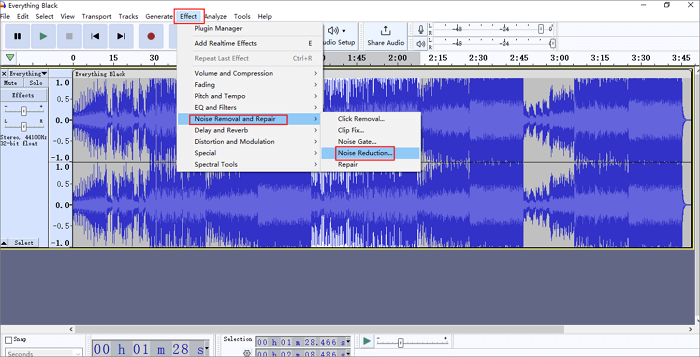
Step 3. Capture Noise Profile
With the breathing sounds selected, go to the "Effect" menu and choose "Noise Reduction." Click on the "Get Noise Profile" button to capture the breathing sound profile.

Step 4. Apply Noise Reduction
After capturing the noise profile, go back to the "Effect" menu and locate "Noise Removal and Repair" in the dropdown menu. Then, navigate to "Noise Reduction." Click on "OK" without making any changes to the settings.
After completing this series of steps, you can review and adjust the audio. Check if the breathing sounds have been removed according to your requirements. If not, undo the noise reduction (Ctrl+Z) and repeat steps 3 and 4, adjusting the noise reduction settings as needed.
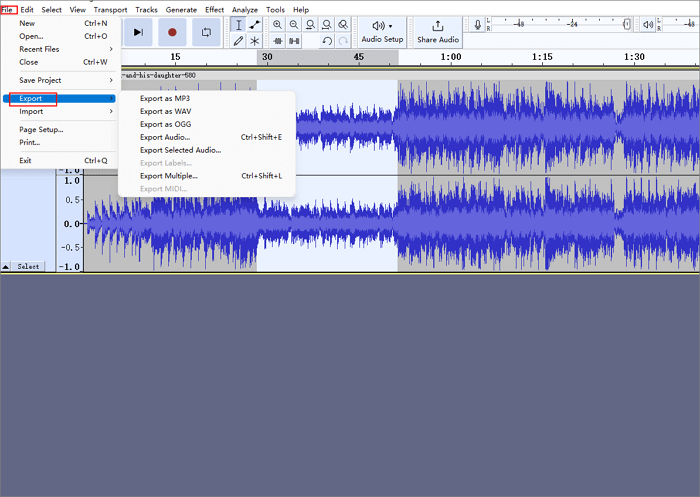
Step 5. Export the Edited Audio
Once you're satisfied with the results, click on "File" in the menu bar and choose "Export" to save the edited audio file. Select the desired file format, name, and location, and click on "Save."
📺To provide you with a quick understanding, there is a YouTube video tutorial available that you can watch directly.
- 0.01:Intro
- 0:53 Tutorial
- 4:58 Outro
You might also be interested in this:
Method 2: Using Noise Gate
If the breathing sounds occur only between words, it is recommended to use the Noise Gate tool. It can remove most of the breathing sounds from the recording. Unlike Noise Reduction, this method does not reduce audio quality.
Step 1. Select "noise profile"
After importing the audio file, drag the selection tool (which looks like an "I" )d to highlight a portion of the audio where the breathing sounds are present. This action captures the breathing sounds as the noise profile.
Step 2. Apply "Noise Gate"
Go to the "Effect" menu located at the top and select "Noise Removal and Repair." Then, navigate to "Noise Gate."

Step 3. Choose "Noise Gate" Again
Go back to the "Effect" menu and choose "Noise Gate" again. Adjust the Gate Threshold, Attack time, and Decay settings.
Step 4. Preview and Apply
After adjusting the settings, click the "Preview" button to hear how the noise gate affects the audio. If you're satisfied with the results, click "OK" to apply the noise gate effect to the entire audio track.

Method 3: Using an Amplify Effect
If the audio you need to work with is not very long, you can use the Amplify effect to eliminate breathing noise from the recording. And if you have already applied the Noise Reduction and Noise Gate effects and still find residual breathing sounds, you can try using the Amplify effect in combination with these other effects.
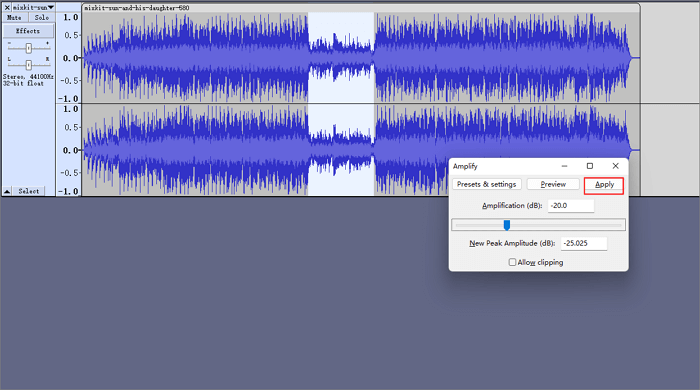
Step 1. Choose "Amplify"
Select the breathing sound, then go to the "Effect" menu. Under the "Volume and Compression" submenu, locate the "Amplify" button.

In the Amplify dialog box, you can adjust the amplification level by moving the slider or entering a specific value. Be cautious not to amplify the audio too much, as it may introduce distortion or other unwanted artifacts.
Step 2. Apply Amplify Effect
Click "OK" to apply the Amplify effect to the selected portion of the audio track.
Bonus Tip: Remove Breathing from Audio in EaseUS Online Vocal Remover
Due to the need for experience in setting various parameters and making repeated adjustments in the methods mentioned above, it can be challenging for beginners. EaseUS Online Vocal Remover is a suitable solution for anyone without video editing experience who needs to accomplish professional video processing. It is a versatile tool that not only allows you to remove vocals from Spotify songs, YouTube videos, or TikTok videos but also serves as a fully AI-powered vocal remover app.
With its distinctive features, it has become a must-try vocal remover tool for many users.
Key Features:
- A free watermark-free vocal remover
- A tool to make acapella from a song
- An online vocal remover to remove background noise
- A software that is compatible with Windows and macOS
Download it right now.
Powered by Advanced AI
To Sum up
Now, you have learned 3 ways to remove breathing in audio using Audacity. Hopefully, the information above will be helpful to you in producing high-quality recordings. However, remember that each method requires careful adjustment and experimentation to achieve the best results. It's important to balance noise reduction with preserving the overall audio quality.
Feel free to share this passage on your social media platforms to help more people discover how to remove breathing from audio in Audacity.
FAQs About How to Remove Breathing From Audio in Audacity
After learning how to properly remove breath sounds in Audacity, the following section also presents you with questions that users often ask about this issue. Read the following questions to deepen your understanding.
1. How do I remove breathing from audio?
Several methods can help remove breathing sounds from audio, such as using a Noise Gate during recording, manual removal, and replacing unwanted sounds with background noise.
2. How do I remove breathing from audio online?
Kapwing, an online tool, can remove breathing from audio. It offers an automatic background noise removal tool for this purpose.
3. How do I get rid of echo in Audacity?
Under the "Effect" dropdown menu, choose "Noise Reduction" and select "Get Noise Profile." Once you have selected the noise profile, the window will close. Go again to your Effects Menu > Noise Reduction, but this time click "OK."
4. How do I get rid of static in Audacity?
To use Audacity's Noise Removal option, select "Noise Reduction" and click on "Get Noise Profile." Then, go back to the "Effect" menu and choose "Noise Reduction" once again.