-
![]()
Sofia Albert
Sofia has been involved with tech ever since she joined the EaseUS editor team in March 2011 and now she is a senior website editor. She is good at solving various issues, such as video downloading and recording.…Read full bio -
![]()
Alin
Alin is a sophisticated editor for EaseUS in tech blog writing. She is proficient in writing articles related to screen recording, voice changing, and PDF file editing. She also wrote blogs about data recovery, disk partitioning, data backup, etc.…Read full bio -
Jean has been working as a professional website editor for quite a long time. Her articles focus on topics of computer backup, data security tips, data recovery, and disk partitioning. Also, she writes many guides and tutorials on PC hardware & software troubleshooting. She keeps two lovely parrots and likes making vlogs of pets. With experience in video recording and video editing, she starts writing blogs on multimedia topics now.…Read full bio
-
![]()
Gorilla
Gorilla joined EaseUS in 2022. As a smartphone lover, she stays on top of Android unlocking skills and iOS troubleshooting tips. In addition, she also devotes herself to data recovery and transfer issues.…Read full bio -
![]()
Rel
Rel has always maintained a strong curiosity about the computer field and is committed to the research of the most efficient and practical computer problem solutions.…Read full bio -
![]()
Dawn Tang
Dawn Tang is a seasoned professional with a year-long record of crafting informative Backup & Recovery articles. Currently, she's channeling her expertise into the world of video editing software, embodying adaptability and a passion for mastering new digital domains.…Read full bio -
![]()
Sasha
Sasha is a girl who enjoys researching various electronic products and is dedicated to helping readers solve a wide range of technology-related issues. On EaseUS, she excels at providing readers with concise solutions in audio and video editing.…Read full bio
Content
Sasha
Updated On 03/10/2025
0 Views |
0 min read
Using Adobe Audition to remove background noise from audio can be complex for beginners, but the effort is always worthwhile because it produces high-quality audio results. So, this article will teach you guys how to remove background noise in adobe audition in 7 ways.
In the following guide, we have listed seven built-in background noise removal tools in Adobe Audition. The list below will give you an overview of these tools.
| Methods | Suitable for | Effectiveness |
|---|---|---|
| Noise Reduction | Almost all kinds of background noise | High |
| Hiss Reduction | Hiss noise, high-frequency noise | High |
| Adaptive Noise Reduction | Constant noise, broadband noise, and intermittent noise | High |
| Denoise | Broadband noise, steady-state noise, background noise | Moderate |
| Dynamics | Transient noise, such as clicks, pops, mic bumps, and other short-duration noises | Moderate |
| Noise Gate | Background noise during silent or quieter parts, intermittent noise | Moderate |
| Equalizer | Specific frequency ranges of noise, such as low-frequency rumble, high-frequency hiss, resonances | Moderate |
We all know that Adobe Audition has professional tools for removing background audio. Users can utilize it to remove breathing from video, remove vocals from a song, or separate vocals from background noise. But how? The following section will focus on that aspect. Now, let's get started.
Way 1. Use Noise Reduction
Adobe Audition's noise reduction tool is a powerful feature designed to help you eliminate unwanted background noise in your recordings. This tool primarily targets noise such as hum, hiss, rumble, and ambient sounds.
To remove background noise using Noise Reduction, follow the steps below:
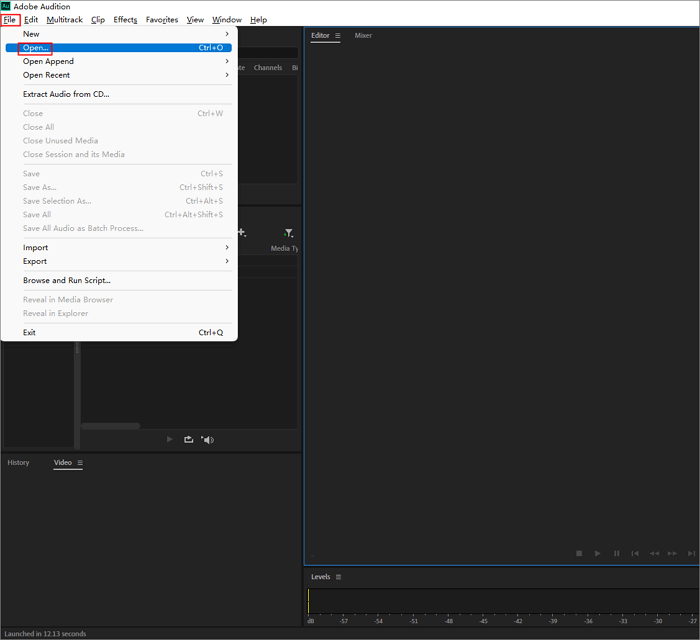
Step 1. Open the Audio File
Launch Adobe Audition and open the audio file you want to work with. You can do this by going to "File" >"Open" or by dragging and dropping the file into the Audition workspace.
Step 2. Capture Noise Print
Go to "Effects" > "Noise Reduction/Restoration" > "Capture Noise Print". This action captures a sample of the background noise as a reference for the noise reduction tool.
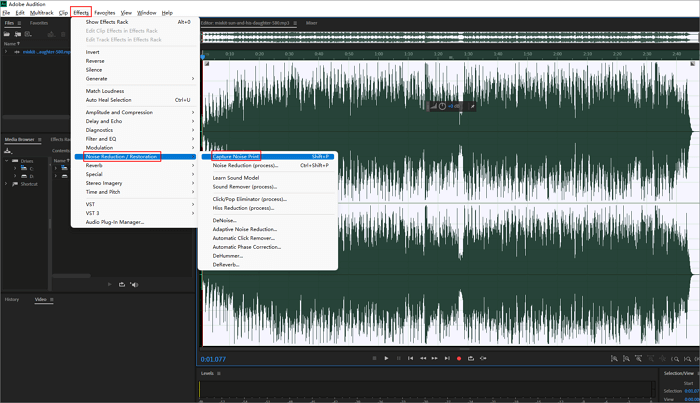
Once you've captured the noise print, press Ctrl + A (Command + A on Mac) to select the entire audio file, or choose the specific section you want to apply the noise reduction to.
Step 3. Choose Noise Reduction (Process)
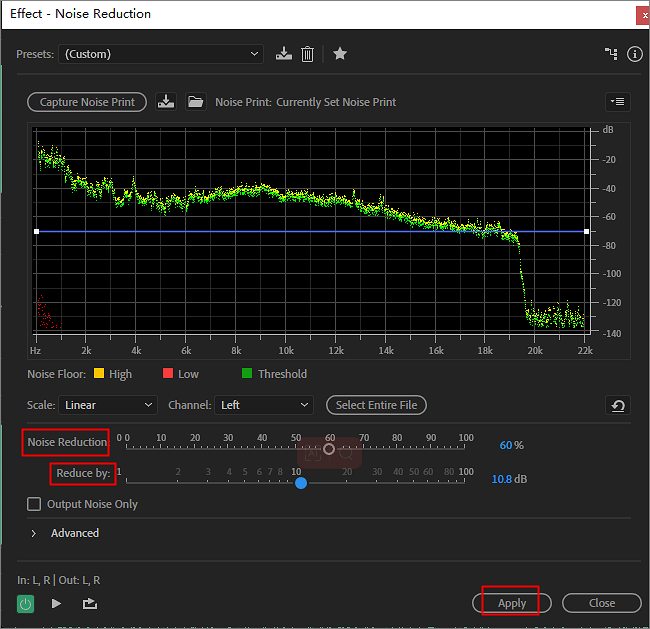
Go back to "Effects" > "Noise Reduction/Restoration" and this time choose Noise Reduction (Process). A dialog box will appear with various settings.

Step 4. Adjust and Apply
In the Noise Reduction dialog box, adjust the "Noise Reduction", "Reduced By", "Frequency Smoothing", and "Attack/Decay Time". Preview the changes if needed, once you're satisfied with the preview, click the "Apply" button to apply the noise reduction effect to the selected audio.
Step 5. Save As
Save your edited audio file by going to "File" > "Save or File" > "Save As".

📺Below is a YouTube tutorial that may be helpful if you prefer video instructions instead of text.
- 0:23 Getting started
- 1:06 DeNoise
- 2:38 EQ
- 4:02 Wrap up
Way 2. Use Hiss Reduction
Hiss noise is typically characterized by high-frequency, constant background noise. It can be present in recordings due to factors like microphone self-noise, electrical interference, or analog tape hiss. This tool is primarily used to reduce or eliminate hiss noise in recordings.
To remove hiss noise using the Hiss Reduction in Adobe Audition, follow these steps:
Step 1. Open your Audio Recording.
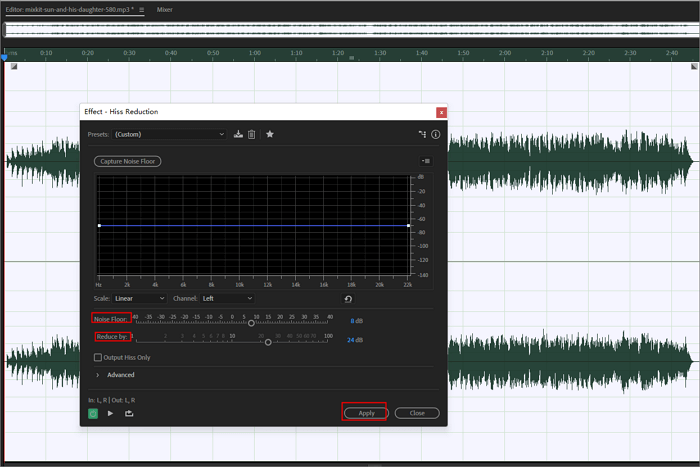
Step 2. Find "Noise Reduction/Restoration" and click "Hiss Reduction".
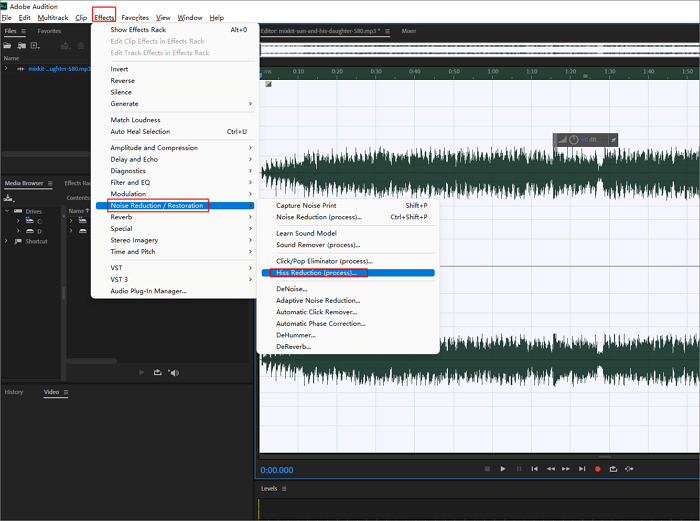
Step 3. A dialogue box pops up with which you can sample your hiss with the Capture Noise Floor function. Use the sliders to control your noise removal effect until you have your best results.
Way 3. Use Adaptive Noise Reduction
The Adaptive Noise Reduction Effect is particularly useful for wind noise and ambient noise. It can pick up small sounds like a random gust of wind. Adaptive noise reduction is also good at isolating excessive bass.
Below is the step-by-step tutorial:
Step 1. Double-click on your audio file or file panels to activate Waveform.
Step 2. With your Waveform selected, go to the "Effects" rack. Click "Noise Reduction/Restoration" and then "Adaptive Noise Reduction".
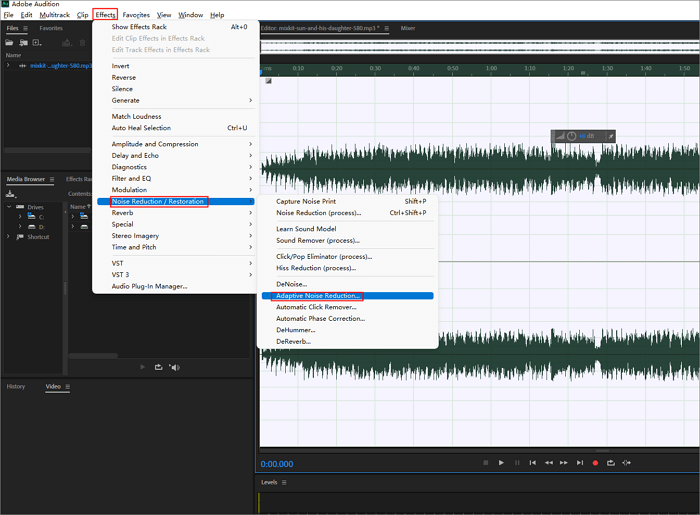
Step 3. Adjust the parameters.

Way 4. Use Denoise
The DeNoise effect in Adobe Audition is used to reduce or completely remove unwanted noise from audio files, such as hum, hiss, fans, air conditioner sounds, or any other background noise.
Here's a step-by-step guide on using the DeNoise effect:
Step 1. Click on the "Effects" tab in the menu. Scroll down to the "Noise Reduction/Restoration" option and hover your mouse pointer over it. A drop-down menu with additional options will appear. Select "DeNoise" from the list.
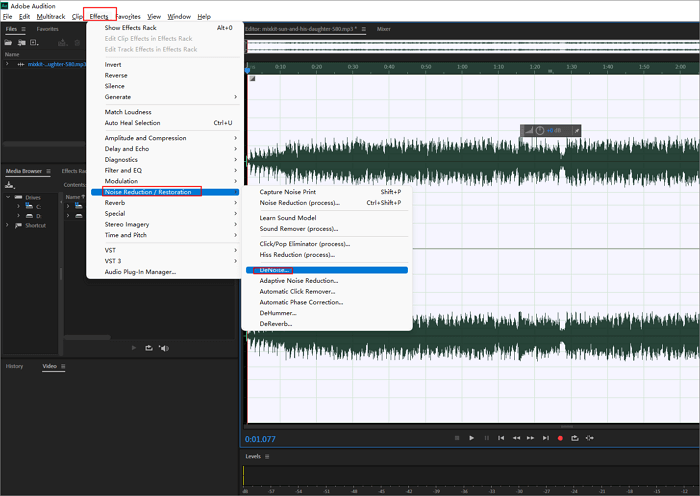
Step 2. After selecting "DeNoise," a new dialog box will pop up, displaying various controls and settings for the effect.
Step 3. Adjust the slider to a position that provides the desired level of noise reduction. You can preview the changes in real time by listening to the audio while adjusting the slider. Once you're satisfied with the result, click on the "Apply" button to apply the effect to the audio.
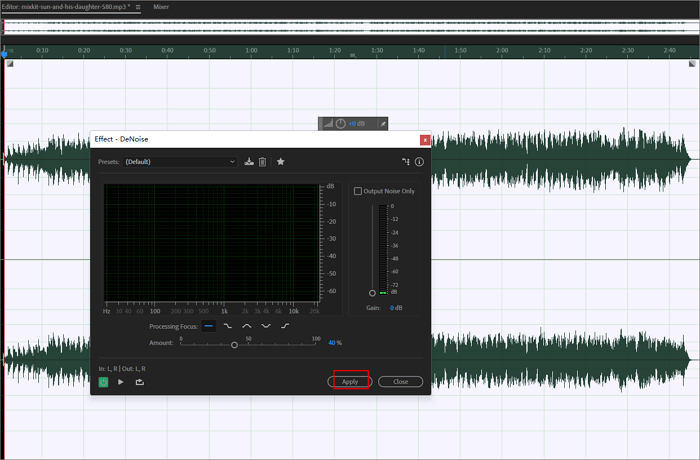
Step 4. Finally, save the edited audio file by going to the "File" menu and selecting "Save" or "Save As."
Way 5. Use Dynamics
The Dynamic effect in Adobe Audition is mainly utilized for reducing or eliminating transient noise in audio recordings. Transient noise refers to abrupt, short-duration sounds like clicks, pops, mic bumps, or other unwanted sounds that occur intermittently throughout the audio. However, it is not designed to handle continuous background noise, such as hum, hiss, or steady-state noise. For continuous background noise, other tools like Adaptive Noise Reduction or Hiss Reduction are more suitable.
To remove transient noise in Adobe Audition, follow these steps:
Step 1. Go to "File" > "Open" or by dragging and dropping the file into the Audition workspace.
Step 2. Click on "Amplitude and Compression" and choose "Dynamic Noise Reduction" from the options.
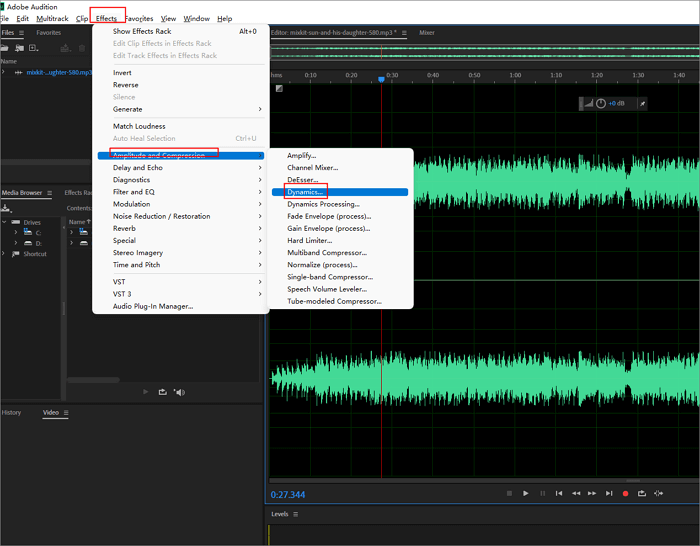
Step 3. Adjust settings and "Apply" the Dynamic Noise Reduction effect to the selected audio.
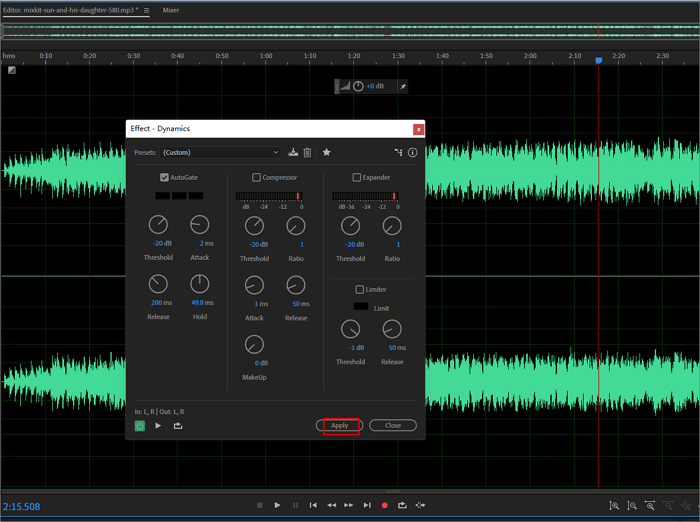
Step 4. Save your edited audio file by going to "File" > "Save or File" > "Save As".
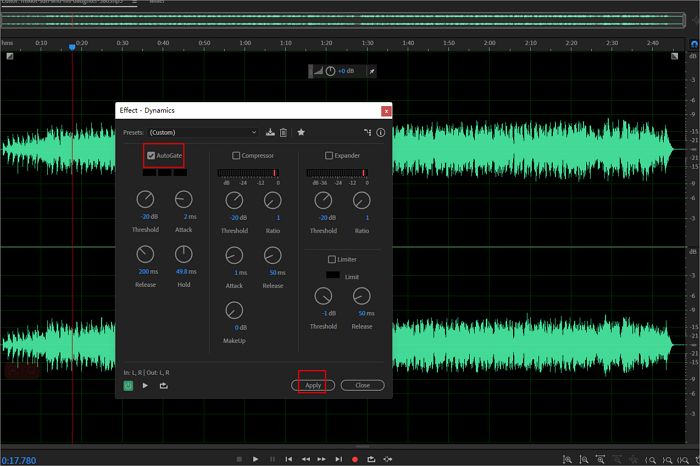
Way 6. Use Noise Gate
The Noise Gate effect in Adobe Audition is primarily used to control or eliminate unwanted background noise in audio recordings. It works by setting a threshold below which any audio signals are considered noise and are effectively muted or attenuated.
To use it, follow the below steps:
Step 1. In the second step of method two, click on the "AutoGate" option and uncheck the others unless they are in use. Set the "Threshold" and "Attack" levels to the values you measured.
Step 2. Click "Apply".
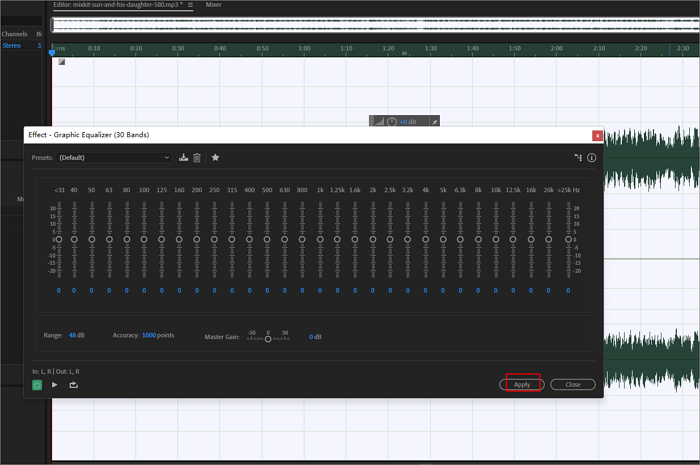
Way 7. Equalizer
The Equalizer is highly effective in reducing or alleviating noise with distinct frequency characteristics, such as low-frequency noise, high-frequency noise, and resonances. Its primary function is to adjust tonal balance and shape the frequency response of audio. For more targeted noise reduction, options like Adaptive Noise Reduction or DeNoise are available.
Here is a guide to help you use it:
Step 1. Double-click on the audio file to activate the Waveform view. Then go to the "Effects" tab and the "Filter and EQ" category and choose "Graphic Equalizer".
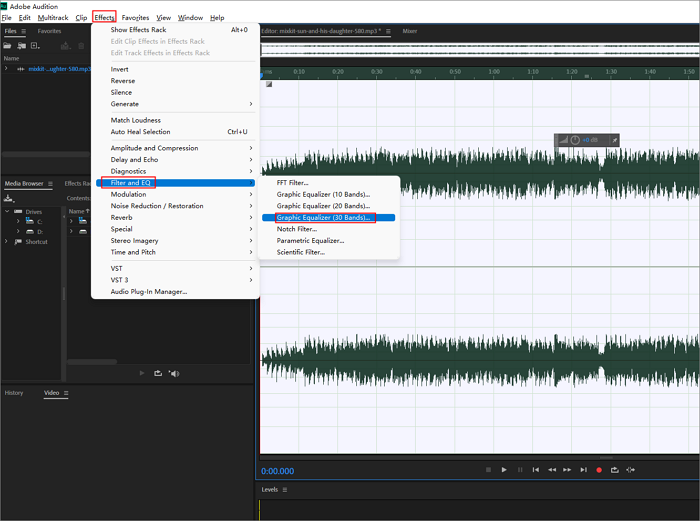
Step 2. Adjust the equalizer bands.
Best Pick: Remove Background Noise with EaseUS VideoKit
Adobe Audition consumes a relatively high amount of computer resources, and even a slight change can potentially damage the entire audio. Therefore, we also have an alternative option here: EaseUS VideoKit.
If you have no experience in audio or video editing, you can try EaseUS VideoKit. It is a professional video editor that allows you to compress videos, remove background music from YouTube videos, or create acapella versions of songs.
Main Features of EaseUS VideoKit:
- Edit without watermark
- Remove vocals from audio and video
- Add transition effects to the video
- Remove background noise
After learning about its main features, if you're interested, click the button below to download it safely.
To Sum up
This article summarizes seven methods to remove different types of noise from your audio. You can choose the most suitable method based on the type of noise you have. If you find the steps confusing, you can also try EaseUS VideoKit. This user-friendly editor can help you quickly and efficiently remove background noise, making it ideal for beginners.
If this article has been helpful to you, please share it with more people.
How to Remove Background Noise in Adobe Audition FAQs
If the above information does not answer your question, we have also provided answers to some other frequently asked questions.
1. How do I remove background noise from a video?
You can use Adobe Audition and follow the steps mentioned above, or you can choose an automatic background noise removal tool such as EaseUS VideoKit, Media.io, LALAL.AI, etc.
2. Is it possible to remove background noise from an audio file?
Yes, it is possible to remove background noise from an audio file. Various audio editing software, such as Adobe Audition, offer noise reduction tools specifically designed for this purpose.
3. How do I remove background white noise from the audio?
In Adobe Audition, use tools like Equalizer or Frequency Analysis to remove white noise.