-
![]()
Sofia Albert
Sofia has been involved with tech ever since she joined the EaseUS editor team in March 2011 and now she is a senior website editor. She is good at solving various issues, such as video downloading and recording.…Read full bio -
![]()
Melissa Lee
Melissa Lee is a sophisticated editor for EaseUS in tech blog writing. She is proficient in writing articles related to screen recording, voice changing, and PDF file editing. She also wrote blogs about data recovery, disk partitioning, data backup, etc.…Read full bio -
Jean has been working as a professional website editor for quite a long time. Her articles focus on topics of computer backup, data security tips, data recovery, and disk partitioning. Also, she writes many guides and tutorials on PC hardware & software troubleshooting. She keeps two lovely parrots and likes making vlogs of pets. With experience in video recording and video editing, she starts writing blogs on multimedia topics now.…Read full bio
-
![]()
Gorilla
Gorilla joined EaseUS in 2022. As a smartphone lover, she stays on top of Android unlocking skills and iOS troubleshooting tips. In addition, she also devotes herself to data recovery and transfer issues.…Read full bio -
![]()
Rel
Rel has always maintained a strong curiosity about the computer field and is committed to the research of the most efficient and practical computer problem solutions.…Read full bio -
![]()
Dawn Tang
Dawn Tang is a seasoned professional with a year-long record of crafting informative Backup & Recovery articles. Currently, she's channeling her expertise into the world of video editing software, embodying adaptability and a passion for mastering new digital domains.…Read full bio -
![]()
Sasha
Sasha is a girl who enjoys researching various electronic products and is dedicated to helping readers solve a wide range of technology-related issues. On EaseUS, she excels at providing readers with concise solutions in audio and video editing.…Read full bio
Content
Dawn Tang
Updated On 03/10/2025
0 Views |
0 min read
Key Tips
▶️To slow down a video in Premiere Pro, right-click the clip and select "Show Clip Keyframes" > "Time Remapping" > "Speed." Hover over the horizontal line in the middle of the clip until the cursor changes to a black arrowhead with a small vertical double-arrow. Then, drag the line downward slightly.
When you want to highlight a particular action or moment that occurs too quickly or enhance the emotional impact of a scene, you want to make a slow-motion video for a specific atmosphere. Premiere Pro allows users to speed up MP3 and slow down a video by 2x or 4x.
But how exactly? Follow our step-by-step guide to slow down a video or clip in Premiere Pro using its built-in features and learn their differences.
Speed/Duration Command
💡Applied Object: One or multiple clips.
✅Pro: Direct control over the exact speed percentage.
🚫Con: Changes affect the entire clip uniformly.
You can change the playback speed or duration of a clip using the shortcut in Premiere Pro. It increases or decreases the playback speed by inputting a percentage, e.g., 50% for half speed and 200% for double speed.
This provides precise control over the speed change and is simple to use. However, the change is applied to the whole video clip, and therefore, it lacks flexibility for variable speed adjustments.
How to slow down MP3 or video clips using the command:
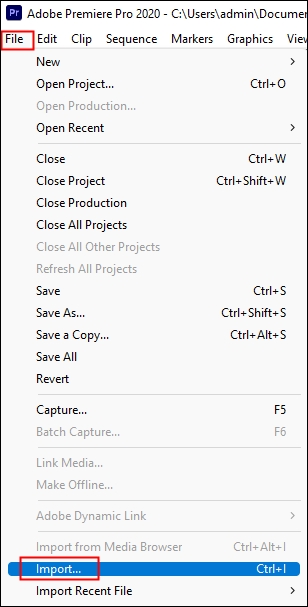
Step 1. Import your video clip.
Start a new project or open an old one, then go up to "File" > "Import…" to load the video. Bring it onto the timeline.
Step 2. Find the effect.
Go up to "Clip" > "Speed/Duration…" or right-click the clip and choose "Speed/Duration…"

Step 3. Adjust the speed.
Decrease the speed percentage to slow down a video.

- To change the speed without changing the duration, break the link for speed and duration.
- To play the clip backward, choose "Reverse Speed."
- To change speed without changing the pitch, choose "Maintain Audio Pitch."
- To keep clips aligned when adjusting neighboring clips, enable "Ripple Edit, Shifting Trailing Clips."
- For speed changes, choose a Time Interpolation option: Frame Sampling, Frame Blending, or Optical Flow.
Click "OK."
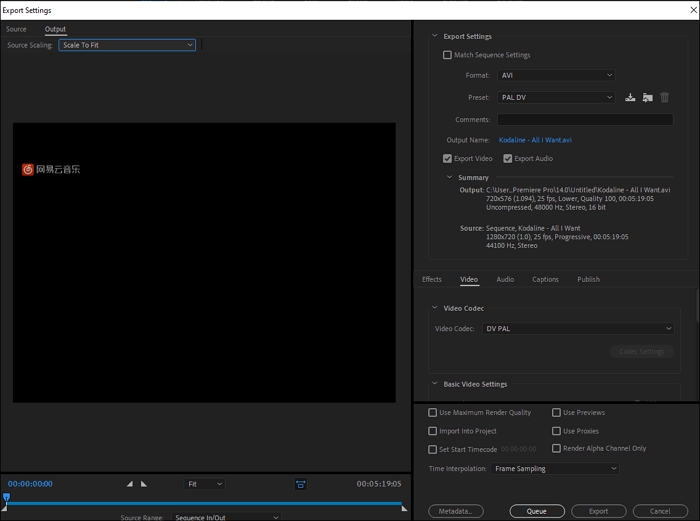
Step 3. Export the slow-motion video.
Go to "File" > "Export" > "Media…" and customize the output.
How to Speed up Video in Premiere without Channing Pitch
From this blog, you can read how to speed up video in Premiere. We have discussed the methods to do this in different versions of Premiere through various methods.
Time Remapping
💡Applied Object: Part of the video clip.
✅Pro: Keyframe-based precise and smooth adjustments on the clip.
🚫Con: Complex and time-consuming to set up.
Time Remapping is a keyframe-based technique in Premiere Pro that allows users to draw the speed changes using the selection tool. This changes the speed at different points in the clip. You can create smooth speed by changing the ramp length and applying gradual slow-motion effects. However, the process can be tricky and complex for users.
To slow down part of the video using time remapping:
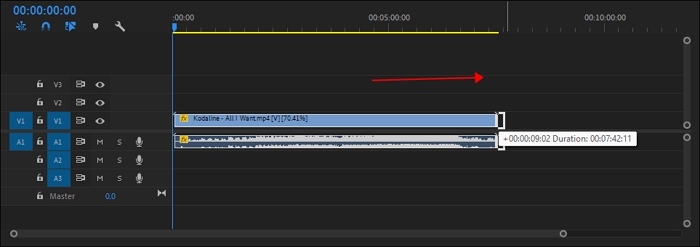
Step 1. Show clip keyframes.
Right-click the video you want to slow down to choose "Show Clip Keyframes" > "Time Remapping" > "Speed."

Step 2. Drag the round ball upward to expand the video.
Then, you can see the black line representing the speed. Drag it upward or downward to speed up a song or slow down a clip. The clip below it is the volume control for you to lower video volume or vice versa.

The following steps smooth the slowing process.
Step 3. Create keyframes.
Select the Pen tool and click on the white speed line at the start and end points of the desired speed change.
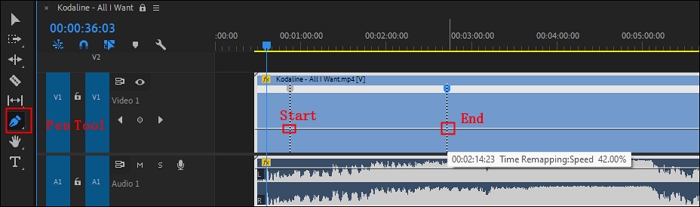
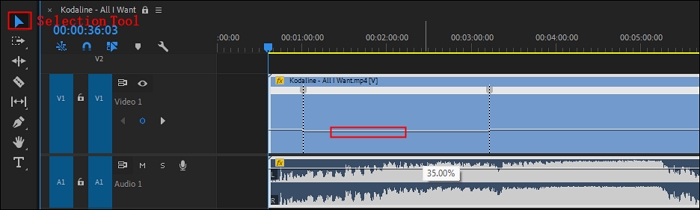
Step 4. Slow down a video.
Switch to the Selection tool and drag the black line up to increase speed or down to decrease it, with percentages shown on the screen.
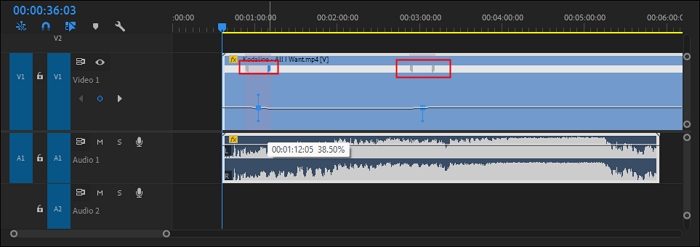
Step 5. Smooth the speed change.
To smooth out the speed change, drag half of the keyframe left or right to adjust the ramp length. For fine-tuning, Alt-drag (Windows) or Opt-drag (Mac) is the keyframe.
See also:
Rate Stretch Tool
💡Applied Object: Entire clip.
✅Pro: Quick and intuitive for matching specific durations.
🚫Con: May introduce unintended speed changes.
The Rate Stretch tool changes the speed of a clip by stretching (slowing down) or compressing (speeding up) it directly in the timeline. It will fit the duration simultaneously. This is easy to make quick adjustments and visually matches clip duration in the timeline. Yet less precise control over specific speed changes and unwanted changes can be made.
Anyway, to use the Rate Stretch Tool for slowing down videos:
Step 1. Show Rate Strech Tool.
Drag your video onto the timeline. Click and hold down to show "Rate Strech Tool" or press R.
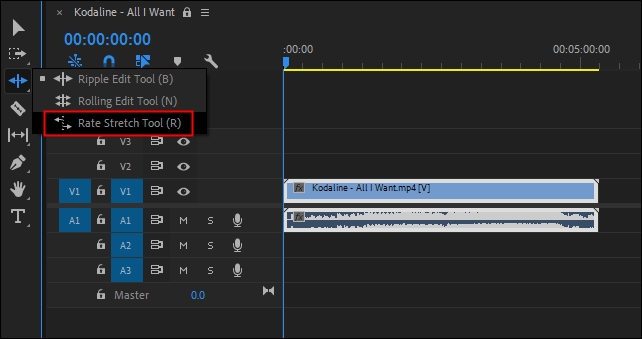
Step 2. Drag the video outward to slow the video down.
Share these methods with Premiere users if they help!
Slow Down a Video/Audio Clip Online Free
Speeding up a video on your iPhone or PC can be as easy as possible. An online video speed changer is a solution that allows you to control speed changes accurately.
EaseUS Speed Changer speeds up or slows down a video or audio clip from 0.5 to 1.5x. Drag the button to anywhere for the desired speed. And this can be done without changing the pitch. You can upload unlimited files of multiple file formats, ranging from MP3, WAV, MP4, FLAC, and more.
It is also an MP3 volume booster enabling volume increasing and decreasing. You can change the speed of the clip at the same page. And of course, this audio editing tool separates vocals and instruments from songs and remove background noise in videos.
Key Features
- Slow down a video from the online URL and the local library.
- Change the speed from 0.5 to 1.5x.
- Unlimited file duration and size.
- Support multiple file formats.
Powered by Advanced AI
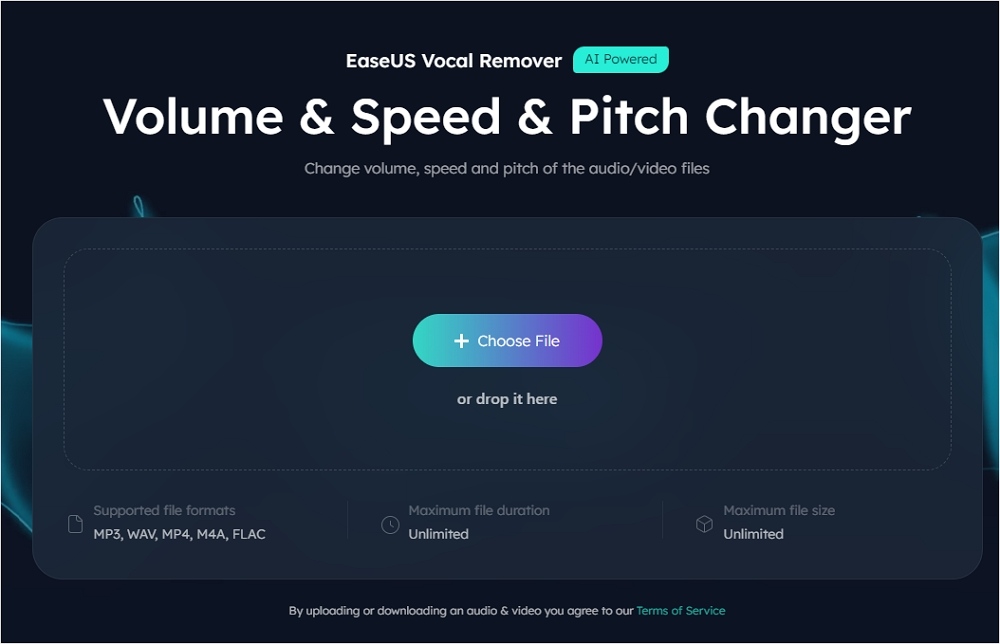
Step 1. Enter the main interface of EaseUS Online Speed Changer. The left sidebar shows new functions of this online tool. Find "Pitch changer" and click it.

Step 2. Then, drop the audio/video file in the blank. It supports multiple file formats, including MP3, MP4, WAV, M4A, and FLAC.
Step 3. The website will analyze your file with AI. You can drag the little dot in the "Speed" section to slow down or speed up with a range of 0.5X to 1.5X.
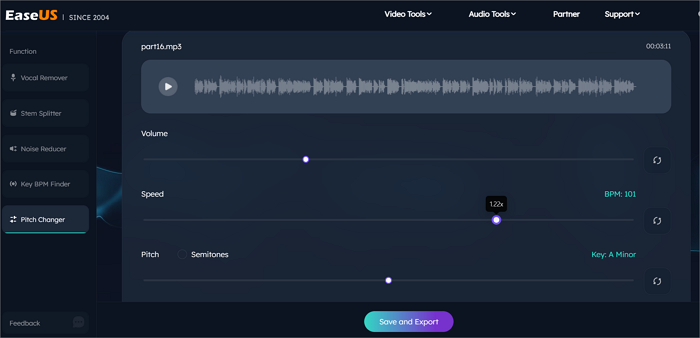
Step 4. Click "Save and Export" to download the processed file to your local file location.
Wrapping up
To slow down a video clip in Premiere Pro, you can:
- Speed/Duration Command: Easily adjust the speed percentage.
- Time Remapping: Smoothly control and adjust speed changes over time.
- Rate Stretch Tool: Stretch the clip to fit a specific duration while slowing it down.
For a quick and simple slow-down, you can also use the EaseUS online speed changer to adjust video and audio speed without compromising audio quality.
Powered by Advanced AI
How to Slow Down a Clip in Premiere Pro FAQs
1. Why is Premiere Pro's playback speed too fast?
If Premiere Pro is playing back your video too fast, the issue often stems from a mismatch in audio hardware settings. To fix it:
- Open Premiere Pro.
- Go to Edit (Windows) or Premiere Pro (Mac) in the top menu.
- Select "Preferences" and then "Audio Hardware."
- Change the "Default Input" setting to "None."
- Click "OK" to apply the changes.
2. How do I slow down a clip on Premiere Pro?
To slow down a clip in Premiere Pro:
- Right-click the clip in the timeline.
- Select "Show Clip Keyframes" > "Time Remapping" > "Speed."
- Drag the rubber band (blue line) downward to reduce speed.
- The percentage change in speed will be displayed.
3. How to change playback speed in Premiere Pro?
To change the playback speed in Premiere Pro, use the shortcut:
- Hit L on your keyboard to increase the speed by 2x. The more you press L, the faster it grows.
- Hit J to slow down the speed. Press it multiple times, it goes slower even more.
- Press K to stop all changes.
- Hold down Shift + L/J for slight changes.