-
Jane is an experienced editor for EaseUS focused on tech blog writing. Familiar with all kinds of video editing and screen recording software on the market, she specializes in composing posts about recording and editing videos. All the topics she chooses are aimed at providing more instructive information to users.…Read full bio
-
![]()
Melissa Lee
Melissa Lee is a sophisticated editor for EaseUS in tech blog writing. She is proficient in writing articles related to screen recording, voice changing, and PDF file editing. She also wrote blogs about data recovery, disk partitioning, data backup, etc.…Read full bio -
Jean has been working as a professional website editor for quite a long time. Her articles focus on topics of computer backup, data security tips, data recovery, and disk partitioning. Also, she writes many guides and tutorials on PC hardware & software troubleshooting. She keeps two lovely parrots and likes making vlogs of pets. With experience in video recording and video editing, she starts writing blogs on multimedia topics now.…Read full bio
-
![]()
Gloria
Gloria joined EaseUS in 2022. As a smartphone lover, she stays on top of Android unlocking skills and iOS troubleshooting tips. In addition, she also devotes herself to data recovery and transfer issues.…Read full bio -
![]()
Jerry
"Hi readers, I hope you can read my articles with happiness and enjoy your multimedia world!"…Read full bio -
Larissa has rich experience in writing technical articles and is now a professional editor at EaseUS. She is good at writing articles about multimedia, data recovery, disk cloning, disk partitioning, data backup, and other related knowledge. Her detailed and ultimate guides help users find effective solutions to their problems. She is fond of traveling, reading, and riding in her spare time.…Read full bio
-
![]()
Rel
Rel has always maintained a strong curiosity about the computer field and is committed to the research of the most efficient and practical computer problem solutions.…Read full bio -
![]()
Dawn Tang
Dawn Tang is a seasoned professional with a year-long record of crafting informative Backup & Recovery articles. Currently, she's channeling her expertise into the world of video editing software, embodying adaptability and a passion for mastering new digital domains.…Read full bio -
![]()
Sasha
Sasha is a girl who enjoys researching various electronic products and is dedicated to helping readers solve a wide range of technology-related issues. On EaseUS, she excels at providing readers with concise solutions in audio and video editing.…Read full bio
Content
Dawn Tang
Updated On 08/19/2024
0 Views |
0 min read
Audio quality can make or break a project, whether you're creating a music track or video content. Audacity is a powerful audio editing software with multiple tools and effects to enhance your audio quality. However, it may be complex for new users to use Audacity audio enhancement features such as removing echo from audio.
This article mentions the eight best tools to improve your audio quality. With step-by-step instructions on Audacity clean-up audio, you can learn how to remove clicking noise from audio. Moreover, the article introduces a free yet best vocal remover to help you simplify the process.
| Tool📝 | Effectiveness🎇 | Targeting at🕵️ |
| Noise Gate | Reduce residual noise | General audio cleanup |
| Noise Reduction | Remove hum, buzz, & hiss | Fixing distorted audio |
| Notch Filter | Eliminate specific noises | Addressing specific issues |
| Click Removal | Remove clicks and pops | Enhancing audio quality |
| Clip Fix | Repair light clips | Fixing minor audio issues |
| Graphic EQ | Adjust frequency balance | Customizing audio output |
| Amplify, Normalize, Repair | Improve overall audio quality | Enhancing overall quality |
Audacity Overview
Audacity is an open-source audio editing software used for how to enhance audio quality situations. With its multiple audio editing tools, it is the first choice of audio professionals. Its audio recording, editing, and enhanced features make it a versatile solution for multiple applications.
From removing noise to how to remove vocals from a song in Audacity, it has features for all. Its compatibility with multiple operating systems and extensive effects and plugins library makes it accessible to all.

Audacity noise gates can complete tasks ranging from simple audio trimming to complex multi-track editing. It can be used to adjust background noise, remove silence, trim audio, and remove distortion from audio. Moreover, Audacity finds applications in converting analog audio into digital recordings and changing sound tempo and pitch.
If you find this information intriguing, please share this informative post on your social media platform to let your friends discover audio editing secrets.
Clean up Audio in Audacity Thoroughly
Audacity is a powerful tool that allows users to process audio professionally. It has multiple tools and effects to enhance audio quality. Here are the audio effects in Audacity.
0️⃣Preparation: Import Your Audio Clip
Before processing an audio in Audacity, make sure to create a duplicate of your original audio. It ensures you have a backup of the original file.
Step 1. Go to the "File"> "Import" > "Audio."

Step 2. Click on the audio, and a warning prompt appears. Select "Make a copy of files before editing" and click "OK."

1️⃣Noise Gate: Reduce Residual Noise
The Noise Gate allows users to selectively restrict or mute sounds below a specific threshold. It is particularly effective at reducing background noise, hiss, or other unwanted low-volume sounds, reducing the audio quality.
It significantly improves the clarity and cleanliness of your audio. However, if not configured correctly, it may cut off portions of your audio and cause unnatural or abrupt sound. Follow the steps to learn how to remove background noise in Audacity:
Step 1. Go to "Effects"> "Noise Removal and Repair" > "Noise Gate."
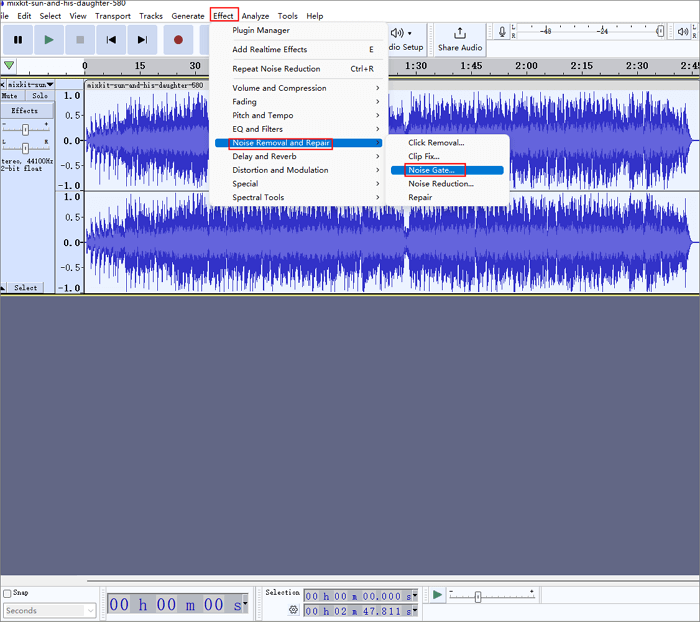
Step 2. Select the portion of the audio to apply the Noise Gate effect.
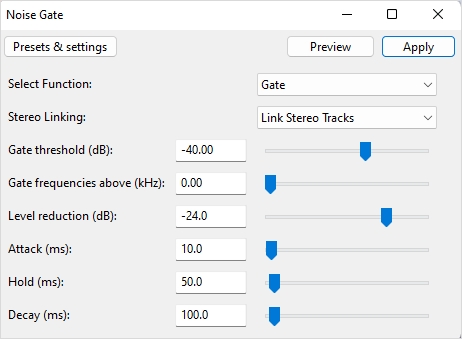
Step 3. Set "Select Function" to "Gate" and enter the -40 threshold level.
Step 4. Tap "OK" to apply the Noise Gate effect.
2️⃣Noise Reduction: Remove Hum, Buzz, and Hiss
The noise reduction in Audacity can eliminate unwanted background noise, such as hum, buzz, and hiss, from your audio. It selects the portion of audio containing the noise and applies specific parameters to control it.
It can significantly enhance the clarity and professional sound quality of your recordings. However, while setting the Noise Reduction parameters, avoid over-processing. It can potentially affect the audio quality.
Step 1. Go to "Effect" > "Noise Removal and Repair" > "Noise Reduction."
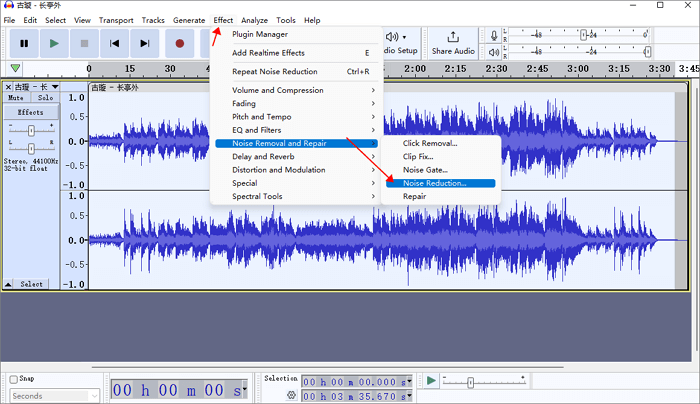
Step 2. Select the noisy portion and tap "Get Noise Profile," then follow the path again to set the values.
Step 3. Adjust Noise Reduction to the lowest value that effectively reduces the noise without damaging the audio. The recommended value is 6dB.
Step 4. Adjust sensitivity between 0 and 24. The ideal value is 6.
Step 5. Set frequency bans to 0-2 for strong audio clarity.
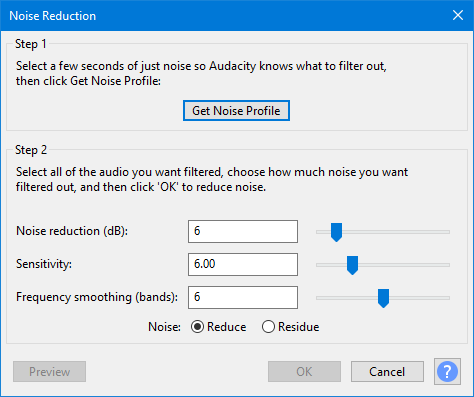
Step 6. Click "OK" to apply the effect.
3️⃣Notch Filter: Get Rid of the Hum or Electrical Whistle
The Notch Filter reduces irritating noises, such as hums or electrical whistles, that occur at a particular frequency. The Notch Filter allows users to pinpoint the exact frequency of the unwanted noise and reduce it.
It selectively targets and eliminates the problematic frequency, leaving the other audio safe. However, any incorrect settings may affect your desired audio.
Step 1. Go to "Effect" > "EQ and Filters" > "Notch Filter"

Step 2. Adjust the frequency up to half the sample rate. The ideal setting is 60 Hz.
Step 3. Set the Q factor value between 0.1-1.
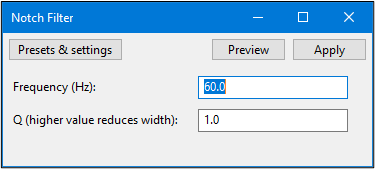
Step 4. Click "OK" to apply the Notch Filter effect.
4️⃣Click Removal Effect: Eliminate Clicks and Pops
The click removal Audacity eliminates the bothering clicks and pops that affect the audio quality. It enhances the audio quality and selectively removes echo from audio in Audacity. However, incorrect configurations may affect the audio's integrity.
Step 1. Go to the "Effects"> "Noise Removal and Repair"> "Click Removal."
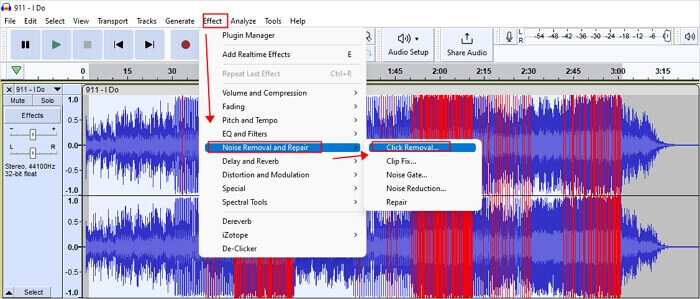
Step 2. Set the "threshold value" to 200. Higher values are less sensitive to smaller clicks and pops.
Step 3. Adjust "Max Spike Width" to 20. It specifies the maximum duration of the clicks and pops to be removed.
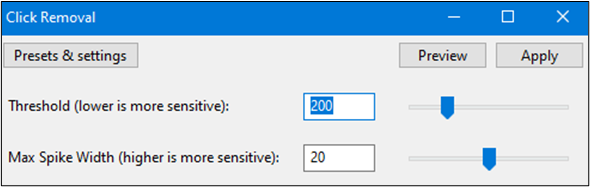
Step 4. Click "OK" to apply the click removal effect to your audio.
5️⃣Clip Fix Effect: Repair Light Clips
The Clip Fix effect repairs light clipping or distortion in audio. The Clip Fix feature identifies clipped portions and restores them to their original quality. However, it may have limitations in fixing high clipping or distortion.
Step 1. Go to "Effect"> "Noise Removal and Repair"> "Clip Fix."

Step 2. In the Clip Fix dialog, set the "Threshold" to 95%.
Step 3. Adjust the "Reduce amplitude to allow for restored peaks" to -9.
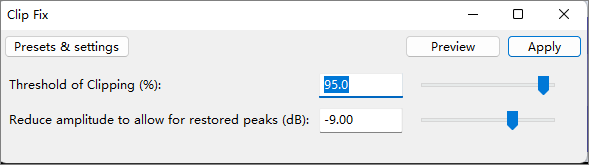
Step 4. Click "OK" to apply the Clip Fix effect.
6️⃣Graphic EQ: Erase Wind and Rumble
The Graphic EQ allows users to manipulate sound by adjusting frequencies. It enables you to increase the volume of specific frequencies while reducing others. It is effective in addressing unwanted noise issues such as wind and rumble.
You can also use it in how to remove breathing from audio in Audacity. However, over-amplification can affect your audio quality.
Step 1. Go to "Effect" > "EQ and Filters" > "Graphic EQ."

Step 2. Customize the sliders to achieve the desired audio frequency adjustments. Normalize the track first to 0 to -3 dB to avoid over-amplification.

Step 3. Click the "OK" button to implement the Graphic EQ effect.
7️⃣Improve Audio Quality Features: Amplify, Normalize, Repair
Audacity provides three essential features, Amplify, Normalize, and Repair, that enhance audio quality.
Amplification increases the overall audio volume and helps in how to clean up audio from a phone recording. Normalization ensures that the loudest part of your audio reaches the desired amplitude without causing distortion.
If Audacity vocal remover not working, you must opt for a different method. Repair encompasses various tools and effects to fix issues like clicks, pops, clipping, and background noise.
Step 1. Navigate to "Effect" > "Volume and Compression" > "Amplify." Adjust the amplification factor to –1dB and click "Apply."

Step 2. Go to "Effect" > "Volume and Compression" > "Normalize." Adjust the normalization factor to 0dB.

Step 3. Go to "Effect" > "Volume and Compression" > "Repair." Identify the specific issue you want to address, such as clicks, pops, or background noise.

To learn the visual instructions on using Audacity tools, watch this YouTube video📺.
- 3:13 Clean up bad audio
- 3:16 Audacity
- 7:44 Noise Reduction
- 12:31 Bass and Treble
- 15:14 The Basics of Audaicty
- 16:00 Effects
Strip Noise from Audio Online for Free
EaseUS Online Vocal Remover is a powerful and user-friendly web-based tool for content creators to improve audio quality effortlessly. With a simple and intuitive interface, this online tool provides an accessible solution for noise reduction.
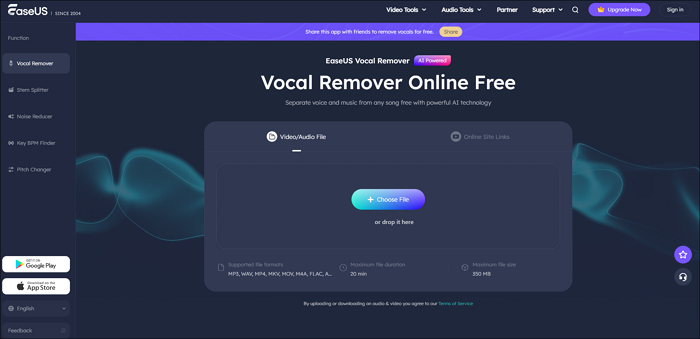
It can process a wide range of formats, including MP3, WAV, FLAC, and more. Its versatility makes it a valuable tool for removing background music from video online free. Whether you're dealing with unwanted background noise, irritating clicks, pops, or humming sounds, it helps you eliminate any distractions.
This acapella extractor allows users to upload a single file of up to 350MB for more extensive audio tasks.
- Offers noise removal capabilities for cleaner audio.
- It cleans up clicks, pops, and humming sounds from audio files.
- Separate vocals from background noise.
- Users can upload a single file of up to 350MB in size for audio editing.
- Enable users to extract vocals and music from YouTube or SoundCloud URLs.
Powered by Advanced AI
Final Words
While creating audio or video content, achieving professional-quality sound is paramount. Audacity is a versatile tool offering multiple effects to clean up and enhance your audio. Features like reducing background noise and creating consistent audio allow users to create desired results.
The article mentioned the eight ways for Audacity to clean up audio, each method offering a unique approach to enhance quality. If you're looking for a simple one-click process, EaseUS Online Vocal Remover can help. It provides an easy, effective way to strip noise from your audio and elevate its quality.
Visit the EaseUS Online Vocal Remover website now to use its multiple features to enhance your audio quality!
FAQs About Clean up Audio in Audacity
If you have questions about improving audio quality or cleaning up distorted audio, here are the solutions for you.
1. How do I smooth out audio in Audacity?
The Noise Reduction effect helps you smooth out audio in Audacity.
- Go to Effect > Noise Removal and Repair > Noise Reduction.
- Adjust Noise Reduction to the lowest value, such as 6dB.
- Adjust sensitivity between 0 and 24. The ideal value is 6.
- Set frequency bands to 0-2 for strong audio clarity.
- Click OK to apply the effect.
2. How do I improve the quality of audio in Audacity?
Multiple audio effects in Audacity, such as Amplify, and Normalize, allow users to improve audio quality.
- Go to "Effect" > "Amplify.'
- Adjust the amplification factor to –1dB.
- Click "OK" to apply the amplification.
3. How do I clean distorted audio in Audacity?
Cleaning distorted audio in Audacity requires careful editing. First, identify the distorted sections of your audio. Use the "Click Removal" to address how to fix distorted audio in Audacity:
- Go to the "Effects" > "Noise Removal and Repair" > "Click Removal."
- Adjust the threshold value to 200.
- Select Max Spike Width to 20.
- Click "OK" to clean up your audio.
4. How do I clean up my audio recording?
Clean up audio recording involves addressing various issues such as noise, distortion, and uneven volume levels. Audacity's built-in effects like Clip Fix help fix such audio issues.
- Go to "Effect" > "Noise Removal and Repair" > "Clip Fix."
- Set the "Threshold" to 95%.
- Adjust the "Reduce amplitude to allow for restored peaks" to -9.
- Click "OK" to apply the Clip Fix effect.