-
![]()
Sofia Albert
Sofia has been involved with tech ever since she joined the EaseUS editor team in March 2011 and now she is a senior website editor. She is good at solving various issues, such as video downloading and recording.…Read full bio -
![]()
Alin
Alin is a sophisticated editor for EaseUS in tech blog writing. She is proficient in writing articles related to screen recording, voice changing, and PDF file editing. She also wrote blogs about data recovery, disk partitioning, data backup, etc.…Read full bio -
Jean has been working as a professional website editor for quite a long time. Her articles focus on topics of computer backup, data security tips, data recovery, and disk partitioning. Also, she writes many guides and tutorials on PC hardware & software troubleshooting. She keeps two lovely parrots and likes making vlogs of pets. With experience in video recording and video editing, she starts writing blogs on multimedia topics now.…Read full bio
-
![]()
Gorilla
Gorilla joined EaseUS in 2022. As a smartphone lover, she stays on top of Android unlocking skills and iOS troubleshooting tips. In addition, she also devotes herself to data recovery and transfer issues.…Read full bio -
![]()
Rel
Rel has always maintained a strong curiosity about the computer field and is committed to the research of the most efficient and practical computer problem solutions.…Read full bio -
![]()
Dawn Tang
Dawn Tang is a seasoned professional with a year-long record of crafting informative Backup & Recovery articles. Currently, she's channeling her expertise into the world of video editing software, embodying adaptability and a passion for mastering new digital domains.…Read full bio -
![]()
Sasha
Sasha is a girl who enjoys researching various electronic products and is dedicated to helping readers solve a wide range of technology-related issues. On EaseUS, she excels at providing readers with concise solutions in audio and video editing.…Read full bio
Content
Dawn Tang
Updated On 04/01/2025
0 Views |
0 min read
Background noises like hiss, clicks, pops, breathing, or mouth noises degrade audio quality and make one look quite unprofessional. So, fixing distorted audio in Audacity is a necessity for content creators and bloggers.
A noise gate is an effective dynamic audio processor that controls the volume threshold of the audio signal and mutes everything that exceeds the gate. This is a common practice to remove background noise in Audacity.
But as beginners, you may be confused about what it is, what's the starting values for those parameters, and which noises it targets. Well, you will get the answers you are looking for in this article.
What Is Audacity Noise Gate
Audacity's Noise Gate is a feature within the popular open-source audio editing software Audacity. It is a tool designed to help users reduce or eliminate unwanted background noise in their audio recordings.
By setting specific parameters, such as the threshold level, attack and release times, and more, users can control when the gate opens and closes, effectively suppressing noise during silent or low-volume moments.
Audacity's Noise Gate is a valuable tool for improving the overall quality of audio recordings by removing echo from audio in Audacity. This feature finds practical utility in various scenarios:
- Masking Low-Level Noise: In situations where low-level noise exists but is effectively masked by the main audio content, a Noise Gate can be employed to reduce noise during silent portions of the recording, preventing it from becoming noticeable.
- Preserving Sound Quality: When other noise reduction methods risk compromising sound quality, a Noise Gate can be used to reduce noise levels between audio segments without altering the recorded sounds themselves.
- Minimizing Intermittent Noise: In cases where intermittent low-level noise of a similar type to the recorded sound is present (e.g., faint background noise like a distant television or radio during pauses in a speech recording), a Noise Gate can help make the pauses quieter.
- Enhancing Noise Reduction: A Noise Gate can complement the Audacity Noise Reduction effect by further reducing noise levels during intended silent intervals, effectively enhancing audio quality.
It's important to note that a Noise Gate doesn't completely eliminate noise from a signal but rather diminishes noise levels during moments of silence or low audio activity. Thus, alternative Audacity noise gate plugins like a Notch Filter or Nyquist Noise Gate Plugin will do the job.
Share the post with others in need!
How to Use Audacity Noise Gate
Noise reduction in Audacity is a simple procedure to follow, and you may want to experiment with those values until you strike a balance.
Install Noise Gate Plugin
Check if you have the noise gate plugin under your "Effect" menu, "Analyze" or "Tools" menu, and find "Plugin Manager," if not, you can add the filter with the following instructions.
Step 1. Go up to "Generate" / "Effect" / "Analyze" / "Tools" > "Plugin Manager."

Step 2. Scroll down to locate "Noise Gate" and click "Enable" > "OK." Then you can find the filter by clicking "Effect" > "Noise Removal and Repair" > "Noise Gate…"
Step 3. If the plugin is not listed, download it from Audacity's plugin page.
Step 4. Locate the "Plug-Ins" folder residing in the Audacity directory, and copy the file to the folder.

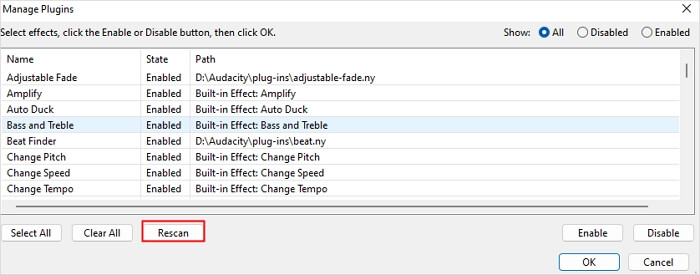
Step 5. Go to the "Plugin Manager" page again and click "Rescan" > "OK" to find the plugin. Then enable it.
Apply Noise Gate in Audacity
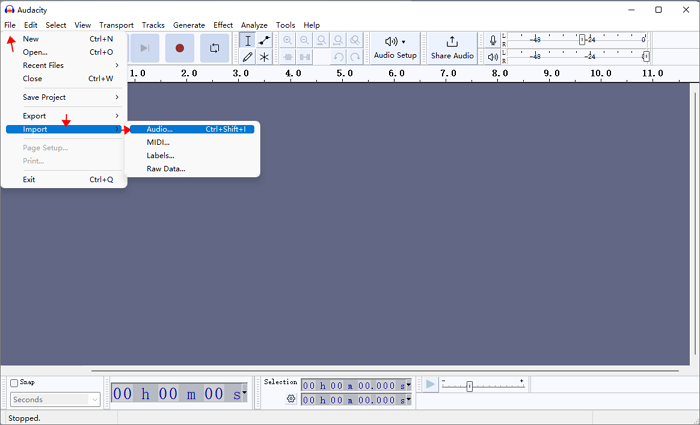
Step 1. Import the audio file.
Launch Audacity, and click "File" > "Open" / "Import" or drag and drop the file to the area.
Step 2. Get the noise level.
Play and listen to the noisy or silent part of your audio (the section without speech), and click the magnifier tool (Ctrl +1) to zoom in on the part. Note the dB of the loudest part (circled in the picture).
Or, you can use the analysis feature of the noise gate effect to get the recommended level.

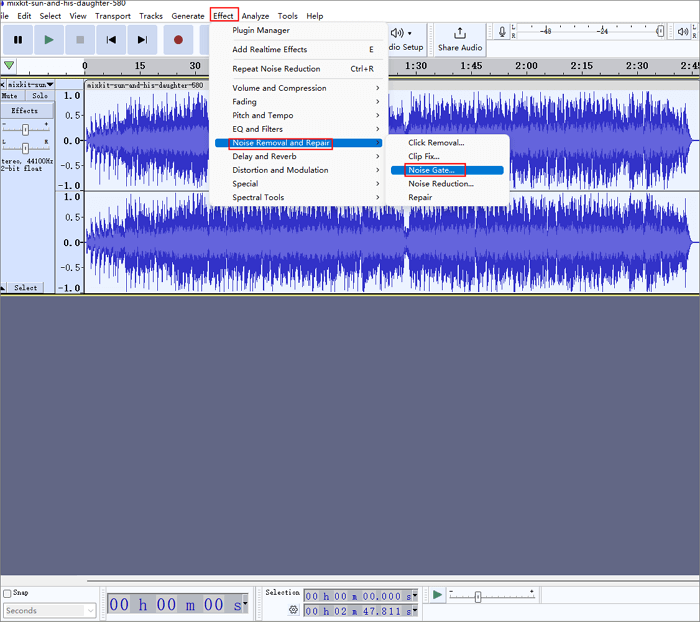
Step 3. Use the noise gate.
Select the audio and go to "Effect" > "Noise Removal and Repair" > "Noise Gate…" to open the window.
Now you can see all the options:
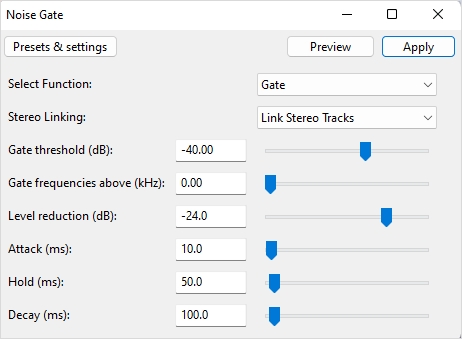
Select Function:
- Gate: Activate the noise gate feature.
- Analyze Noise Level: Evaluate the audio volume level that you've chosen. All other adjustments are inactive while this choice is engaged. To use this feature, select the noise part only.
Stereo Linking:
- When "Link Stereo Tracks" is chosen (the default), the gate affects both channels of a stereo track together, adjusting both channels equally when their levels fall below the threshold. This is usually recommended but may leave low-level noise unprocessed if the other channel has sound above the threshold.
- In contrast, selecting "Don't Link Stereo" lets the gate independently adjust the amplitude for the left and right channels of a stereo track. This may be useful when the channels contain unrelated sounds, like a two-sided conversation. However, for typical stereo tracks, it can create an unusual sensation of sound movement in the stereo field.
Gate threshold:
- The gate reduces output when audio goes below the threshold and restores it when audio exceeds the threshold. In this case, put a relatively higher value than the noted noise level to remove the click in Audacity.
Gate frequencies above:
- At zero, the gate affects all audio. Above zero, it affects only frequencies above the set kHz level, letting lower frequencies pass through. It is useful when there's more hiss in high frequencies and less noise in lower ones, like removing breathing from audio in Audacity.
Level reduction:
- This slider controls how much sound is reduced when the gate is "closed" (below the threshold). At -100 dB, it silences the sound unless "Gate frequencies above" are above zero, in which case, frequencies above the specified kHz level are silenced when below the threshold.
- Lower settings reduce noise better but can cause noticeable audio fluctuations as the gate opens and closes.
Attack:
- This setting determines how fast the gate opens when the signal exceeds the threshold.
- Unlike typical hardware noise gates, this effect can anticipate and start opening before the threshold is reached. This prevents sound clipping at the start, even with longer Attack settings.
- Minimum (1 ms) opens the gate almost instantly when the level crosses the threshold. Maximum (1000 ms) gradually starts opening one second before the level exceeds the threshold.
Hold:
- This is how long the gate stays open after the signal goes below the threshold before it begins to close.
- For low-frequency sounds, set Hold to avoid the gate closing between peaks. For percussive sounds like snare drums, set Hold to let the sound naturally decay before the gate closes.
Decay:
- This is the opposite of Attack. While Attack determines how fast the gate opens, Decay determines how fast it closes. The gate starts closing after the signal falls below the threshold and the Hold time (if set) has passed. Longer Decay times result in a slower gate closure.
- After you have set the values, click "Preview" to listen to the result, and if it works great, click "OK."
- Notice:
- You can add the "Amplify" effect to increase the volume and use "Compressor" for enhancement.
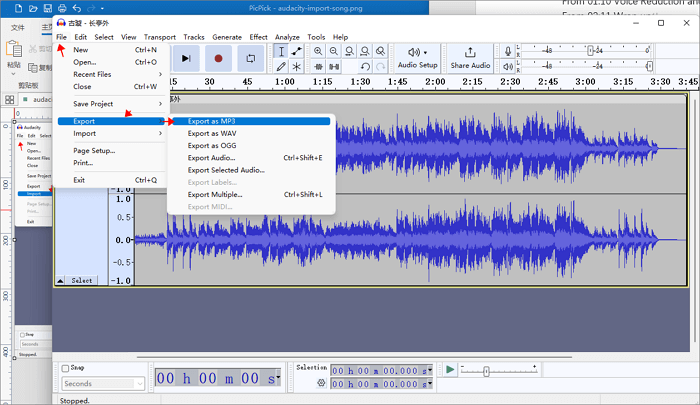
Step 4. Export the audio file.
Go up to "File" > "Export" > "Export as…" to export the audio signal.
You can see the video guide below👀
- 0:00 How to use Noise Gate in Audacity?
- 0:09 Audacity Beginner? You need this Course!
- 0:30 Sample Audio
- 1:10 Noise Gate Effect Walkthrough
- 1:15 Tweak the Effects
- 2:00 Final Result
- 2:45 Check out my PRESETS!

Fix Audacity Noise Gate Not Working
When Audacity vocal remover is not working, you can canvass issues such as Audacity update, internet connection, software glitches, etc.
To fix the Audacity noise gate not working, you can try to download a modified version of the noise gate and install it as I mentioned above. Meanwhile, disable the original noise gate until the next version of Audacity is released since this is a temporary workaround.
Audacity has issued the 3.0.2 version by now, so if the problem persists, try to download a new release and enable the noise gate to see if it works as expected.
Remove Background Noise Online for Free
If you don't feel like downloading software and straining your computer resources, why not access an online vocal remover to get things done?
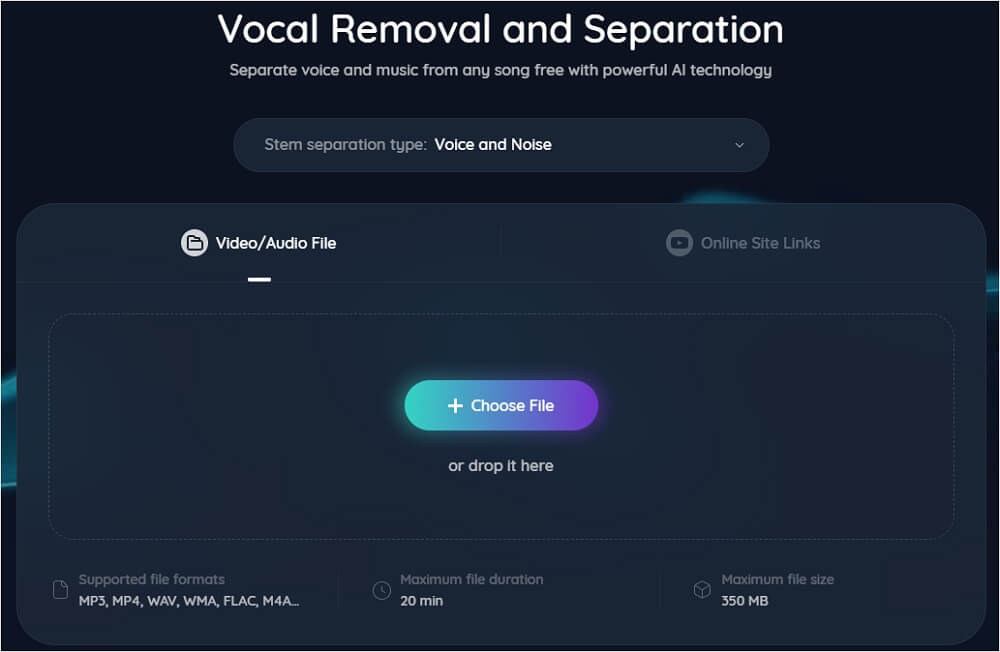
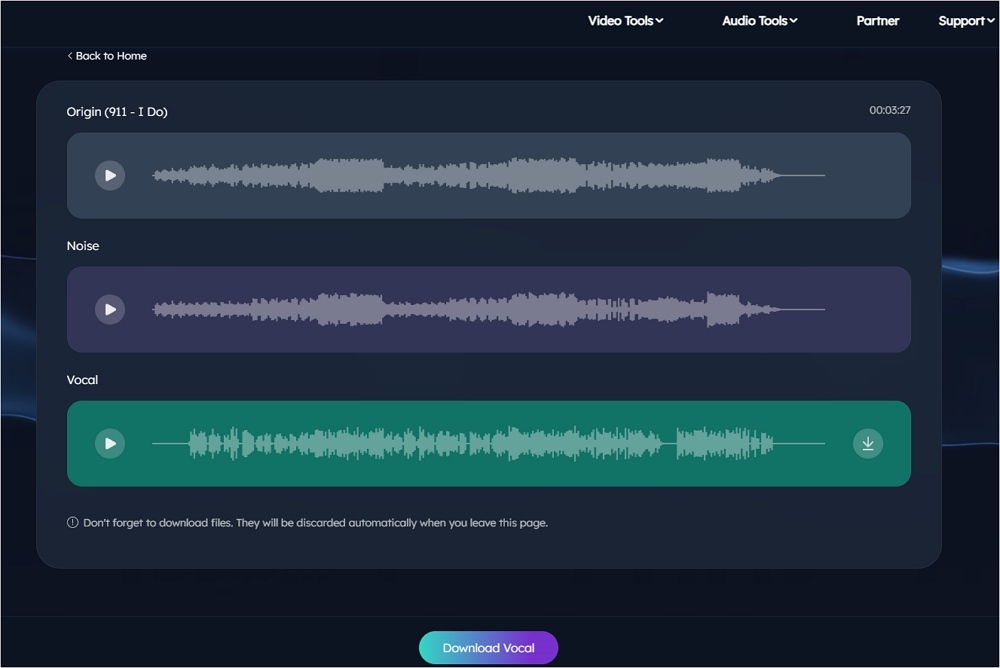
EaseUS online vocal remover is a free program highly compatible with multiple file formats, e.g., MP3, WAV, AAC, AIFF, M4A, FLAC, and more. You can separate vocals from background noise using the AI algorithm in seconds.
This acapella extractor allows you to upload a single audio file of 20 minutes up to 350 MB. And you don't have to log in to get the final result.
Key features
- Create karaoke out of song
- Support various file formats with long duration
- Separate vocals from instrumental
- Remove noise from audio/video
- Extract music and vocals from YouTube/SoundCloud URL
Powered by Advanced AI
Delete noise from audio online
Step 1. Visit the website and select the "Noise Reducer" option.
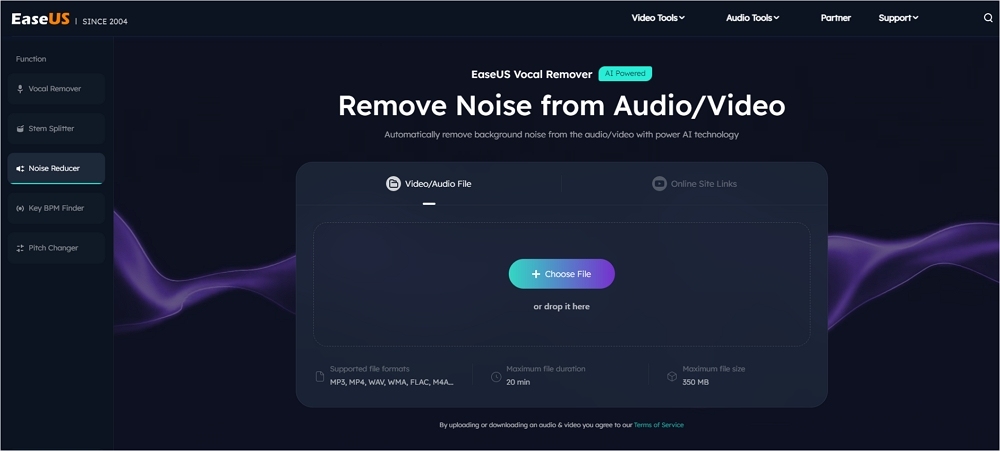
Step 2. Click "Choose File" or drag and drop the file in the area and wait for the AI analysis.
Step 3. Download the final work with noise removed.
Wrapping up
In conclusion, Audacity's noise gate is a valuable tool for removing vocals from a song in Audacity by selectively reducing unwanted noise. Whether you're working on music, podcasts, or other audio projects, it can help you achieve cleaner and more professional results.
If you're looking for additional audio enhancement tools, consider trying out EaseUS Online Vocal Remover. It's a convenient online solution for removing vocals from a song or audio track, giving you even more control over your audio editing and production.
Powered by Advanced AI
Together with Audacity's noise gate, these tools can be powerful allies in your quest for high-quality audio.
Audacity Noise Gate FAQs
1. Should I turn on the noise gate?
Whether you should activate a noise gate in your audio setup depends on factors like background noise, microphone sensitivity, and the nature of your audio source. Noise gates can help eliminate unwanted noise during silent or low-activity periods, enhancing audio quality.
However, they should be set up carefully to avoid introducing artifacts or cutting off desired audio. Personal preference and specific project needs also play a role in deciding whether to use a noise gate effectively.
2. What should my noise gate be at?
To set your noise gate effectively, start by adjusting the threshold just above the background noise but below your desired audio signal, and choose an attack time that balances abrupt noise reduction with smooth transitions.
Similarly, select an appropriate release time to control how quickly the gate reopens. If available, configure the hold time and ratio settings to fine-tune noise reduction and prevent rapid gate fluctuations. Continuously listen and make adjustments as needed, as the optimal settings can vary depending on your specific audio source and preferences.
3. Should I use a noise gate on vocals?
Using a noise gate on vocals depends on factors like background noise, recording environment, and vocal style. It can be helpful in reducing background noise during silent moments, particularly in less controlled recording spaces.
However, it should be used judiciously to avoid impacting the natural dynamics of vocal performances. Consider alternative solutions such as acoustic treatment or noise reduction in post-production for optimal results.