-
![]()
Sofia Albert
Sofia has been involved with tech ever since she joined the EaseUS editor team in March 2011 and now she is a senior website editor. She is good at solving various issues, such as video downloading and recording.…Read full bio -
![]()
Melissa Lee
Melissa Lee is a sophisticated editor for EaseUS in tech blog writing. She is proficient in writing articles related to screen recording, voice changing, and PDF file editing. She also wrote blogs about data recovery, disk partitioning, data backup, etc.…Read full bio -
Jean has been working as a professional website editor for quite a long time. Her articles focus on topics of computer backup, data security tips, data recovery, and disk partitioning. Also, she writes many guides and tutorials on PC hardware & software troubleshooting. She keeps two lovely parrots and likes making vlogs of pets. With experience in video recording and video editing, she starts writing blogs on multimedia topics now.…Read full bio
-
![]()
Gorilla
Gorilla joined EaseUS in 2022. As a smartphone lover, she stays on top of Android unlocking skills and iOS troubleshooting tips. In addition, she also devotes herself to data recovery and transfer issues.…Read full bio -
![]()
Rel
Rel has always maintained a strong curiosity about the computer field and is committed to the research of the most efficient and practical computer problem solutions.…Read full bio -
![]()
Dawn Tang
Dawn Tang is a seasoned professional with a year-long record of crafting informative Backup & Recovery articles. Currently, she's channeling her expertise into the world of video editing software, embodying adaptability and a passion for mastering new digital domains.…Read full bio -
![]()
Sasha
Sasha is a girl who enjoys researching various electronic products and is dedicated to helping readers solve a wide range of technology-related issues. On EaseUS, she excels at providing readers with concise solutions in audio and video editing.…Read full bio
Content
Dawn Tang
Updated On 03/20/2025
0 Views |
0 min read
In the world of audio editing, achieving pristine sound quality is paramount, and addressing unwanted echoes and reverberations is a common challenge. Fortunately, Audacity, a powerful and versatile audio editing tool, provides you with tools to remove vocals from a song in Audacity and tackle this issue effectively.
Whether you're a podcaster, musician, or content creator, removing background noise from audio can elevate your audio projects to a professional level.
In this guide, we'll delve into these three proven techniques, equipping you with the knowledge and skills needed to remove echo from audio in Audacity.
| Methods | Effectiveness | Suitable for |
|---|---|---|
| Using Noise Reduction Effect | Remove complicated background noise but may involve human voice at the same frequency as well. | Various noises, including echo, in audio recordings. |
| Using Noise Gate | Reduce the sound volume to a predetermined threshold level. | Noise between sections of an audio clip. |
| Using Dereverb | Fine-tune the reverb reduction threshold for the frequency band. | Manual tweaking, reverb, and echo. |
Can You Remove Echo from Audio in Audacity
Yes, you can remove echo from audio in Audacity when Audacity vocal remover is not working using various techniques and effects available in the software.
These methods typically involve using tools like the Noise Reduction effect, the Equalization effect, the High Pass filter, or the DeReverb effect, depending on the specific characteristics of the echo you want to remove.
Experimenting with these tools and adjusting their parameters can help fix distorted audio in Audacity and eliminate echo from your audio recordings.
Reduce Echo from Audio in Audacity in 3 Ways
Similar to removing breathing from audio in Audacity, you can also apply Noise Reduction and Noise Gate effects to clear echo from audio in Audacity.
1. Using Noise Reduction Effect🪄
Noise Reduction is effective at diminishing persistent background noises like hums, whistles, whines, buzzing, and "hisses" such as tape hiss, fan sounds, or FM/webcast interference.
However, it's not designed for handling isolated clicks, pops, or sporadic background disturbances like those from traffic or a live audience.
Achieving satisfactory noise removal can be difficult when dealing with very loud or variable noise, when the audio source isn't much louder than the noise, or when the noise frequencies closely match the audio content. But anyway, it suits more noise. Here's how:
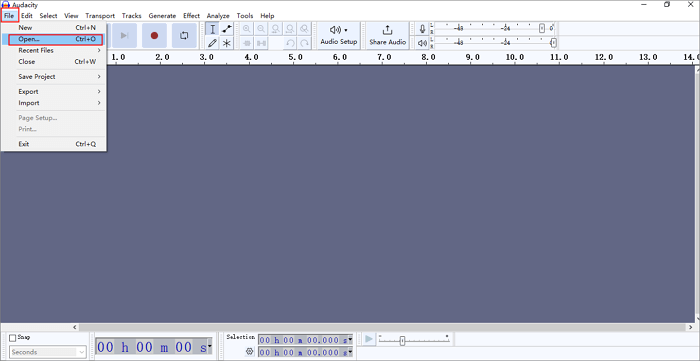
Step 1. Import the audio file.
Open Audacity and go to "File" > "Open" or drag and drop the audio files to Audacity.
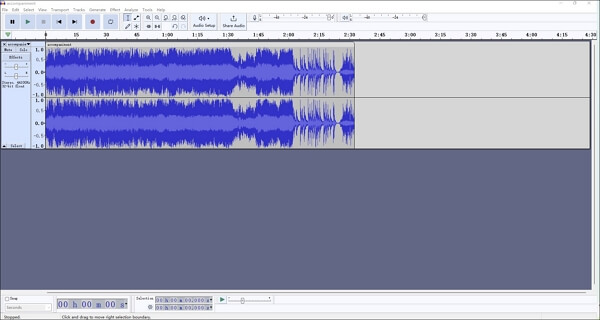
Step 2. Select the track.
Select the whole track using your mouse or use Ctrl + A on Windows or Cmd+ A on Mac.
Step 3. Use Noise Reduction effect.
Go up to "Effect" > "Noise Removal and Repair" > "Noise Reduction" and click "Get Noise Profile."
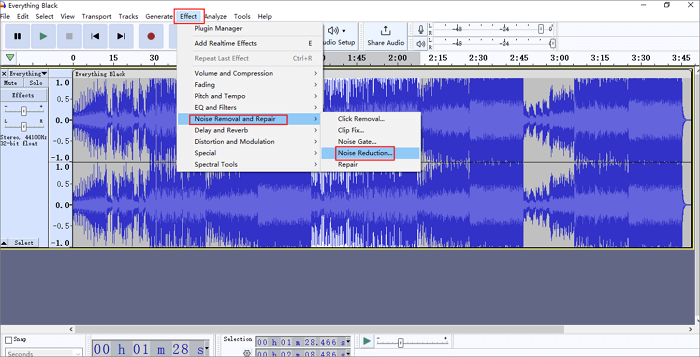
Follow the path again and tune up the reduction values using the noise reduction slider. Start from the small values for sensitivity that control the noise reduction degree. And keep the frequency smoothing from 1 to 6.
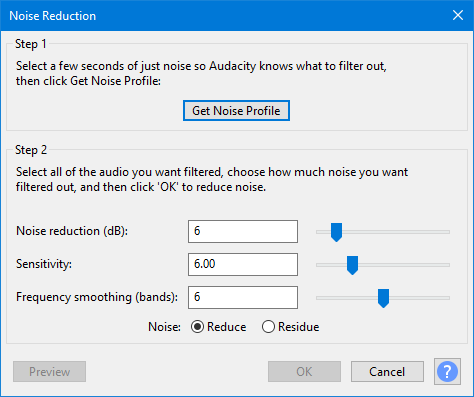
Preview the result and undo it using Ctrl+Z or Cmd+ Z. Click "OK."
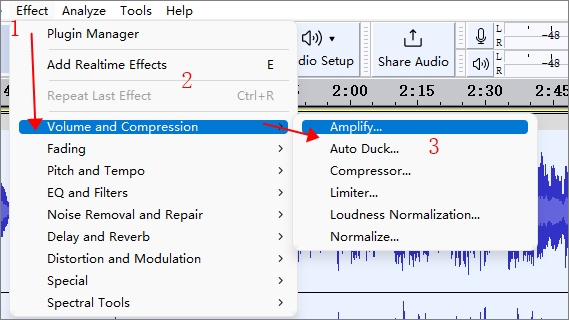
Step 4. Amplify the volume.
You can turn up the volume by going to "Effects" > "Volume and Compression" > "Amplify…" and setting the amplification db. Click "Apply."
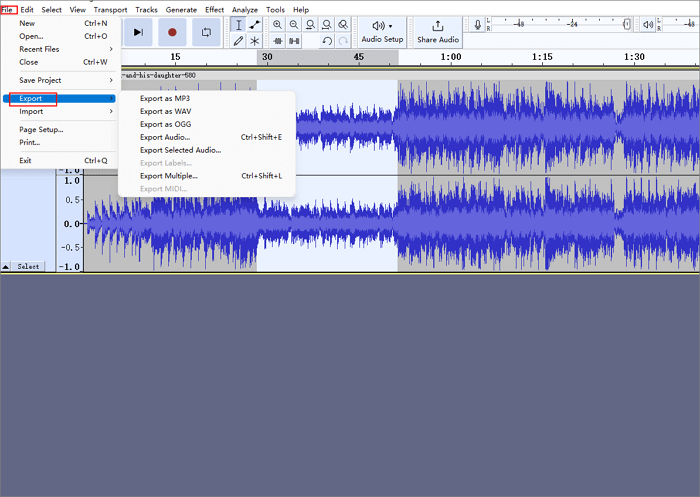
Step 5. Export the result.
Click "File" > "Export" and choose "Export as…" to save the final result.
Watch the video guide below if needed📽️.
- From 00:49 Remove Echo with Audacity
- From 01:54 Remove Echo with EaseUS Online Vocal Remover
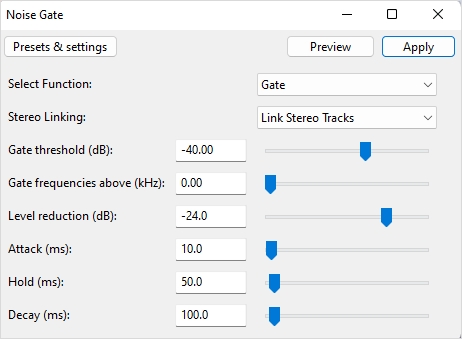
2. Using Noise Gate📣
Utilize the Noise Gate feature to diminish sound levels beneath a set threshold. Noise Gates are employed to attenuate residual noise intervals within a recording.
Despite its apparent simplicity, this Noise Gate is equipped with multiple features and customizable settings that enable it to effectively and subtly reduce noise, making it suitable for a wide range of audio applications.
Step 1. Load your audio clip and select the entire track.
Step 2. Use the Noise Gate effect.
Go up to "Effect" > "Noise Removal and Repair" > "Noise Gate" and adjust the settings.

Gate Threshold: Controls when the gate opens or closes based on the audio level. Try 30 to start.
Gate Frequencies: Specifies the kHz level above which the gate affects audio frequencies.
Level Reduction: Determines the extent of audio attenuation when the gate is closed. You can try with an average value of -100.
Attack: Adjusts how quickly the gate opens when the audio level exceeds the threshold. Try 75 for it.
Hold: Sets the duration the gate remains open after audio falls below the threshold.
Decay: Governs how gradually the gate closes after the signal drops below the threshold and Hold time. Try 75 for it.
Step 3. Use the Amplify effect.
Increase the clip volume by setting the amplification values.

Step 4. Use Compressor.
To permit the audio to be amplified further, go up to "Effects" > "Volume and Compression" > "Compressor…" and change ratio. You can also alter the noise floor and threshold as well. Click "Apply."

Step 5. Use a Low Pass or High Pass Filter.
A low-pass filter fixes high-pitched audio, while a high-pass filter helps with low or muffled audio. Go to "Effect" > "EQ and Filters" > "High-Pass Filter" or "Low-Pass Filter." Change the Rolloff and preview the result. Click "OK."

Step 6. Use Graphic EQ.
Graphic EQ manipulates sounds by frequency. You can increase or decrease the volumes of some frequencies. Go to "Effect" > "EQ and Filters" > "Graphic EQ…" and adjust the values by hand or use the factory presets.

Share the article with others if it helps!
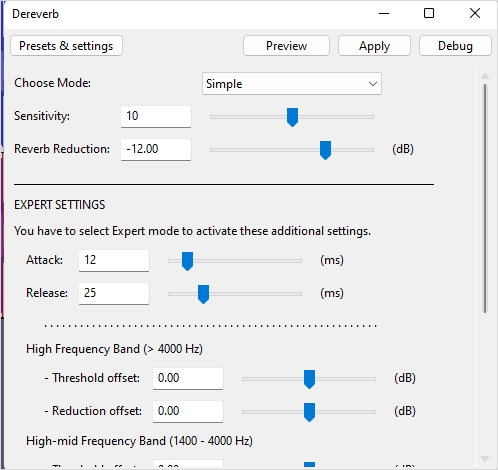
3. Using Dereverb🎶
Dereverb functions as a multi-band gate that offers precise control over threshold and reverb reduction for each frequency band. The plugin automatically estimates gate thresholds based on the terms of respective frequency bands, creating an accurate reverb profile and reducing the need for manual adjustments.
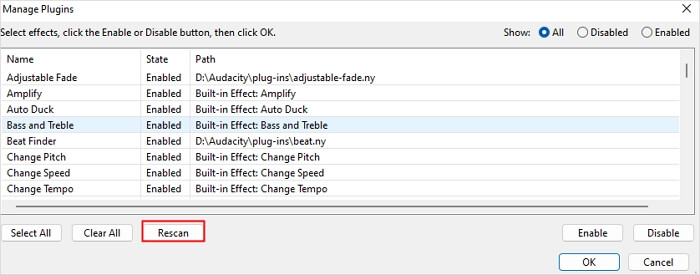
Step 1. Download the Dereverb plugin and add it to Audacity.
Visit the link to download the effect, and find the "Plug-Ins" folder under the Audacity download location. Drag the effect file to the folder.

Open Audacity, go to "Effect" > "Plugin Manager," and click "Rescan" > "OK."
Step 2. Import the audio into Audacity.
Go to "File" > "Open" to select your audio file.
Step 3. Use the Dereverb effect.
Select the track and scroll down; you can see the Dereverb effect here. If necessary, you can fine-tune the profile using "Sensitivity" and "Threshold offset" for individual frequency bands.

Typically, controlling the plugin with "Sensitivity" and "Reverb Reduction" should suffice, but you can further customize it by enabling "Expert mode" and adjusting "Release," "High-mid," and "Low-mid Reduction" settings. Click "OK."
See also:
Remove Echo from Audio Online Free
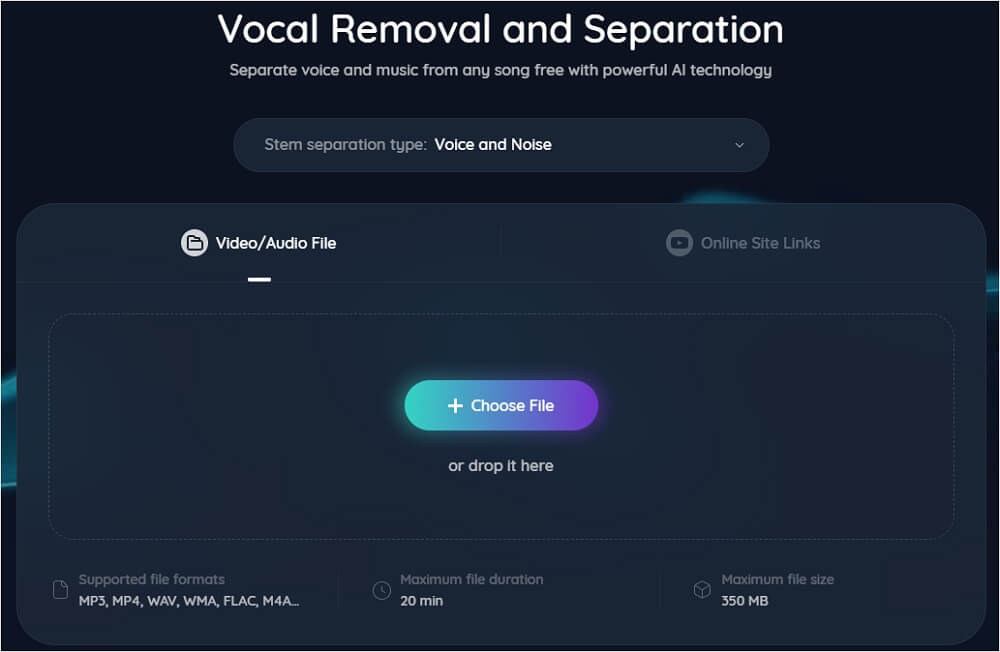
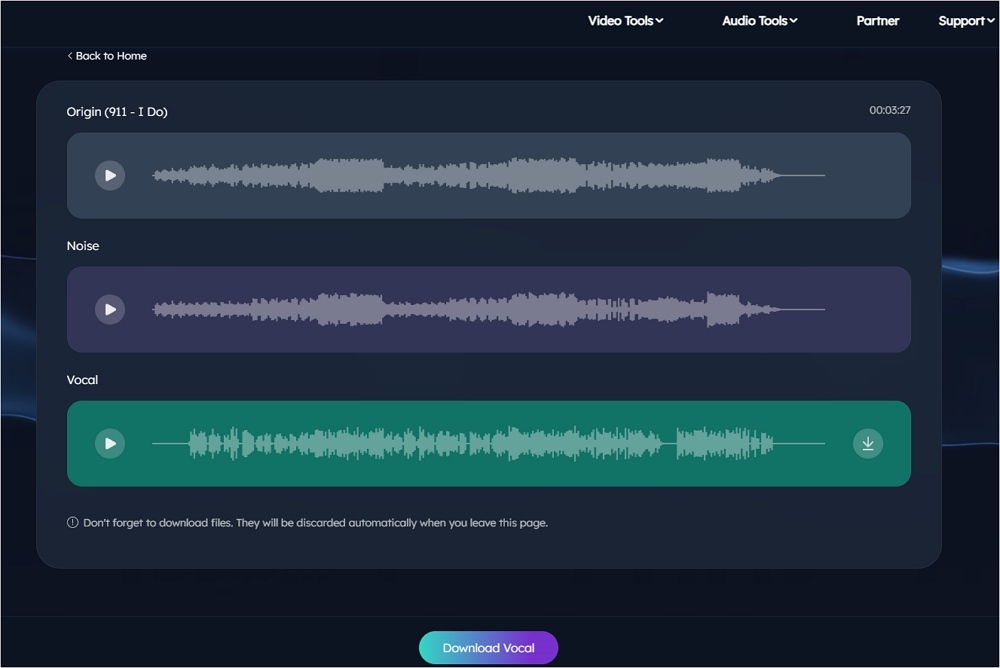
Can echo removal be easier in a one-stop solution? Of course, look no further than EaseUS online vocal remover without downloading or installing it for free.
This AI audio enhancer specializes in separating vocals and music. It supports multi-track separation and allows users to upload a single file of up to 20 minutes in duration and 350MB in size.
This versatile acapella extractor is compatible with various formats, including MP3, WAV, AAC, AIFF, M4A, FLAC, and more. Powered by AI algorithms, it swiftly divides songs into music and accompaniment, all in a matter of seconds.
Here are the features of EaseUS Online Vocal Remover:
- Multi-Track Separation: Supports the separation of vocals and music from audio tracks with multiple stems.
- File Compatibility: Compatible with various audio formats, including MP3, WAV, AAC, AIFF, M4A, FLAC, and more.
- URL Support (Upcoming): Soon, it will allow you to extract audio from YouTube and SoundCloud URLs.
- File Size and Duration: Accepts audio files up to 20 minutes in length and 350MB in size.
- Acapella Creation: Capable of generating acapella versions from original songs and separating vocals from background noise.
- No Login Required: Completely free to use, without the need for user registration or login.
Powered by Advanced AI
Remove echo from audio in EaseUS online vocal remover
Step 1. Visit the website and select the "Noise Reducer" option.
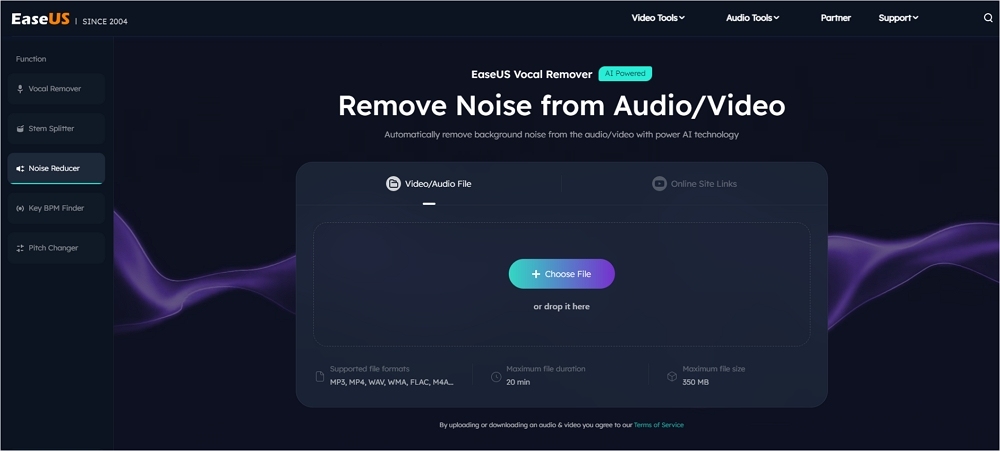
Step 2. Click "Choose File" or drag and drop the file in the area and wait for the AI analysis.
Step 3. Download the final work with noise removed.
Wrapping up
In conclusion, removing echo and reverb from audio in Audacity can significantly improve the quality of your recordings. By utilizing the tools and techniques mentioned earlier, you can achieve cleaner and more professional-sounding audio.
However, for those looking for an even more streamlined approach to audio processing, consider exploring EaseUS Online Vocal Remover. This online tool offers a user-friendly interface and AI-powered capabilities to separate vocals from music, making it a valuable addition to your audio editing toolkit.
Powered by Advanced AI
Whether it's echo removal or vocal separation, these tools combined can elevate your audio editing endeavors to a whole new level of excellence.
Get Rid of Echo from Audio in Audacity FAQs
1. How do I remove echo from audio?
To effectively remove echo from audio, you can utilize audio editing software such as Adobe Audition, Audacity or even online tools like EaseUS Online Vocal Remover.
- Start by identifying the section with the echo and select it.
- Then, apply an echo reduction or removal effect or filter, which can often be found under noise reduction or audio enhancement settings.
- Adjust the parameters like delay time, decay rate, and wet/dry mix until you achieve the desired reduction in echo while preserving the original audio quality.
- Preview the result and fine-tune it as needed to ensure the audio sounds clear and echo-free before saving or exporting the edited audio file.
2. How do I remove reverb from audio in Audacity?
To remove reverb from audio in Audacity, you can use a specific plugin called Dereverb.
- Download the plugin and toggle it under the plug-ins file.
- Import your audio clip to Audacity and select the reverb part or the whole clip.
- Enable it from "Effect" > "Dereverb."
3. How to do an echo fade in Audacity?
To do an echo fade, set the delay time and decay factor for the echo effect you have applied; for a fade-in effect, it's recommended to start with a small delay time and a gradual increase in the number of echoes. Preview the result and export.