-
![]()
Joey Albert
Joey has been involved with tech ever since she joined the EaseUS editor team in March 2011 and now she is a senior website editor. She is good at solving various issues, such as video downloading and recording.…Read full bio -
![]()
Alin
Alin is a sophisticated editor for EaseUS in tech blog writing. She is proficient in writing articles related to screen recording, voice changing, and PDF file editing. She also wrote blogs about data recovery, disk partitioning, data backup, etc.…Read full bio -
Jean has been working as a professional website editor for quite a long time. Her articles focus on topics of computer backup, data security tips, data recovery, and disk partitioning. Also, she writes many guides and tutorials on PC hardware & software troubleshooting. She keeps two lovely parrots and likes making vlogs of pets. With experience in video recording and video editing, she starts writing blogs on multimedia topics now.…Read full bio
-
![]()
Gorilla
Gorilla joined EaseUS in 2022. As a smartphone lover, she stays on top of Android unlocking skills and iOS troubleshooting tips. In addition, she also devotes herself to data recovery and transfer issues.…Read full bio -
![]()
Rel
Rel has always maintained a strong curiosity about the computer field and is committed to the research of the most efficient and practical computer problem solutions.…Read full bio -
![]()
Dawn Tang
Dawn Tang is a seasoned professional with a year-long record of crafting informative Backup & Recovery articles. Currently, she's channeling her expertise into the world of video editing software, embodying adaptability and a passion for mastering new digital domains.…Read full bio -
![]()
Sasha
Sasha is a girl who enjoys researching various electronic products and is dedicated to helping readers solve a wide range of technology-related issues. On EaseUS, she excels at providing readers with concise solutions in audio and video editing.…Read full bio
Page Table of Contents
Dawn Tang
Updated on Jun 16, 2026
0 Views |
0 min read
Fixing distorted audio in Audacity is a straightforward and powerful process that can help enhance the quality of your recordings and projects. Audacity, being a versatile and open-source audio converter software, provides a range of tools and features designed to address various types of distortion.
Whether you're dealing with clipping, wind noise, silence, hum, hiss, overdrive, or rumble, Audacity's intuitive interface and internal tools offer effective solutions to restore clarity and improve your audio's quality.
In this guide, we will explore step-by-step techniques to identify and rectify distorted audio using Audacity.
| Methods👷♂️ | Effectiveness📝 | Targeting at🔎 |
|---|---|---|
| Clip Fix Effect | Set a threshold and reduce amplitude to allow for restored peaks. | Too many signals while recording. |
| Noise Reduction | Clear out complex background noise and hiss. | Complicated unwanted noise and hiss. |
| EQ | Adjust the frequency range of a particular part. | Distorted audio within a specific frequency range, like wind or rumble. |
| Amplify | Change the volume of a track. | Short trivial distortion. |
| Repair Tool | Fix short clips. | A brief tape drop-out, a dropped object causing a bang, or a vinyl record needle skipping. |
| Truncate Silence | Shorten passages with volume below a set threshold level. | Silence. |
| Low Pass Filter | Cut the hiss frequency area. | High-pitched hiss in the audio recording. |
Why Is Your Audio Distorted in Audacity
There are sometimes when Audacity vocal remover not working and the audio is distorted. Identifying the specific cause helps in using Audacity's tools effectively for distortion correction and audio enhancement. The reasons can be boiled down to:
- Clipping: Audio peaks exceeding the maximum level, causing distortion.
- Overdriven Input: Too high input levels during recording lead to harsh sound.
- Background Noise: Unwanted noise interferes with audio clarity.
- Software Effects: Excessive use of certain effects causes unintended distortion.
- Audio Interface Issues: Problems with hardware cause distortion.
- Low-Quality Source: Using poor-quality recordings leads to distortion.
- Incompatible Settings: Mismatched sample rates or bit depths cause distortion.
How to Eliminate Distorted Audio in Audacity 7 Methods
Recognizing the causes of audio distortion in Audacity paves the way for effective solutions. Now, let's explore the seven methods to remove background noise from audio and achieve professional-quality sound in your recordings.
1. Using Clip Fix Effect🎼
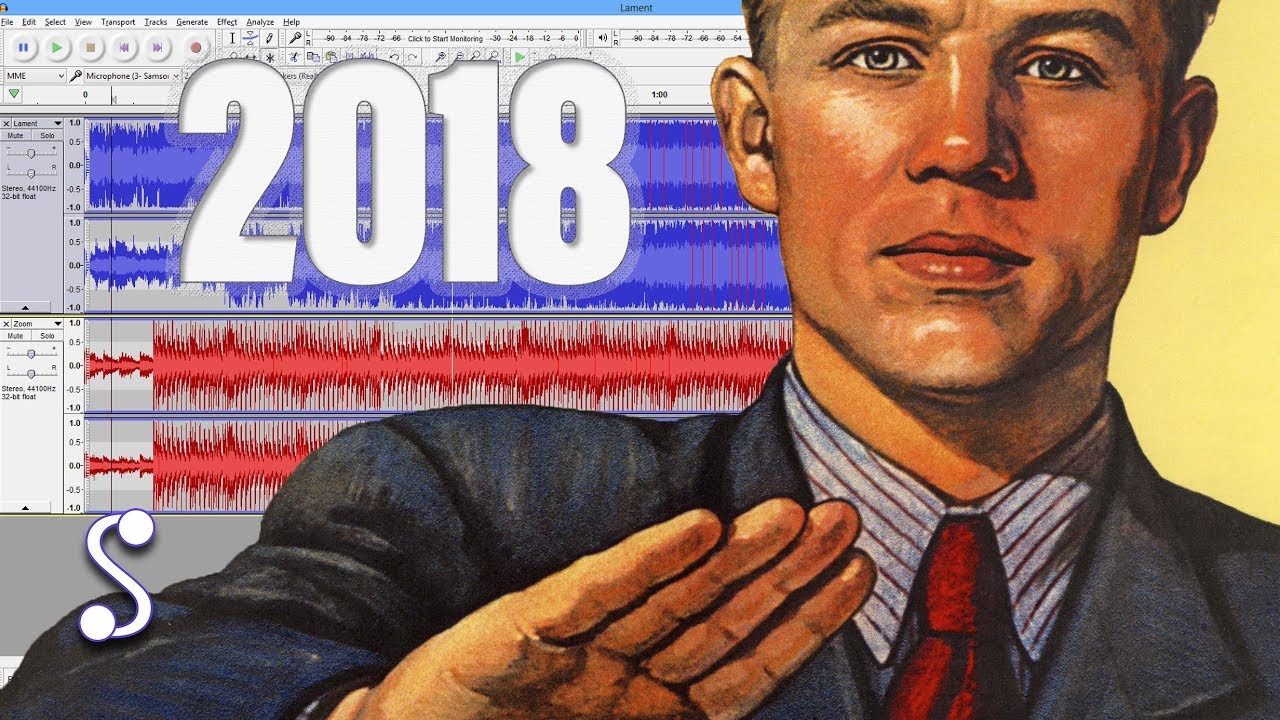
Clipping in audio occurs when the signal exceeds the maximum level, leading to distortion. This typically happens when the signal is higher than the available headroom, cutting off or flattening waveform peaks. Audacity has a tool to make the clipping audio waveform visible and remove the distorted audio.
Wipe off distortion from audio in Audacity using Clip Fix
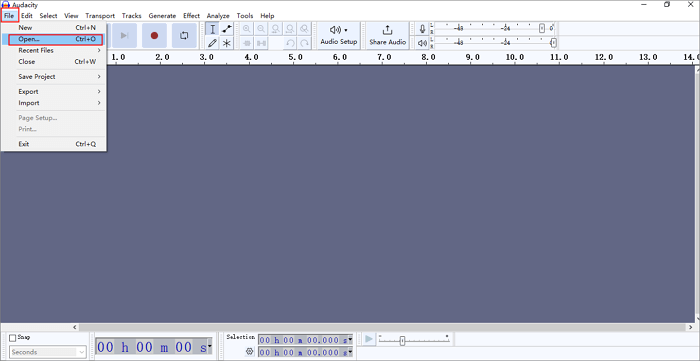
Step 1. Open Audacity and import the file.
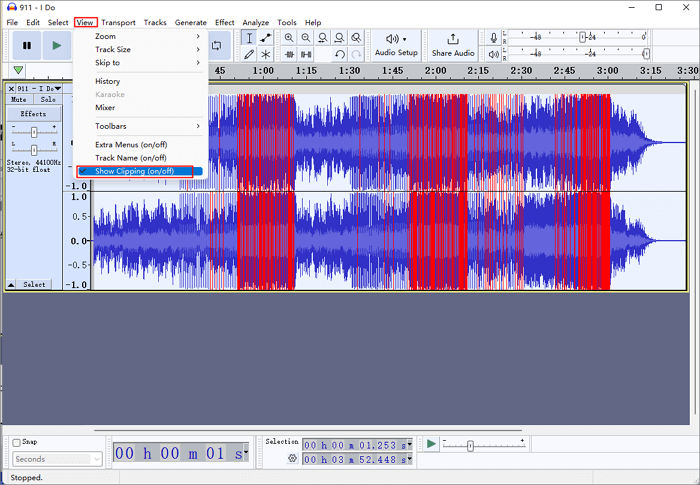
Step 2. Go to "View" > "Show Clipping (on/off)" and show the clipping in red.
Step 3. Select the audio and click "Effect" > "Noise Removal and Repair" > "Clip Fix…" to open the window.
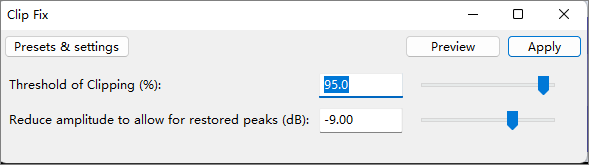
Step 4. There are two values to fill in. Then Click "Preview" to listen to the result and "Apply" the setup.
- Threshold of Clipping: Defines what is considered clipped audio by setting its proximity to the maximum sample magnitude.
- Reduce amplitude to allow for restored peaks: Reduce selected audio amplification in Audacity to create headroom for repairs.
Step 5. Click "File" > "Export" to decide the export format.

Here's a video guide about the method, and note that there can be differences between the interfaces of older and the latest versions.
Share the post online and spread the knowledge to help others improve their audio quality!
2. Using Noise Reduction🎵
For complex constant background noises in your recording, try Audacity's "Noise Reduction" effect. It works well when there are sections with only noise and no target audio. This tool is especially useful for dealing with hiss and background noise, even if they are not initially noticeable in the recording.
Erase distorted audio in Audacity using Noise Reduction
Step 1. Select the portion in an audio recording containing noise.
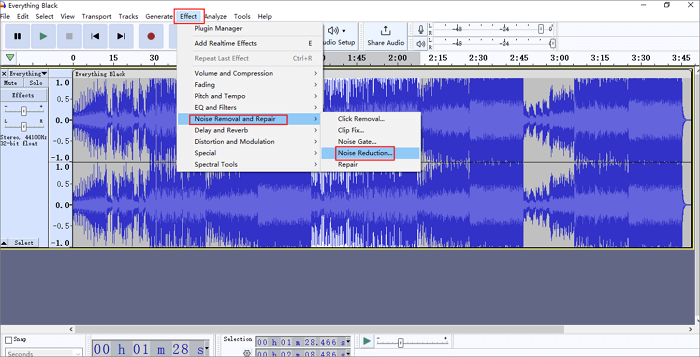
Step 2. Navigate to "Effect" > "Noise Removal and Repair" > "Noise Reduction…"
Step 3. Click "Get Noise Profile", and the window will collapse immediately.
Step 4. Back to the "Noise Reduction…" again and define the noise reduction values.
- Noise Reduction (dB): Adjust the volume reduction to minimize identified noise in Audacity.
- Sensitivity: Set the noise threshold from 0 to 24 in Audacity. Higher sensitivity removes more noise but may affect desired signals. Use the lowest value for effective noise removal without artifacts.
- Frequency Smoothing (bands): For noise reduction across neighboring bands, set the control to 1 or higher. Keep it at 0 (off) for clear desired audio with light noise. Try Frequency Smoothing between 1 and 6 bands for artifacts, depending on the track's sampling frequency.
- Residue: Use this option to preview the filtered-out sound. Find optimal settings without damaging the audio. Recognizable parts of the desired sound in the residue indicate settings may be too high.
Step 5. Click "Preview" to listen to the result and "OK" to apply.
Step 6. Export the audio file.
- Tip
- There is a "Noise Gate" option above the reduction feature. It is a dynamics processor that allows audio above a set threshold to pass through (gate "open") and reduces or stops sounds below the threshold (gate "closed"). It effectively cuts residual noise between recording sections and offers various settings for an unobtrusive and versatile performance on different types of audio.
3. Using EQ🎶
To remove distorted audio in a specific frequency range, use EQ-ing in Audacity. Adjust the frequency range with the built-in Graphics EQ, reducing unwanted frequencies like a bass rumble affecting your recording.
Clean up distortion from audio in Audacity using EQ
Step 1. Load your distorted audio into Audacity.
Step 2. Go to "Effect" > "EQ and Filters" > "Graphic EQ…"

Step 3. In the EQ, each slider corresponds to a frequency range, from low (left) to high (right). Simply adjust the sliders to eliminate noise from your recording.
Step 4. Click "Presets & settings" > "Factory Presets" to see the presets available.
Step 5. Click "Preview" to listen to the result and "OK" to apply.
Step 6. Export the work.
- Important
- The Effects menu offers a Filter Curve EQ, similar to Graphics EQ, altering specific frequencies on your recording. It uses a graph form for easier interpretation. Click anywhere on the line to change a frequency, making it more adaptable than Graphics EQ. Presets are available under "Manage" > "Factory" Presets.
4. Using Amplify🎙️
Use the Amplify effect in Audacity to adjust the volume for selected audio tracks or selections. Amplify maintains relative volumes for selected tracks or channels. Unlike Normalize, which maximizes each track independently, Amplify applies the same amplification to all selected tracks or channels.
Take away distorted audio in Audacity using Amplify
Step 1. Select the audio track.
Step 2. Access the effect by "Effect" > "Volume and Compression" > "Amplify...".
Step 3. Input a value for the amount of amplification or drag the slider. Check or uncheck the "Allow Clipping".
- Tip
- Unchecked, entering an amplification above 0 dB disables the OK button to prevent excessive distortion. If checked (default), you can apply any amplification, but be cautious.

Step 4. Click "Preview" to listen to the result and "OK" to apply.
Step 5. Export the final work.
5. Using Repair Tool🎤
This tool fixes extremely short clips in under a second. It's useful for correcting distortion caused by tape drop-outs, sudden impacts, or needle skips on vinyl records. Even brief distortions impact audio quality significantly. Shorter selections generally yield better repair results.
Clear away distortion from audio in Audacity using Repair Tool
Step 1. Choose the tiny audio portion.
Step 2. Go to "Effect" > "Noise Removal and Repair" > "Repair".

Step 3. No options are available for this tool; it directly applies the effect to the selected audio.
Step 4. Export the audio track.
6. Using Truncate Silence🎧
Truncate Silence shortens passages with volume below the specified threshold for the specified time duration.
Wipe off distortion from audio in Audacity using Truncate Silence
Step 1. Go to "Effect" > "Special" > "Truncate Silence...".
Step 2. Set up the values or use presets.
- Threshold: Audio must be below the threshold level (-20 dB to -80 dB) to be treated as silence.
- Duration: Minimum silence length. Audio must stay below the "Threshold" for this duration to be silent. Lower "Duration" for more reduction; minimum 0.001 seconds.
- Truncate Detected Silence: Silences are cut to a set duration. If audio remains below the "Detect Silence" threshold for the specified time, it's truncated to the "Truncate to" duration.
- Compress Excess Silence: If audio remains below the "Detect Silence" threshold for the specified duration, any excess silence is compressed to the entered "Compress to" percentage, but not proportionally.
- Truncate tracks independently: When applied to multiple tracks, the "Truncate tracks independently" checkbox decides whether to synchronize them as a mix or process them separately.

Step 4. Click "OK" and export the audio.
7. Using Low Pass Filter🔊
To remove the high-pitched hiss in an audio recording caused by wind noise or a noisy AC unit, try using a low pass filter or a notch filter to cut out the hiss frequency area.
Reduce distorted audio in Audacity using Low Pass Filter
Step 1. Select the whole audio and click "Analyze" > "Plot Spectrum…".
Step 2. For high-pitched hiss, note the frequency area of the spike in the upper frequencies by reading the X-axis of the plotted spectrum.
Step 3. Go to "Effect" > "EQ and Filters" > "Low-Pass Filter…".
Step 4. Enter a value slightly lower than the hiss frequency in the "Frequency" input field. Set the "Roll-off" value using the input box based on your needs.

Step 5. Listen to the preview and click "OK" to apply.
Add-on: Remove Distortion from Audio/Video in EaseUS VideoKit
EaseUS VideoKit, a versatile video editor for Windows, offers a user-friendly interface to remove audio distortion from audio or videos effectively. You can easily separate vocals from background noise, and download accompaniment and vocals individually for the karaoke version.
The AI-powered vocal remover supports over 1000 video formats and provides a noise remover to reduce hiss, white noise, hum, clicks, rumble, and more. It also doubles as a video editor, compressor and converter, audio extractor and compressor, etc. Free download available for Windows 11/10/8/7.
Remove Distortion from Video in EaseUS VideoKit
1
Conclusion
In summary, Audacity offers seven effective methods to fix distorted audio, utilizing tools like noise reduction and EQ. Additionally, EaseUS VideoKit provides a user-friendly solution to remove distortion from audio and video for Windows users. With these tools, you can enhance audio quality and achieve professional results.
How to Get Rid of Distorted Audio in Audacity FAQs
1. How do you fix distorted audio?
Removing distortion from audio can be a challenging task depending on the nature and severity of the distortion. Here are some general steps you can take to try and fix distorted audio:
- Identify the type and source of distortion.
- Check hardware connections for issues.
- Adjust volume and gain levels to prevent clipping.
- Use an equalizer (EQ) to balance frequencies and reduce distortion.
- Apply noise reduction to clean up the background noise.
- Utilize normalization to even out the audio levels.
- Apply compression to control dynamic range and reduce peaks.
- Consider using de-clip or de-distort plugins for severe cases.
- Try time stretching or compressing to adjust audio timing.
- Re-record distorted sections if possible.
- Utilize a limiter to prevent audio from exceeding a certain level and avoid further distortion.
- Consider using professional audio restoration software for complex distortion.
2. How do I get rid of fuzziness in Audacity?
To eliminate fuzziness and static sound in Audacity, follow the steps below:
- Open Audacity and import your audio clip.
- Click the magnifier to zoom in on the waveform.
- Select the track and go to "Effect" > "Noise Removal and Repair" > "Noise Reduction…"
- Tune up the values and click "Preview" > "OK".
3. How do I make distorted audio clear?
To make distorted audio clearer, follow these steps:
- Identify the cause of distortion.
- Use noise reduction to minimize background noise.
- Normalize the audio to optimize levels.
- Apply EQ to balance frequencies and reduce harshness.
- Consider using de-clip or de-distort plugins.
- Use a compressor or amplifier to control volume fluctuations.
- Adjust timing with time stretching.
- Re-EQ and adjust reverb for clarity.
- Try harmonic exciters for added presence.
- Manually adjust volume with automation.
- Use professional audio restoration software if needed.
- Work with high-quality audio sources for better results.