-
Jane is an experienced editor for EaseUS focused on tech blog writing. Familiar with all kinds of video editing and screen recording software on the market, she specializes in composing posts about recording and editing videos. All the topics she chooses are aimed at providing more instructive information to users.…Read full bio
-
![]()
Melissa Lee
Melissa Lee is a sophisticated editor for EaseUS in tech blog writing. She is proficient in writing articles related to screen recording, voice changing, and PDF file editing. She also wrote blogs about data recovery, disk partitioning, data backup, etc.…Read full bio -
Jean has been working as a professional website editor for quite a long time. Her articles focus on topics of computer backup, data security tips, data recovery, and disk partitioning. Also, she writes many guides and tutorials on PC hardware & software troubleshooting. She keeps two lovely parrots and likes making vlogs of pets. With experience in video recording and video editing, she starts writing blogs on multimedia topics now.…Read full bio
-
![]()
Gloria
Gloria joined EaseUS in 2022. As a smartphone lover, she stays on top of Android unlocking skills and iOS troubleshooting tips. In addition, she also devotes herself to data recovery and transfer issues.…Read full bio -
![]()
Jerry
"Hi readers, I hope you can read my articles with happiness and enjoy your multimedia world!"…Read full bio -
Larissa has rich experience in writing technical articles and is now a professional editor at EaseUS. She is good at writing articles about multimedia, data recovery, disk cloning, disk partitioning, data backup, and other related knowledge. Her detailed and ultimate guides help users find effective solutions to their problems. She is fond of traveling, reading, and riding in her spare time.…Read full bio
-
![]()
Rel
Rel has always maintained a strong curiosity about the computer field and is committed to the research of the most efficient and practical computer problem solutions.…Read full bio -
![]()
Dawn Tang
Dawn Tang is a seasoned professional with a year-long record of crafting informative Backup & Recovery articles. Currently, she's channeling her expertise into the world of video editing software, embodying adaptability and a passion for mastering new digital domains.…Read full bio -
![]()
Sasha
Sasha is a girl who enjoys researching various electronic products and is dedicated to helping readers solve a wide range of technology-related issues. On EaseUS, she excels at providing readers with concise solutions in audio and video editing.…Read full bio
Content
Jean
Updated On 08/16/2024
0 Views |
0 min read
PAGE CONTENT:
As a content creator, you're constantly at war with background noises. You often record your best attempt on a song or podcast, only to see it ruined by the constant gasps or windy sounds. It affects sound clarity, and the users fail to connect with your voice and message. So, it is essential to remove background noise from audio.
The background noise can come from the environment (traffic, wind, vehicle), room equipment (fans, lights, ACs), and processes (compression, equalization). It is humanly impossible to control/ remove all these sounds manually. You need AI-based tools to separate vocals from background noise.
Audacity is the leader in this genre; you can use it to remove the background noise from audio online for free with two distinct methods. Here is the summary of both methods
| Feature | Noise Reduction Method | Noise Gate Method | EaseUS VideoKit |
| Ideal for | Constant high-frequency noise (Fans, traffic, brisk wind, and all routine sounds) | Small frequency noise (Breathing, lip sounds) | All noise |
| Effectiveness | High | Moderate | Very High |
| Requirements | Built-in feature | Plug-in needed for some versions | Download |
| Difficulty | Easy | Medium | Super easy |
| Completion Time | Less | Slightly Higher | Lesser |
How to Reduce Background Noise in Audacity
Before jumping straight to applying noise reduction with Audacity, let's briefly see what the software is all about.
Audacity is an open-source, free-to-use software for audio recording and editing. The software is compatible with Windows, macOS, Linux, and other operating systems. It is known for studio-quality sound and ease of usage.
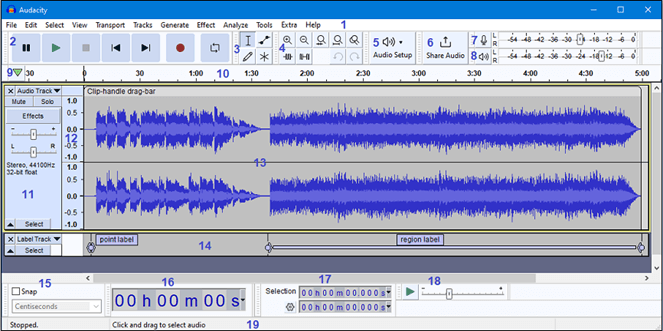
With Audacity, you can
- record live or instrument sounds,
- edit all audio files (MP3, WAV, FLAC, MP2, etc.)
- Cut, Copy, Mix, and Slice multiple tracks
- Change, speed, temp, the background of a recording
You can use the following two methods to remove background noise from audio files with Audacity.
1. Audacity Noise Reduction Method
The Audacity has a noise reduction feature to remove constant background noises. You can use it to remove the hiss of fans, the buzz of winds, and all such sounds. The process of background removal is straightforward.
Follow these steps to use the Audacity Noise Reduction Method.
Step 1. Download and Install the Audacity app on your system
Step 2. Open the app and create a new audio file. (Spoken words, song, or any other audio).
Step 3. Select the noisy section on the visible audio timeline. It shouldn't have any other audio.
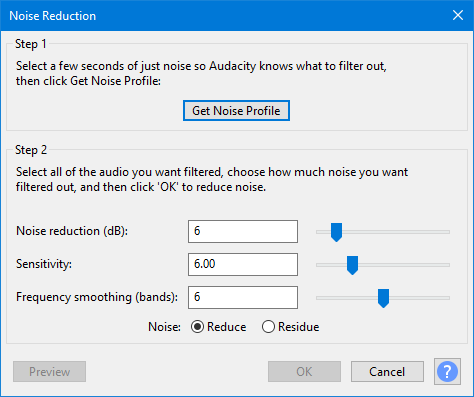
Step 4. Click on the "Effect." Check out the Effects menu and select the "Noise Reduction" option.

Step 5. Click the Get Noise Profile Button in the pop-up window. It will select background noise voice for further work.
Step 6. After this, the menu will show you three variables; Noise Reduction (dB), Sensitivity, and frequency smoothing bands.
Step 7. You can manually adjust each variable's value, select the "Reduce" option, and click OK. The software will remove background noises from selected parts.

Step 8. Watch the preview. If you require any more changes, you can use the manual option.

Step 9. Press CTRL+ A to select the entire track.
Step 10. Go back to Noise Reduction and apply these changes to the whole track.
Step 11. The background sounds will be removed.
You can watch this video that may help you a lot.
2. Audacity Noise Gate Method
Noise Gate is ideal for removing more sophisticated noises like breathing, lip-smacking, or unwanted instrument sounds. They are usually low in frequency and hard to detect. The Noise Gate acts like a barrier that only allows sounds above the threshold to pass, and the rest are removed. It provides a clean output voice.
This is how you can use the Audacity Noise Gate Method.
Step 1. Check whether your Audacity has a Noise Gate plug-in. If not, click on Effects> add/remove plug-ins>Noise Gate plug-in.
Step 2. Record an audio file. Right-click on the "Audio Track" option available on the left of the interface.

Step 3. Choose "Waveform (dB)." The Audacity will show more prominent and refined waveforms of your audio file.

Step 4. Use your mouse to enlarge the track size further. Play the waveform and locate breathing or buzzy sounds. You can see its maximum frequency.

Step 5. Go to Effects and choose the "Noise Gate" option.
Step 6. You will find the "Gate Threshold" and the "Level Reduction" options in the Noise Gate Window. Both factors are equally important.
Gate Threshold is the value below which the noise will be removed.
Level Reduction controls the amount of audio signal reduction.
Step 7. Select the values of both features and press "OK."

Step 8. The software will take time and remove all such noises. It can take from minutes to hours, depending on file size.
Step 9. Your clear audio file is ready.
You may want to know:
Pro Tip: Best Alternative to AI Reduce Noise in Audacity🔥🔥
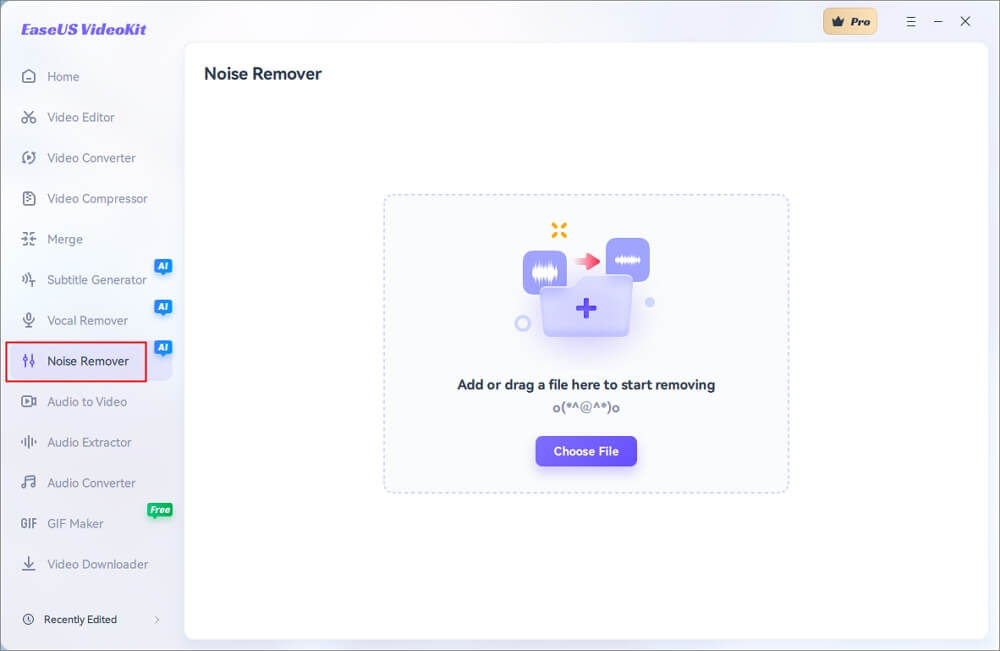
Although Audacity is an excellent app for AI-based voice reduction, it can sometimes fail to produce the desired results. Plus, for studio-quality sound, you need a more sophisticated option. If your Audacity app isn't working correctly, we recommend you use EaseUS VideoKit, a world-class audio/video recording and editing software.
- 🏅Ratings: 4.5 out of 5
- 💻Compatibility: Windows 7/8/10/11 and MacOS 10.3 and later
- 💵Price: $0 - $79.95 (According to the selected version)
EaseUS VideoKit, this perfect AI noise remover, uses the latest AI-driven background noise remover, which uses cutting-edge AI to remove background noise from an audio/video file. It combines AI Algorithms and deep machine learning to identify all types of noises. After this, you can seamlessly remove background noise without affecting the original sound. It provides clear, sharp, and crisp output sound. It can perform many sophisticated operations, like removing wind noise from a video. The EaseUS Videokit is essential for making high-quality podcasts, songs, videos, and music recordings.

EaseUS Video kit offers other audio features, including a vocal remover and an audio extractor. You can edit partial or complete main audio from a file with vocal remover. At the same time, the audio extractor can extract audio from any video. You can save audio in MP3 and use it for future content creation. It also allows you to cut, copy, paste, and mix different sounds. There isn't any file size limit either. It can apply these changes to all files with no exceptions. EaseUS VideoKit is your complete workstation from home.
Another glowing aspect of the EaseUS Video kit is its video editing. It supports more than 1000+ video formats. It can accept and edit 4K/8K videos with ease. It allows you to trim, edit, and merge videos. You can add backgrounds, subtitles, and watermarks to your content. Since Audacity is only concerned with audio, it can't compete with EaseUS Video Kit in video editing. It makes the EaseUS Video Kit a more feasible option for content creators.
If you're a Windows or Mac user, Install the latest EaseUS VideoKit Version today. It will remove all your background noise problems and take your content creation to the next level. Now, follow some steps.
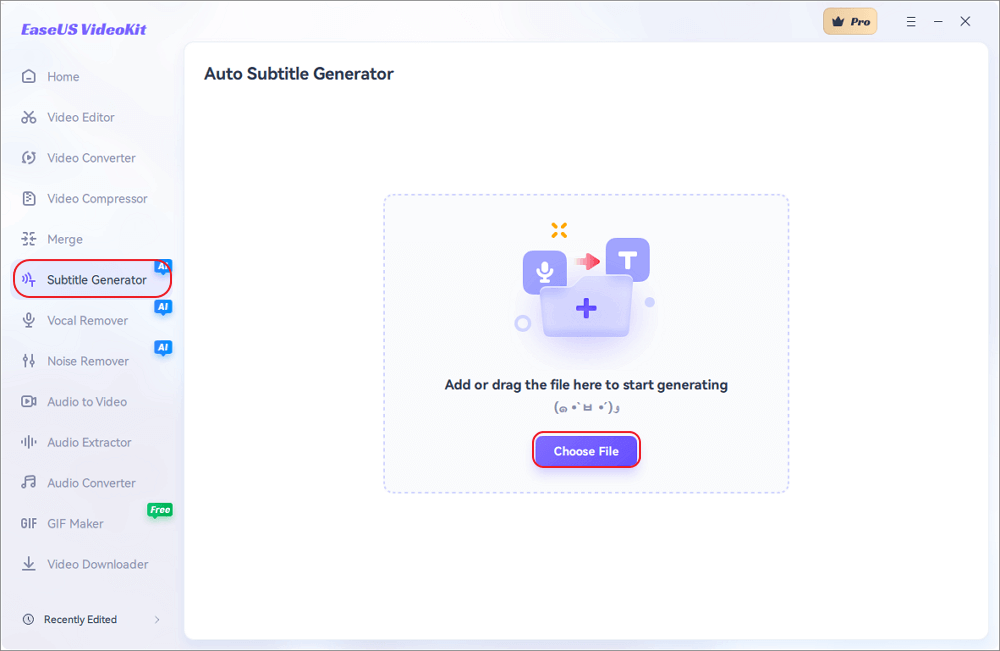
Step 1. Open EaseUS VideoKit and find the "Subtitle Generator" panel.
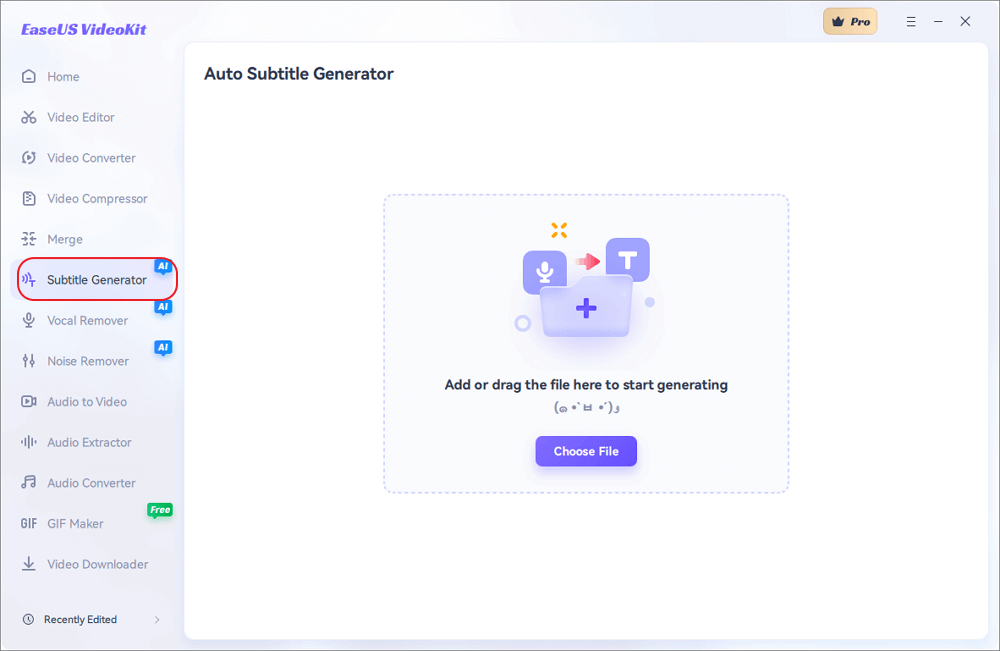
Step 2. Click "Choose File" or drag the YouTube video file to the interface.
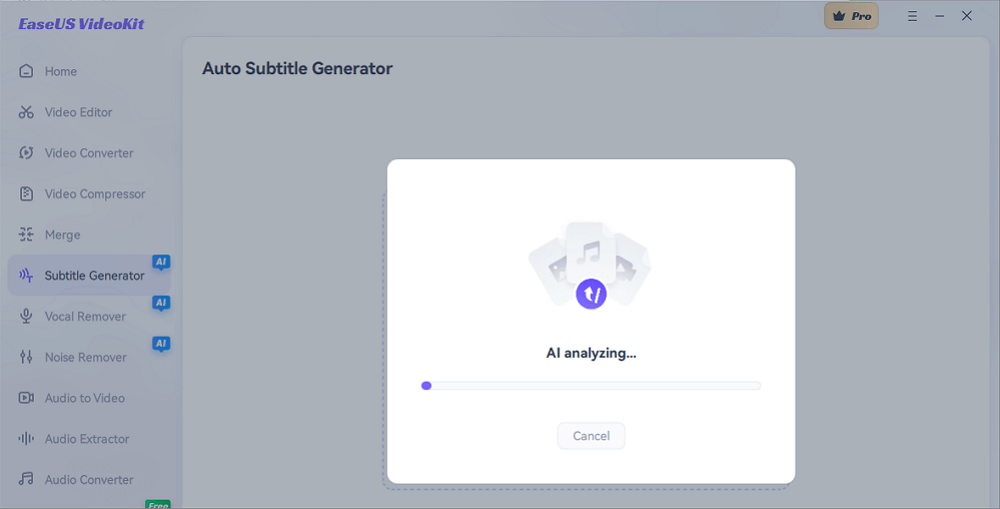
Step 3. Wait for the AI analyzing.
Step 4. Click the "Text" button to change the text, or customize font, background, and position under "Style" menu.
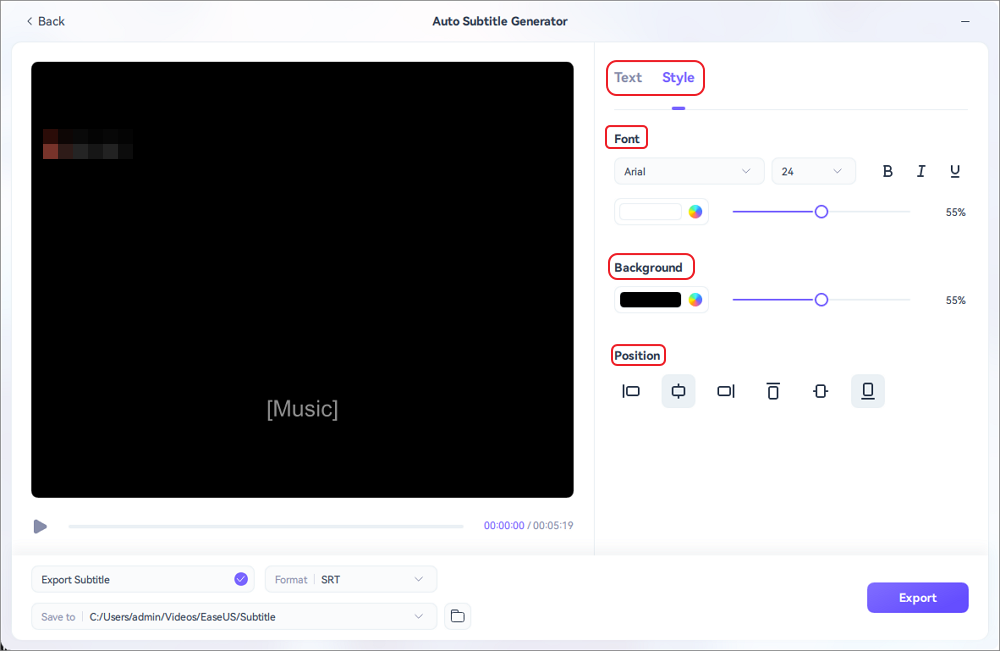
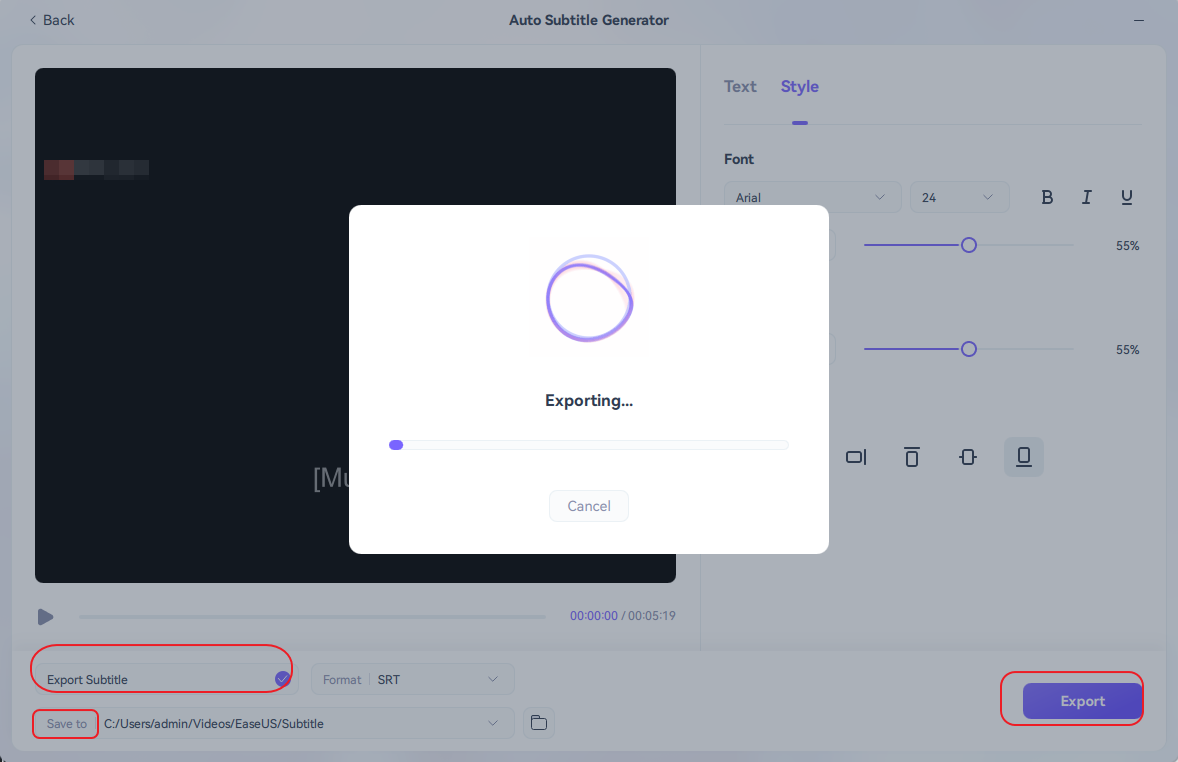
Step 5. Click "Export Subtitle" to select exported subtitle format, "Save to" to change location, and press "Export" to export the video with subtitles.
Share this post with others to help more people know how to remove background noise with EaseUS VideoKit.
Conclusion
Background Noise is the ultimate deal breaker in content creation. Any content with an annoying background receives negative reviews and is destined to fail. This article explains how to remove background noise in Audacity. We have discussed two methods: the Audacity Noise Reduction Method and the Audacity Noise Gate method.
The introduction and step-wise process of each method has been provided. You can pick anyone as per requirement. If Audacity does work or you want a higher quality sound, you can use EaseUS VideoKit as as an alternative. It can instantly remove background noise from all audio files. Download it now and start rocking the content creation industry.
How to Remove Background Noise in Audacity FAQs
These are the most searched questions about removing background noise in Audacity. If you have any other queries, you can always comment below.
1. How do I remove a specific sound in Audacity?
You can use the Audacity Noise Reduction method to remove any specific sound from Audacity. Follow these steps
Step 1. Upload the audio with the specific sound on Audacity.
Step 2. Select the small area with a specific sound.
Step 3. Click on Effects, Noise Reduction, and Noise Profile.
Step 4. In Noise Profile, select Noise Reduction to the maximum. It will remove the sound.
Step 5. Now press CTRL+A to select the entire file and apply the same settings.
Step 6. The sound will be removed.
2. What tool in Audacity is used to remove unwanted noise?
To remove sounds, Audacity uses Noise Reduction and Noise Gate tools. You can choose any one as per requirement.
3. Can you separate sounds in Audacity?
You can separate sounds using the Edit, Audio Clips, and Split option in the Audacity app. You can find all separate options in the Split menu.