-
![]()
Sofia Albert
Sofia has been involved with tech ever since she joined the EaseUS editor team in March 2011 and now she is a senior website editor. She is good at solving various issues, such as video downloading and recording.…Read full bio -
![]()
Melissa Lee
Melissa Lee is a sophisticated editor for EaseUS in tech blog writing. She is proficient in writing articles related to screen recording, voice changing, and PDF file editing. She also wrote blogs about data recovery, disk partitioning, data backup, etc.…Read full bio -
Jean has been working as a professional website editor for quite a long time. Her articles focus on topics of computer backup, data security tips, data recovery, and disk partitioning. Also, she writes many guides and tutorials on PC hardware & software troubleshooting. She keeps two lovely parrots and likes making vlogs of pets. With experience in video recording and video editing, she starts writing blogs on multimedia topics now.…Read full bio
-
![]()
Gorilla
Gorilla joined EaseUS in 2022. As a smartphone lover, she stays on top of Android unlocking skills and iOS troubleshooting tips. In addition, she also devotes herself to data recovery and transfer issues.…Read full bio -
![]()
Rel
Rel has always maintained a strong curiosity about the computer field and is committed to the research of the most efficient and practical computer problem solutions.…Read full bio -
![]()
Dawn Tang
Dawn Tang is a seasoned professional with a year-long record of crafting informative Backup & Recovery articles. Currently, she's channeling her expertise into the world of video editing software, embodying adaptability and a passion for mastering new digital domains.…Read full bio -
![]()
Sasha
Sasha is a girl who enjoys researching various electronic products and is dedicated to helping readers solve a wide range of technology-related issues. On EaseUS, she excels at providing readers with concise solutions in audio and video editing.…Read full bio
Content
Why Your Audio Sound Like a Robot
Remove Robot Voice in Audacity Step-by-Step
Isolate Vocals from Noise Online for Free
Final Words
FAQs About Remove Robot Voice in Audacity
Dawn Tang
Updated On 03/20/2025
365 Views |
4 min read
Robot voice in your audio can be really irritating and is a result of various factors. The recording errors and overdoing of post-processing effects can take a toll on your audio and make it sound metallic or robotic.
If you are also troubled by the inclusion of robot voice, you have to work around a few filters in Audacity to get rid of it. Learn how to remove robot voice in Audacity with a detailed Audacity tutorial and the best vocal remover.
Why Your Audio Sound Like a Robot
Many factors contribute to your audio to sound like a robotic voice. Let us look at the reasons for robotic voice and good practices to know how to enhance audio quality.
1. Echo and Communication issues: The robotic voice can sometimes be introduced in the recording setup rather than in audio processing. If any of the instruments introduce echo or distortion, it will degrade the audio quality.
2. Audio Processing and Mic Technique:
Similarly, the metallic voice or robotic tint can also result from some audio processing.
- Overprocessing: If you are overusing audio effects like compression, normalization, or Audacity noise gate, they can strip away the natural dynamics of the audio and make it sound unnatural.
- Low Input Volume: If you are someone with a low voice and use effects to boot voice in post-processing, it will exaggerate noise and add the robotic tint. Also, learn how to remove vocals from a song in Audacity, if the voice is low.
Let us see what we can do to address the issue by following some good recording and editing practices:
- Record your audio with the best possible quality. Ensure your microphone is set properly and you have a quiet room to remove echo from audio in Audacity.
- Use noise reduction before anything else to remove the unwanted noise. If you apply various effects without filtering out the unwanted noise, you enhance them along with the audio.
- Use the effects moderately to enhance the audio. Try and test various levels to find the best one before applying it to the audio.
Do not hesitate to spread the word to help others in need!
Remove Robot Voice in Audacity Step-by-Step
Now, if your audio is affected by robotic or metallic tint, you can use the open-source program Audacity to correct it and make it sound natural. Let us know about the effects we will be using to remove the robot voice in detail.
- Noise Gate: It is impossible to avoid unwanted noises even with studio-level equipment. While processing, we must remove those voices using noise reduction in Audacity.
- EQ (Filter Curve EQ): Equalization allows us to manipulate sounds of various frequencies. You can increase volumes of some frequencies and reduce others. You can use EQ for click removal Audacity.
- Clip Fix: Audio clipping happens when a signal exceeds the maximum limits of the recording, seen as flattened tracks in DAWs. Audio clipping introduces distortion and harsh and unpleasant sounds.
Let us dive right into how to use these effects to remove robotic voice in Audacity:
Step 1. Open the Audio file in Audacity.
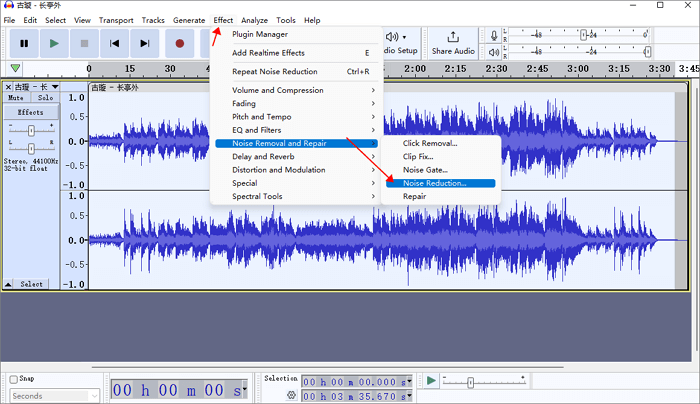
Step 2. At first, we use the "Noise Gate" to derive a "Noise Profile" and remove the unwanted noises in the audio.
Select a part of the noise with no actual audio (external noise), and navigate to "Effects" > "Noise Removal and Repair" > "Noise Reduction."
Click on "Get Noise Profile" to generate a noise profile for the audio. This effect also helps you to know how to remove breathing from audio in Audacity.
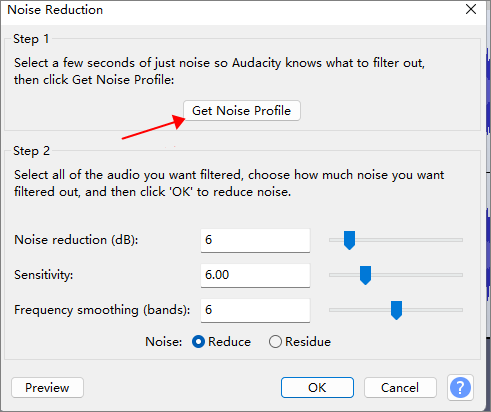
Now, press "Ctrl + A" to select the complete audio. Again, go to the "Effects" > "Noise Removal and Repair" > "Noise Reduction" settings.
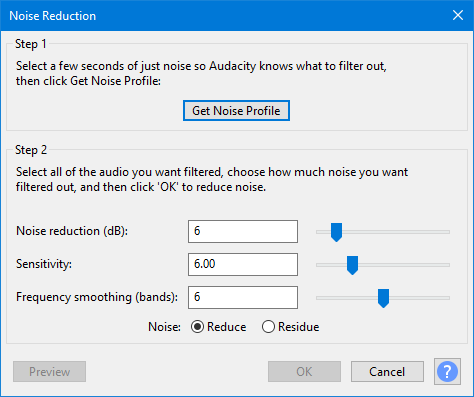
Adjust the Noise Reduction, Sensitivity, and frequency sliders to control the amount of noise reduction. Click on "Preview" to check the audio, and "OK" if you are satisfied.
Step 3. Now, we will use the "Clip Fix" effects to adjust the audio clipping and restore the audio in a natural way.
Come back to the landing page, go to "View" > "Show Clipping (on/off)" and see the clipping. You will find the audio clippings in red.
Now, Navigate to "Effect" > "Noise Removal and Repair" > "Clip Fix" and open it.

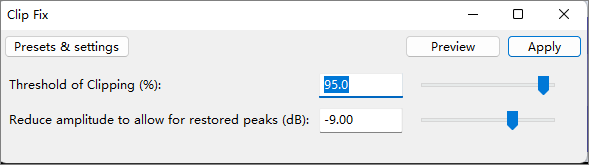
Clip Fix offers two values to apply to the audio:
- Threshold clipping (%): This parameter allows you to set a threshold percentage considering the maximum level above which the audio is considered clipping. The recommended value is 95%.
- Reduce amplitude to allow for restored peaks (dB): This allows you to create headroom for repairs while reducing the Amplitude of the selected region. The default value is -9 dB.
Step 4. Let's work with various sounds to go up or down the frequencies. You can do this with "Filter curve EQ." Try turning down the sounds to remove vocals if Audacity vocal remover not working.
Select the audio, and "Effects" > "EQ and Filters" > "Filter Curve EQ." Here, you will see a graph with frequencies on the X-axis and Sound on the Y-axis.

To apply things automatically, click on "Presets & Settings" and select the options. For manual, just tap on the desired frequency and use the trackpad or mouse to change the sound.

Step 5. After completing the process, check the audio to see if the robotic tint is gone. Now, to export the audio, click on "File" > "Export" to see the available download options.

Isolate Vocals from Noise Online for Free
All of this may seem overwhelming if you are not into audio production or just want to remove robot voice from your audio for once. What if you can remove robotic sound from voice online for free with just simple steps? With EaseUS online Vocal Remover, you can improve your audio recording quality in seconds.
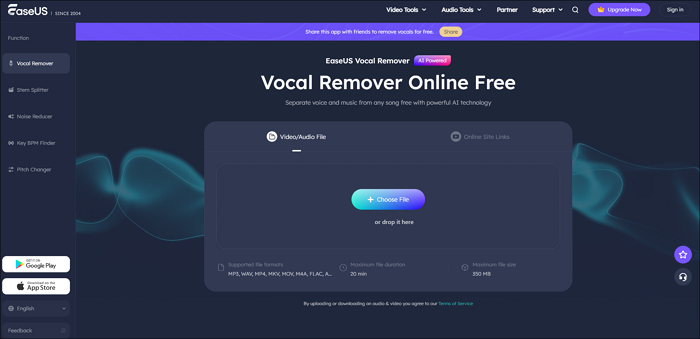
The AI-powered tool analyses the audio and removes the unwanted noise responsible for the robot's voice to generate a high-quality audio file. Additionally, you can use this tool to remove background music from video online free, separate vocals, karaoke, and acapella. You just have to upload the file and let the AI do the job.
Key Features of EaseUS Online Vocal Remover:
- Remove the robot voice for free online.
- Separate vocals from background noise, and download the file.
- MP3, WAV, AAC, AIFF, M4A, FLAC, and audio formats are supported.
- No limit on files, and remove vocals from YouTube links.
Powered by Advanced AI
Final Words
Robotic voice can be pretty irritating and ruins the entire audio or music file quality. There are many reasons that contribute to the overall robotic voice tint in the audio. Learn the recording tips and how to remove robot voice in Audacity by following the step-by-step guide.
The simplest method to remove robotic or metallic tint in your audio is to use the online vocal remover. All you need to do is upload the file and let the AI do its magic to enhance the audio quality.
FAQs About Remove Robot Voice in Audacity
Here are some of the most frequent FAQs asked about removing robot voice using Audacity. I hope you find these queries helpful.
1. How do I get rid of robotic tone?
The robotic tone is a mixture of unfriendly recording practices and post-processing effects. To get rid of it:
- Record the audio in quiet environments and a good microphone.
- Upload the audio to Audacity, and remove the unwanted noises using a Noise Reduction filter.
- Apply EQ and Clip Fix to make the audio sound natural.
- Export the audio file in the desired format.
2. How do I make my voice clear in Audacity?
- Open Audacity and upload the audio file.
- Open the "Effects" > "EQ and Filters" > "Filter Curve EQ."
- Reduce the sounds for frequencies below 60 Hz using the graph.
- Now, apply Bass and Treble boost to make your voice more clear.
3. How do I make my voice robotic in Audacity?
- Launch Audacity and record your voice.
- Copy the audio, go to "Tracks" > "Add New" > "Stereo Track," and duplicate the audio twice.
- Now, use the time shifter tool to move the tracks ahead, and late by a second or so.
- Preview the audio, and you will have your robot voice.
See this detailed YouTube Tutorial to make your voice robotic in Audacity.