-
![]()
Sofia Albert
Sofia has been involved with tech ever since she joined the EaseUS editor team in March 2011 and now she is a senior website editor. She is good at solving various issues, such as video downloading and recording.…Read full bio -
![]()
Melissa Lee
Melissa Lee is a sophisticated editor for EaseUS in tech blog writing. She is proficient in writing articles related to screen recording, voice changing, and PDF file editing. She also wrote blogs about data recovery, disk partitioning, data backup, etc.…Read full bio -
Jean has been working as a professional website editor for quite a long time. Her articles focus on topics of computer backup, data security tips, data recovery, and disk partitioning. Also, she writes many guides and tutorials on PC hardware & software troubleshooting. She keeps two lovely parrots and likes making vlogs of pets. With experience in video recording and video editing, she starts writing blogs on multimedia topics now.…Read full bio
-
![]()
Gorilla
Gorilla joined EaseUS in 2022. As a smartphone lover, she stays on top of Android unlocking skills and iOS troubleshooting tips. In addition, she also devotes herself to data recovery and transfer issues.…Read full bio -
![]()
Rel
Rel has always maintained a strong curiosity about the computer field and is committed to the research of the most efficient and practical computer problem solutions.…Read full bio -
![]()
Dawn Tang
Dawn Tang is a seasoned professional with a year-long record of crafting informative Backup & Recovery articles. Currently, she's channeling her expertise into the world of video editing software, embodying adaptability and a passion for mastering new digital domains.…Read full bio -
![]()
Sasha
Sasha is a girl who enjoys researching various electronic products and is dedicated to helping readers solve a wide range of technology-related issues. On EaseUS, she excels at providing readers with concise solutions in audio and video editing.…Read full bio
Content
What Is Audio Normalization in Premiere Pro
How to Normalize Audio Levels in Premiere Pro
Reduce Audio Noise Online for Free
Final Words
FAQs About How to Level Audio in Premiere
Dawn Tang
Updated On 03/20/2025
8242 Views |
5 min read
While editing videos, achieving consistent audio quality is a basic goal of creators. Whether you're a filmmaker or content creator, ensuring your audio levels are balanced and distortion-free is essential.
This "How to Normalize Audio in Premiere Pro" guide shows the essential techniques and best practices to help you. From equalizing audio to how to remove clicking noise from audio, we'll walk you through the steps to attain professional-grade audio quality.
Whether you're new to Premiere Pro or want to improve your skills, we'll help you with how to remove wind noise in Premiere Pro. Moreover, the article introduces the best vocal remover that is free to use.
| Methods📑 | Effectiveness🪄 | Difficulty🔍 |
| Normalize audio before editing. | Easy | |
| From the timeline | Normalize individual clips. | Easy |
| Using G | The fatest way. | Super easy |
| Normalize mix track | Normalize multiple audio clips. | Moderate |
What Is Audio Normalization in Premiere Pro
Audio normalization is analyzing the amplitude of an audio signal and adjusting it to a specific level. Audio normalization in Premiere Pro helps you achieve consistent and balanced audio levels throughout a video project.
It can also remove echo from audio in Premiere Pro. It adjusts the volume of audio clips to a specific level, ensuring the audio remains clear and distortion-free.
It helps you with how to enhance audio quality. You can apply normalization to individual audio clips or entire audio tracks. Here is why you should choose Premiere Pro among Davinci Resolve vs. Premiere Pro.
| Balanced Audio Levels | The main function of normalization is to ensure that the audio levels are balanced. Normalization prevents parts of your video from being too quiet or loud, providing an enjoyable experience. |
| Avoiding Clipping | Clipping occurs when audio levels exceed the maximum allowed volume. Normalizations help prevent audio clipping that can cause distortion and reduce audio quality. |
| Multiple Clips | When you're working with multiple audio clips from different sources or recorded at various levels, normalization can help unify their volumes. |
| Dialogue clarity | Audio normalization ensures that all spoken parts are clear and audible, even if they were recorded at different levels. |
| Music and Sound Effects | When combining sound effects with dialogue or other audio elements, normalization ensures that these elements blend seamlessly. |
Did you find the information helpful? Share it with your friends on social media!
How to Normalize Audio Levels in Premiere Pro
Audio normalization is essential to clean up audio levels in your Premiere Pro projects. Whether you're adjusting individual clips or an entire mix track, here are the ways to help you remove distortion from audio.
1. Normalize Volume from the Project Panel
When organizing your project and preparing audio clips before editing, you can normalize the audio directly from the Project Panel. It helps ensure that all your audio parts are at a consistent level from the start. Follow these steps to normalize volume to remove echo from audio:
Step 1. Click on the audio clips you want to normalize in the Project Panel. If you want to add more tracks, you can select them using Ctrl+Click. Drag the tracks to the timeline and export the waveform to look bigger.

Step 2. Select the entire clip using the Ctrl+A key in Windows and the Cmd+A key in macOS. Or you can choose specific tracks with the Ctrl+Click key.
Step 3. Right-click on any selected audio and choose "Audio Gain."
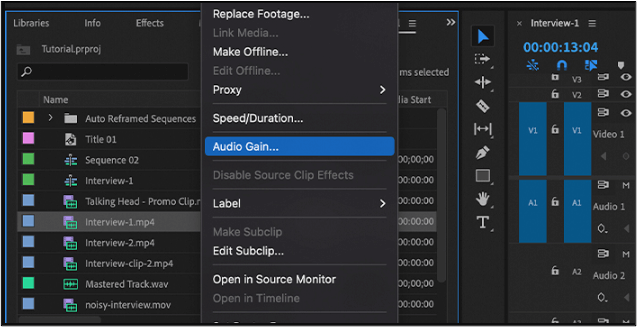
Step 4. In the Audio Gain dialog box, you can specify the target volume level from -3dB to 0dB. The ideal gain is 0dB.
Step 5. Preview the final audio before exporting.
2. Normalize Volume from the Timeline
When you're working directly in the Timeline, you can normalize the audio levels for individual clips. Here's how:
Step 1. Select the audio clip in the Timeline that you want to normalize.
Step 2. From the "Audio" menu, select "Audio Gain."

Step 3. Adjust the "Normalize Max Peak" from 0dB to -3dB.
Step 4. Click "OK" to apply the normalization to the selected clip. Repeat this process for other clips as needed.
3. Normalize Volume Using the Shortcut G
Premiere Pro offers a keyboard shortcut to quickly normalize audio levels while editing.
Step 1. Select the Clip to normalize.
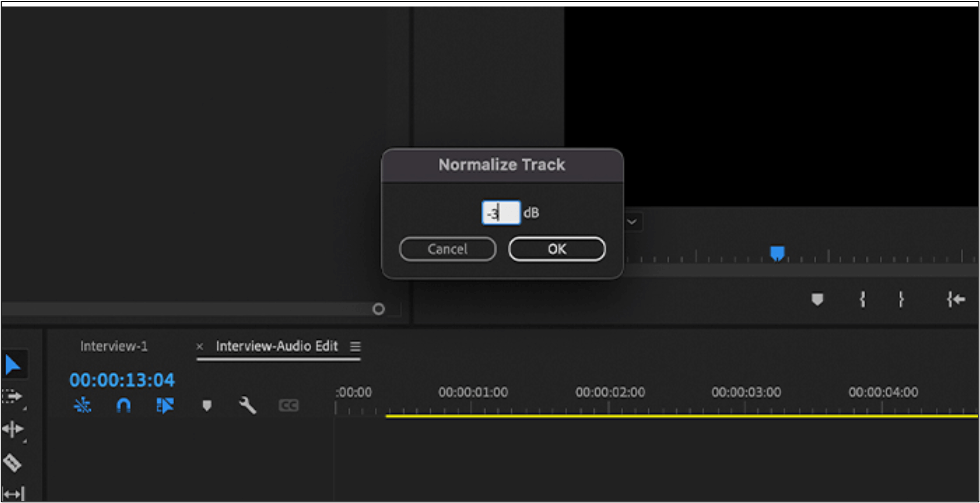
Step 2. Press the "G" Key on your keyboard.

Step 3. This keyboard shortcut will open the "Normalize Track" window. Add the target value of 0dB or –3dB and click "OK" to apply the effect.

Watch the YouTube video to follow the visual instructions to normalize audio using the Shortcut G.
- 0:00 Tutorial start
- 0:09 Check out my presets
- 0:34 Getting started
- 0:59 Audio gain
- 1:38 Wrap up
- 1:58 Like and subscribe
4. Normalize Mix Track
The audio mix track is the combined audio of all clips on your Timeline. Normalizing the audio mix tracks may be a complex process. Follow the steps to normalize the mix tracks and remove background noise from video Premiere Pro:
Step 1. Select the Mix Track in Premiere Pro.
Step 2. Go to the "Audio" menu and select "Normalize mix Track."

Step 3. Adjust the normalization value to -3dB.
Reduce Audio Noise Online for Free
To achieve professional audio quality, dealing with unwanted background noise or vocal interference is a significant challenge. EaseUS Online Vocal Remover is a convenient and powerful solution. Its AI audio enhancer tools offer multiple features to help you remove background music from video online free. This is why you should choose it over Premiere on noise removal.
| Feature | Adobe Premiere Pro | EaseUS Online Vocal Remover |
| Main Function | Video editing, including audio manipulation. | Audio processing, focusing on noise removal and vocal extraction. |
| Purpose | Comprehensive video and audio editing. | Specialized in audio enhancement and vocal removal. |
| Real-Time Processing | Yes, but it can be resource-intensive. | Offers real-time processing for audio enhancement. |
| Noise Removal | Available but may require plugins. | Specializes in noise removal from audio recordings. |
| Vocal Extraction | Not the primary focus. | Specialized tool for extracting vocals from audio. |
| Ease of Use | Complex and requires a learning curve. | User-friendly and accessible for all skill levels. |
| Cost | $20.99/month. | Offers a free online version with premium options. |
It improves the clarity of your audio recordings. EaseUS Online Vocal Remover is basically designed to separate vocals from background noise. It effectively reduces the audio background noise and unwanted elements to improve audio quality. Whether you want to remove echoes, clicks, or distortion, its valuable tools will help you refine your audio perfectly.
- Excels in removing noises and distortion from music tracks.
- With a one-click process, you don't need advanced editing skills.
- Supports a wide range of audio file formats.
- No limit on the number of files you can process.
- Process audio files with larger file sizes of up to 350MB.
Powered by Advanced AI
Final Words
Mastering audio normalization in Premiere Pro is an essential skill for video editors and content creators. Achieving balanced and distortion-free audio not only enhances the quality of your videos but also ensures a better experience.
This guide on "How to Normalize Audio in Premiere Pro" covers a range of techniques, from equalization to even-out audio levels. By following these steps and best practices, you can elevate the audio quality of your projects.
If you're looking for a more precise method, EaseUS Online Vocal Remover ensures maximum accuracy. With its simple process, you can process any audio within seconds.
FAQs About How to Level Audio in Premiere
Premiere Pro serves features to improve your audio quality. If you want to enhance your audio quality in Premiere Pro, below are some tips for you.
1. How do I equalize audio in Premiere Pro?
Equalizing audio in Premiere Pro allows you to adjust the frequencies of your audio to achieve the desired sound quality. To equalize audio in Premiere Pro, follow these steps:
Step 1. Select the audio clip.
Step 2. Open the Effects panel "Window" > "Effects."
Step 3. Search for and drag the Parametric Equalizer effect onto the clip or track. The Parametric Equalizer window will open.
Step 4. Adjust the volume of different frequencies in frequency bands.
2. How do I even out audio levels in Premiere?
You can even out your audio levels using the audio gain tool. To use the Audio Gain tool, follow these steps:
Step 1. Select the audio clip that you want to adjust.
Step 2. Open the Audio Gain window ("Window" > "Audio Gain").
Step 3. In the Audio Gain window, you can see the current volume level of the audio clip. Use the Gain slider to set the volume level.
Step 4. Select the Normalize checkbox to normalize the audio clip.
3. How do I fix unbalanced audio in Premiere Pro?
To fix unbalanced audio in Premiere Pro:
Step 1. Import your video or audio clip into Premiere Pro.
Step 2. Open the "Window" menu and select "Audio Mixer."
Step 3. Locate the track with unbalanced audio.
Step 4. Use the channel sliders to balance the audio levels between the left and right channels.
If needed, apply audio effects like "Balance" or "Fill Left" and "Fill Right" to further adjust audio balance.