-
![]()
Joey Albert
Joey has been involved with tech ever since she joined the EaseUS editor team in March 2011 and now she is a senior website editor. She is good at solving various issues, such as video downloading and recording.…Read full bio -
![]()
Alin
Alin is a sophisticated editor for EaseUS in tech blog writing. She is proficient in writing articles related to screen recording, voice changing, and PDF file editing. She also wrote blogs about data recovery, disk partitioning, data backup, etc.…Read full bio -
Jean has been working as a professional website editor for quite a long time. Her articles focus on topics of computer backup, data security tips, data recovery, and disk partitioning. Also, she writes many guides and tutorials on PC hardware & software troubleshooting. She keeps two lovely parrots and likes making vlogs of pets. With experience in video recording and video editing, she starts writing blogs on multimedia topics now.…Read full bio
-
![]()
Gorilla
Gorilla joined EaseUS in 2022. As a smartphone lover, she stays on top of Android unlocking skills and iOS troubleshooting tips. In addition, she also devotes herself to data recovery and transfer issues.…Read full bio -
![]()
Rel
Rel has always maintained a strong curiosity about the computer field and is committed to the research of the most efficient and practical computer problem solutions.…Read full bio -
![]()
Dawn Tang
Dawn Tang is a seasoned professional with a year-long record of crafting informative Backup & Recovery articles. Currently, she's channeling her expertise into the world of video editing software, embodying adaptability and a passion for mastering new digital domains.…Read full bio -
![]()
Sasha
Sasha is a girl who enjoys researching various electronic products and is dedicated to helping readers solve a wide range of technology-related issues. On EaseUS, she excels at providing readers with concise solutions in audio and video editing.…Read full bio
Page Table of Contents
Dawn Tang
Updated on Jan 21, 2026
0 Views |
0 min read
Welcome to the world of video editing in Premiere Pro! Adding subtitles to videos can greatly enhance their accessibility and reach a broader audience, especially for those with hearing impairments.
In this guide, we will take you through the step-by-step process of how to add captions to YouTube videos using Premiere Pro. Whether you're a seasoned video editor or just getting started, this tutorial will help you master the art of incorporating subtitles seamlessly into your projects. Let's dive in and unlock the power of subtitles in Premiere Pro!
| Methods | Effectiveness | Suitable for |
|---|---|---|
| Automatic way | Transcribe sequence with the speech-to-text feature. | Long sequences |
| Manual way | Create a new caption track and customize the subtitles. | Short sequences |
Why Can't Add Captions in Premiere Pro
You can remove background noise in Premiere Pro, but if you are unable to add captions to it, several issues may be at play. First, ensure video format compatibility and match project settings with your video to avoid any issues.
And make sure you use the correct subtitle format (SRT or WebVTT) and see to it that a caption track is present in the timeline. Then, import caption files correctly through the "File" menu.
Moreover, it's crucial to keep Premiere Pro updated regularly to benefit from bug fixes and new features that enhance captioning capabilities. Should you encounter corrupted projects, address the problem by creating new ones and re-importing media and subtitles.
Furthermore, verify your computer's resources to prevent any hindrance during the captioning process. Consider closing unnecessary applications for better performance. In case of persistent difficulties, don't hesitate to seek assistance from Adobe Support or explore community forums.
By following these steps and seeking help if needed, you'll effectively overcome challenges and achieve seamless and successful captioning in Premiere Pro.
How to Add Subtitles in Premiere Pro
Now we are good to add subtitles to MP4 in Premiere Pro. Discover how to add engaging and accessible subtitles with ease by following the step-by-step guide below to ensure a smooth and effective process.
How to Add Subtitles Automatically in Premiere Pro👨🚀
Except for fixing distorted audio in Premiere Pro, this video editor also provides a speech-to-text feature for automatic transcript generation and caption addition. Supported languages include English, Chinese, Japanese, Spanish, etc. Starting with the automatic video transcript is the quickest way to create captions and streamline the process. Here's how:
Step 1. Import your video.
Open Premiere Pro, go to the "Project" panel, and either right-click the empty space or double-click anywhere in the box to select "Import."

Step 2. Set the automatic transcript.
Click "Window" > "Workspaces" > "Captions and Graphics" > "Text" > "Transcript" > "Transcribe sequence" to open the dialogue. Set the language, speaker labeling, and audio analysis. And click "Transcribe."
- Transcribe in point to out point only: Specify to transcribe audio within the marked In and Out points.
- Merge output with existing transcription: Insert auto-transcription into an existing one between specific In and Out points to ensure continuity.
- Tip
- Set the in and out point range before so you can enable the two options.

Step 3. Create subtitles.
Under "Transcript," click the "…" next to the speaker to edit or add the speakers' names and save; type in words in the search field and click "Replace" or "Replace All" for a change.
There are other practical uses under the "Text" panel; for instance, you can enable "Spell check" for your captions. Click "CC" to select a preset, customize the format, stream, style, etc., and hit "Create captions" at last.
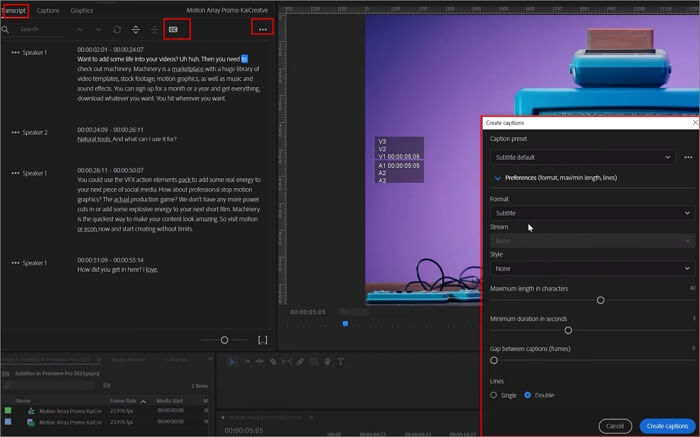
Step 4. Check out your captions.
Because they are not always 100% accurate, you need to check out the motion array and machinery and edit the subtitles as needed on the left of the panel.
Or, double-click the caption box to open the "Essential Graphics" panel; you can click "Edit" for more changes, like font, size, subtitle position, etc.

Step 5. Export the subtitle file or video.
Move to the "Captions" tab, and click the three dots on the top left; press "Export" > "Export to SRT File" or other formats to export your subtitles.
To export the video, go to "Export" from the header bar and, configure the file name, location, format, and press "Export."

If you found this blog helpful, share it with your social groups!
How to Add Subtitles Manually in Premiere Pro🤚
For shorter sequences, manual transcription is an option to consider. Here's the step-by-step guide.
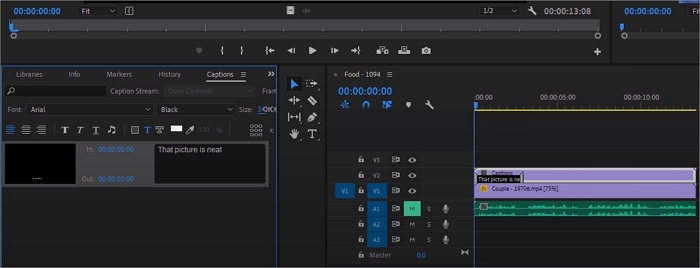
Step 1. Launch Premiere Pro, and go to "Window" > "Workspaces" > "Captions and Graphics" > "Text" > "Create new caption track."
Shortcut: Mac: Opt + Cmd + A, Win: Ctrl + Alt + A
Step 2. Now, you can customize your caption's track format and style and click "OK."
Step 3. Position playhead at the start of the dialog and align the text caption with audio using waveforms.
Step 4. Click the "+" icon in the "Text" panel or use keyboard shortcuts (Mac: Opt + Cmd + C, Win: Ctrl + Alt + C) to add a blank caption.
Step 5. Double-click "New Caption" in the "Text" panel or "Program Monitor" to edit and type the caption. And change the styles from the menu.
Step 6. Trim the caption's end in the timeline to match spoken dialog. Add captions similarly for the remaining audio in sequence.
Are steps cumbersome? Generate video subtitles using AI in seconds with the user-friendly EaseUS VideoKit!
Watch the video to learn more about the manual method📺:
- 00:09 How to add open captions
- 00:33 Drag the captions from the project panel under the track above your video clip on the timeline
- 00:43 How to add captions
- 01:07 Change Opacity
- 02:25 Outro
How to Add Effects to Captions in Premiere Pro🪄
Adding SRT to MP4 in Premiere Pro is a piece of cake, but animating captions is not. How do we make the captions more interesting and intriguing? Follow the steps to increase your fascination with videos in Premiere Pro.
Step 1. Start Premiere Pro, click "Window" > "Text" > "Create transcription," and configure the transcript.
Step 2. Read the transcribed subtitles over and double-click the section to edit them.
Step 3. Hit "CC" to open the window and customize format, stream, style, length, and more; choose "Create captions."
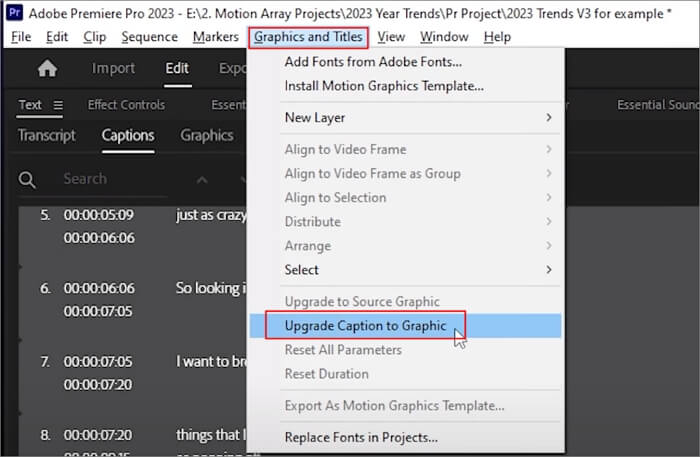
Step 4. Highlight your captions and go up to "Graphics and Titles" > "Upgrade Caption to Graphic."
Step 5. To style them all the same way, take one section, go up to the "Essential Graphics" panel, and change the font, size, shadow, position, and more. You can also create a style for future use.
Step 6. Highlight all remaining text and drag the saved style over the top of all of them.
Create Subtitles Automatically with AI-Based Generator
Premiere Pro's automatic subtitle generation also has drawbacks, including variable accuracy with complex dialogues, issues with low-quality audio, and lack of context awareness. Manual editing is often needed for professional and error-free subtitles.
And that's where the AI-powered subtitle generator EaseUS VideoKit comes into play, which presents a simpler UI and solution to add subtitles or closed captions to videos easily. You can extract subtitles from MP4 and edit and stylize them as you want. And with an AI algorithm, the dialogue accuracy is guaranteed.
This versatile tool also allows you to remove wind noise from video, compress video of 1000+ formats, and convert audio to video. See how to use it to produce your personal captions effortlessly.
1
Wrapping up
In conclusion, you can add subtitles to your videos in Premiere Pro either automatically or manually. The automatic option offers quick generation but may require adjustments for accuracy. On the other hand, manual creation provides more control for professional results.
For a comprehensive video editing solution, consider EaseUS VideoKit. With its AI-powered features, it simplifies subtitle addition and enhances your video editing experience. Whether you choose automatic or manual subtitles, EaseUS VideoKit is a valuable tool for elevating your videos. Try it now and make your content more engaging and accessible.
Add Subtitles in Premiere Pro FAQs
1. How do you add subtitles to Premiere Pro for YouTube?
To add subtitles to your video in Premiere Pro for YouTube, follow these steps:
- Open Premiere Pro, and go to "Windows" > "Captions and Graphics."
- Move to "Text" > "Transcribe sequence"
- Choose the language and target the audio track.
- Click "Transcribe" and stylize your captions.
2. How do I add SRT subtitles to Premiere?
Follow these steps to add SRT subtitles to Premiere:
- Import the SRT file into Premiere Pro.
- Drag the SRT file from the Project panel into your sequence.
- Premiere Pro creates a new caption track and places the captions on it.
3. Can Premiere Pro generate subtitles?
Yes, Premiere Pro can generate subtitles. It provides various tools and features to create and edit subtitles for videos, allowing users to add, customize, and time subtitles for their content.