-
![]()
Sofia Albert
Sofia has been involved with tech ever since she joined the EaseUS editor team in March 2011 and now she is a senior website editor. She is good at solving various issues, such as video downloading and recording.…Read full bio -
![]()
Alin
Alin is a sophisticated editor for EaseUS in tech blog writing. She is proficient in writing articles related to screen recording, voice changing, and PDF file editing. She also wrote blogs about data recovery, disk partitioning, data backup, etc.…Read full bio -
Jean has been working as a professional website editor for quite a long time. Her articles focus on topics of computer backup, data security tips, data recovery, and disk partitioning. Also, she writes many guides and tutorials on PC hardware & software troubleshooting. She keeps two lovely parrots and likes making vlogs of pets. With experience in video recording and video editing, she starts writing blogs on multimedia topics now.…Read full bio
-
![]()
Gorilla
Gorilla joined EaseUS in 2022. As a smartphone lover, she stays on top of Android unlocking skills and iOS troubleshooting tips. In addition, she also devotes herself to data recovery and transfer issues.…Read full bio -
![]()
Rel
Rel has always maintained a strong curiosity about the computer field and is committed to the research of the most efficient and practical computer problem solutions.…Read full bio -
![]()
Dawn Tang
Dawn Tang is a seasoned professional with a year-long record of crafting informative Backup & Recovery articles. Currently, she's channeling her expertise into the world of video editing software, embodying adaptability and a passion for mastering new digital domains.…Read full bio -
![]()
Sasha
Sasha is a girl who enjoys researching various electronic products and is dedicated to helping readers solve a wide range of technology-related issues. On EaseUS, she excels at providing readers with concise solutions in audio and video editing.…Read full bio
Content
Dawn Tang
Updated On 03/10/2025
0 Views |
0 min read
When it comes to creating high-quality videos, audio plays a crucial role in delivering a seamless and immersive experience. However, removing audio from MP4 can be a challenging task, especially in environments where background noise is unavoidable.
Fortunately, with the help of Final Cut Pro, a powerful video editing software and the best vocal remover, you can effectively remove background noise and enhance the overall audio quality of your videos.
In this guide, we will explore various techniques and tools within Final Cut Pro that will enable you to eliminate unwanted background noise, ensuring that your audience focuses on the intended sounds and voices without any distractions.
| Methods | Effectiveness🎶 | Potential Problems🏷️ | Suitable for📝 |
|---|---|---|---|
| Audio Enhancements | Change the sound frequencies in a selected clip. | May remove the voice at the same frequency of noise, and make the sound electronic or artificial. | Remove background noise from standard video and 360° clips. |
| Denoiser | Set a noise threshold and reduction value for further removal. | May produce artifacts. | When you have recordings with background noise, hissing, hum, or other types of noise interference. |
Can You Remove Background Noise in Final Cut Pro
Yes, you can remove background noise from audio of videos in Final Cut Pro. This video editor does provide some audio enhancement tools that can help improve the overall quality of your audio, including reducing background noise, removing hum noise, making human voice more prominent, etc.
Another tool is the DeNoiser effect, which is designed to reduce various types of noise in your audio clips. The DeNoiser effect eliminates noise below a certain volume level and applies FFT algorithms to minimize unwanted noise, such as background hum, hiss, or static. While it may not be able to completely get rid of all noise, it can significantly reduce its presence, making your audio cleaner and more pleasant to listen to.
Take out Background Noise in Final Cut Pro with 2 Ways
We know that Final Cut Pro prepares noise removal features for users in need to remove wind noise from videos effectively. But how? The following section will emphasize that part. Now let's get started.
Reduce Background Noise in Final Cut Pro Using Audio Enhancements⚙️
Audio enhancement features in Final Cut Pro change the sound frequencies to improve audio quality and reduce background noise essentially, this helps denoise the video clip but threatens the voice in the same frequency. Anyhow, this is a straightforward and widely used method currently.
Step 1. Put a video clip onto the timeline.
Open Final Cut Pro on your Mac, and go to "File" > "New" > "Project".
A newly created project shows, specify the project, and go to "File" > "Import" > "Media". Then put the imported video onto the timeline.
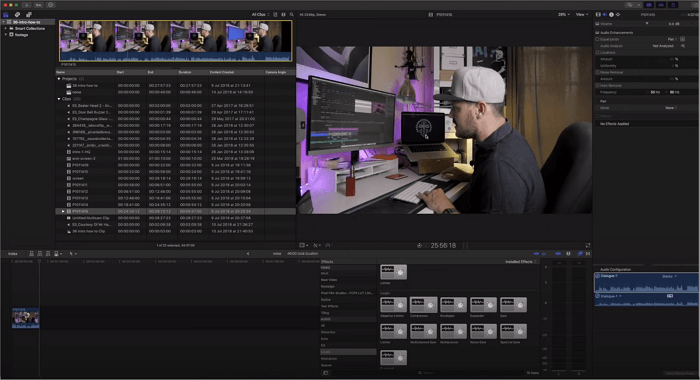
Step 2. Add a "Compressor" to level out the voice frequencies.
Come into your effects tab and find the effect under "Installed Effects", tap the second icon from the right, and click "Levies" > "Compressor".
Drag and drop the Compressor on the audio clip. Open it to open the window, play with attack, release, threshold, etc. Find "Presets" under "Compressor" and click "Default" to choose "Voice" for a boost.
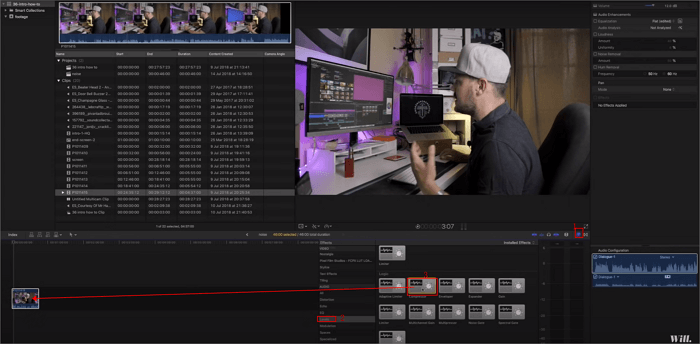
Step 3. Put a "Limiter" on to control the clipping optionally.
Under "Installed Effects", find and drag a "Limiter" effect onto the track.

Step 4. Use removal options from "Audio Enhancements".
Go to "Modify" > "Enhance Audio", or tap Command+A instead; Or click the enhancement pop-up menu and choose "Enhance Audio"; Or click the sparkler icon, then select "Auto Enhancer Audio".
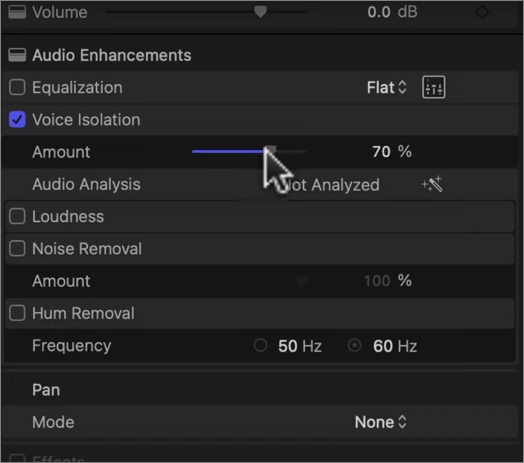
An audio inspector on the right shows, where you can customize options and their sliders.
- Equalization: Choose from preset options to adjust the audio's frequency balance.
- Voice Isolation: Prioritize human voices over other audio elements.
- Loudness: Improve overall volume and uniformity of the audio.
- Background Noise Removal: Reduce unwanted background noise.
- Hum Removal: Eliminate electrical hum noise at 50 or 60 Hz.
Step 5. Preview and export the video.
Listen to the sound quality every time you use an effect or removal option, you don't have to follow the whole procedure so export the satisfactory video when it works.

Want to see the video instead? Here's a guide below.
- 2:50 Add a Compressor
- 4:30 Glitch Effects
- 5:44 Hum Removal
- 6:09 Noise Removal
- 6:13 Noise Gate
- 7:05 Glitch Effect
- 7:35 Equalizer
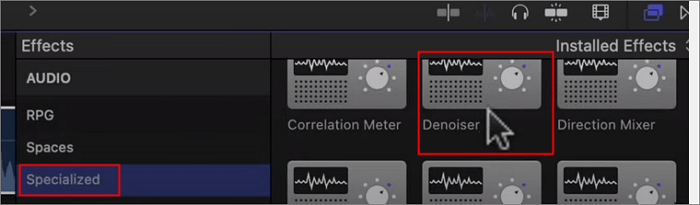
Strip Background Noise in Final Cut Pro Using Denoiser🔧
Denoiser in Final Cut Pro allows you to set a noise threshold and reduction value to remove background noise, hissing, hum, and other types of interference. However, excessive use or high-reduction settings may introduce artifacts. Denoiser is ideal for enhancing recordings with unwanted noise, improving overall audio clarity.
Step 1. Import the video clip and add it to the Final Cut Pro timeline.
Step 2. Click the effects button in the top-right corner (or Command+5), select the effect, and drag it to the audio clip.
Step 3. Select a preset or by default and click the triangle next to "Parameters".
Step 4. Set the Threshold value to filter out unwanted noise portion.
Step 5. Adjust the Reduce value for optimal noise reduction without affecting the desired signal.
Step 6. Use the Smoothing controls to address any artifacts encountered.
- Important
- You can add the Denoiser effect other than the Audio Enhancements if the result doesn't work as expected. Besides, there is another way to denoise video in Final Cut Pro, using noise removal plugins like Neat Video, FxFactory Pro, or Magic Bullet Suite. But they usually charge.
If you found this article on Final Cut Pro helpful, don't keep it to yourself!
Best Pick: Erase Background Noise from Audio/Video Online
One notable drawback of Final Cut Pro is that it is exclusively available for macOS. This means that users who do not have access to a Mac computer cannot utilize the software.
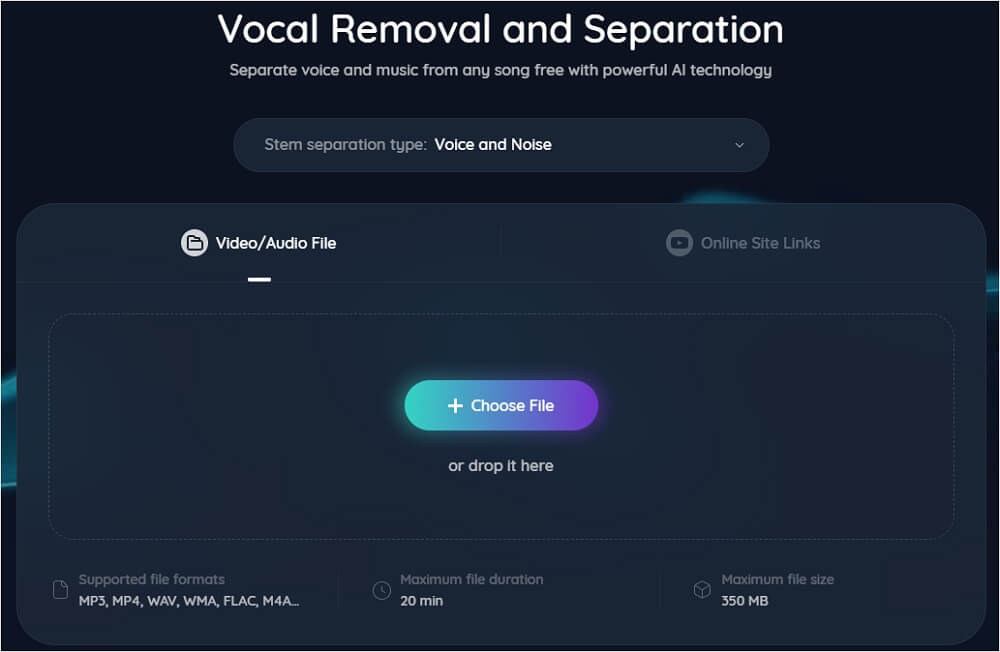
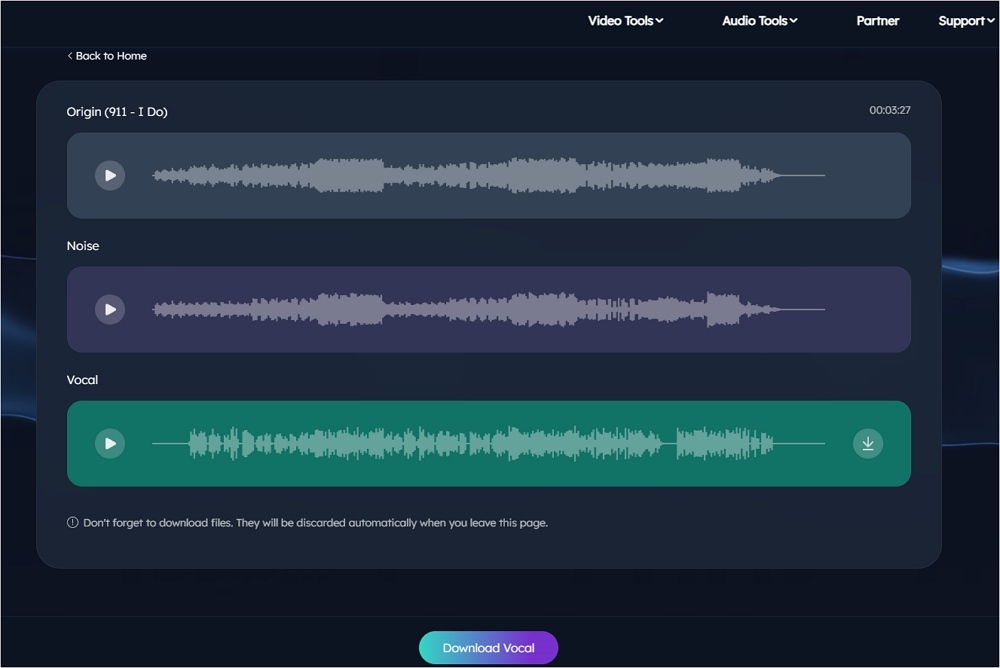
EaseUS Online Noise Remover is a web-based audio editor and the best option to remove music from YouTube videos or separate vocals from music or vice versa with a click. This internal feature is easy to use and no other operations are needed.
Powered by Advanced AI
This vocal remover for any device produces lossless video and audio clips without distortion or artifacts. It also supports multiple formats like MP3, FLAC, WAV, MP4, etc. You can also use it to remove background noise, extract instruments from songs, find the key of a song, or change the pitch, volume, and speed of audio.
Wipe off Background Noise from Video Easily
Step 1. Visit the website and select the "Noise Reducer" option.
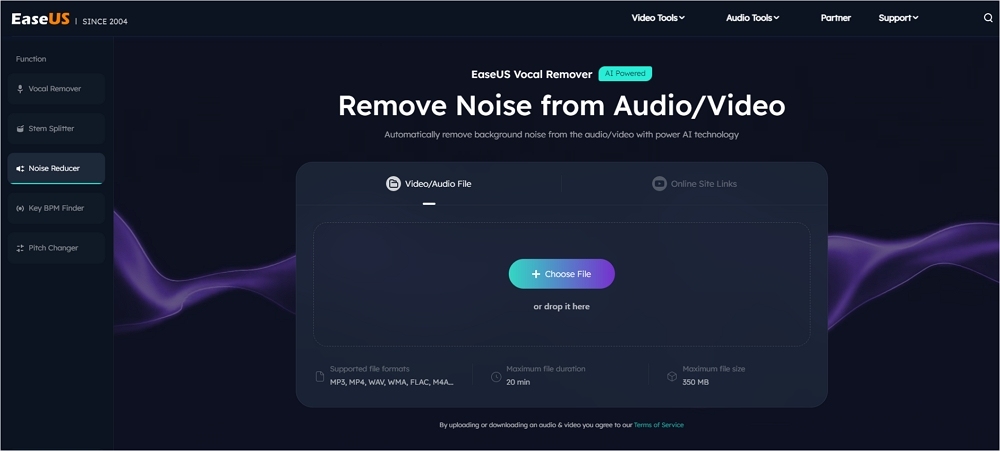
Step 2. Click "Choose File" or drag and drop the file in the area and wait for the AI analysis.
Step 3. Download the final work with noise removed.
Verdict
Final Cut Pro provides noise removal tools and features like Audio Enhancements and Denoiser to reduce background noise, it is worth noting that the software is exclusive to macOS.
Users can consider EaseUS Online Noise Remover as an excellent alternative. With its user-friendly interface and powerful noise reduction capabilities, it offers a valuable solution for enhancing audio quality in videos on any platform.
Powered by Advanced AI
Clean up Background Noise in Final Cut Pro FAQs
1. How to fix noise removal not showing in Final Cut Pro?
To fix noise removal not showing in Final Cut Pro, go to "Audio Enhancements" > "Equalization" > "Audio Analysis" > the effect icon next to it, hover your cursor over the area, and a "Show" control should appear.
2. How do I remove background noise from an audio clip?
To remove background noise from an audio clip, you can follow these steps:
- Import the audio clip into EaseUS Online Noise Remover.
- Wait for the AI analysis.
- Export or save the audio clip with the background noise removed.
3. Can you reduce wind noise in Final Cut Pro?
Yes, you can reduce wind noise in Final Cut Pro using audio editing techniques. Here's how:
- Import the video clip with wind noise into Final Cut Pro.
- Choose "Modify" > "Enhance Audio" > "Audio Enhancements".
- Add the "Noise Reduction" effect to the clip and drag the slider to adjust.
- Export the final work.
4. What is the best noise removal plugin for FCPX?
Neat Video is the best noise removal plugin for Final Cut Pro X users seeking to enhance their video quality. It enhances video quality by reducing noise and grain, transforming grainy footage into clean and sharp videos. It maintains the detail and clarity of the original video and includes an auto-profiling tool for streamlined workflow, allowing you to generate and save noise profiles.