-
![]()
Sofia Albert
Sofia has been involved with tech ever since she joined the EaseUS editor team in March 2011 and now she is a senior website editor. She is good at solving various issues, such as video downloading and recording.…Read full bio -
![]()
Melissa Lee
Melissa Lee is a sophisticated editor for EaseUS in tech blog writing. She is proficient in writing articles related to screen recording, voice changing, and PDF file editing. She also wrote blogs about data recovery, disk partitioning, data backup, etc.…Read full bio -
Jean has been working as a professional website editor for quite a long time. Her articles focus on topics of computer backup, data security tips, data recovery, and disk partitioning. Also, she writes many guides and tutorials on PC hardware & software troubleshooting. She keeps two lovely parrots and likes making vlogs of pets. With experience in video recording and video editing, she starts writing blogs on multimedia topics now.…Read full bio
-
![]()
Gorilla
Gorilla joined EaseUS in 2022. As a smartphone lover, she stays on top of Android unlocking skills and iOS troubleshooting tips. In addition, she also devotes herself to data recovery and transfer issues.…Read full bio -
![]()
Rel
Rel has always maintained a strong curiosity about the computer field and is committed to the research of the most efficient and practical computer problem solutions.…Read full bio -
![]()
Dawn Tang
Dawn Tang is a seasoned professional with a year-long record of crafting informative Backup & Recovery articles. Currently, she's channeling her expertise into the world of video editing software, embodying adaptability and a passion for mastering new digital domains.…Read full bio -
![]()
Sasha
Sasha is a girl who enjoys researching various electronic products and is dedicated to helping readers solve a wide range of technology-related issues. On EaseUS, she excels at providing readers with concise solutions in audio and video editing.…Read full bio
Content
Sasha
Updated On 03/26/2025
0 Views |
0 min read
In today's digital age, video content has become an essential part of communication and entertainment. Whether you are a Vlogger, YouTuber, or TikTok creator, adding subtitles to your videos can enhance their accessibility and reach a wider audience.
DaVinci Resolve is a powerful and popular video editing software that offers a range of tools to seamlessly add subtitles to your videos. In this article, we will guide you through the step-by-step process of adding subtitles in DaVinci Resolve, catering to both beginners and experienced users.
Below is a comparison of these methods.
| Methods | Effectiveness | Difficulty |
|---|---|---|
| Create Subtitles Manually | Particularly useful when fine-tuning subtitles | Easy |
| Import SRT Subtitles | Reliable when you have SRT subtitle files | Easy |
| Bonus: EaseUS VideoKit | Generate subtitles automatically and accurately | Super easy |
Method 1: Create Subtitles Manually
DaVinci Resolve allows users to manually add subtitles to MKV and other files for free. Users have full control over the timing and content of the subtitles. With this method, you can ensure perfect synchronization between the audio and the text displayed on the screen. This manual approach is particularly useful when you want to fine-tune the subtitles for accuracy and readability.
Below is the tutorial to create subtitles manually in DaVinci Resolve 18 :
Step 1. Access the Edit Page
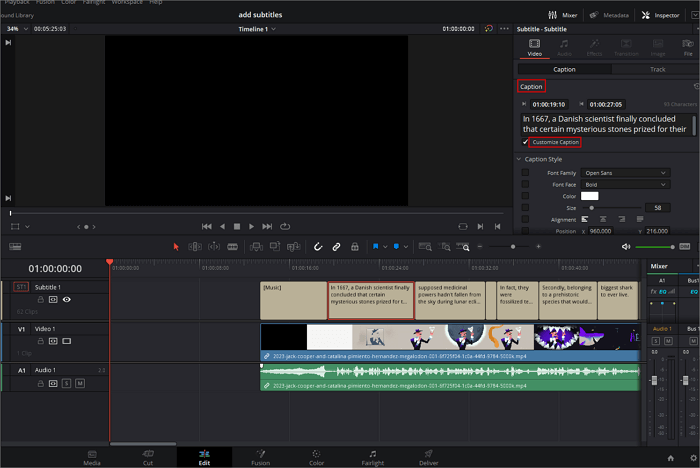
To begin, navigate to the edit page by clicking on "Edit" from the horizontal menu bar at the bottom of the screen.
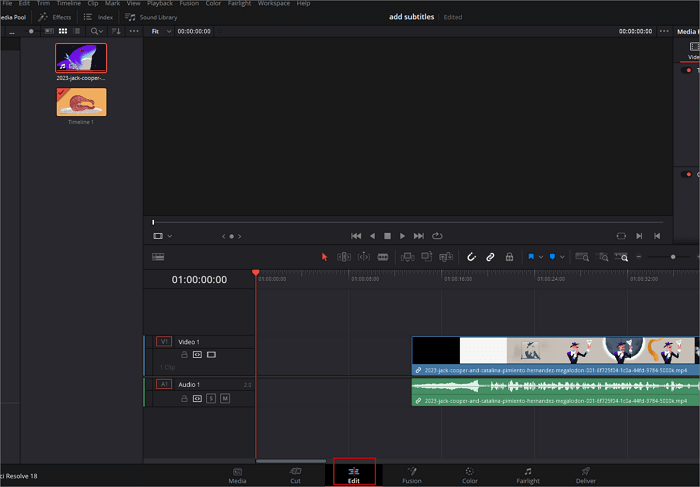
Step 2. Add a Subtitle Track
Drag your video onto the timeline, then right-click on the left side of the timeline where your video track is located. Select "Add Subtitle Track" from the menu that appears.
Step 3. Add Your Subtitles
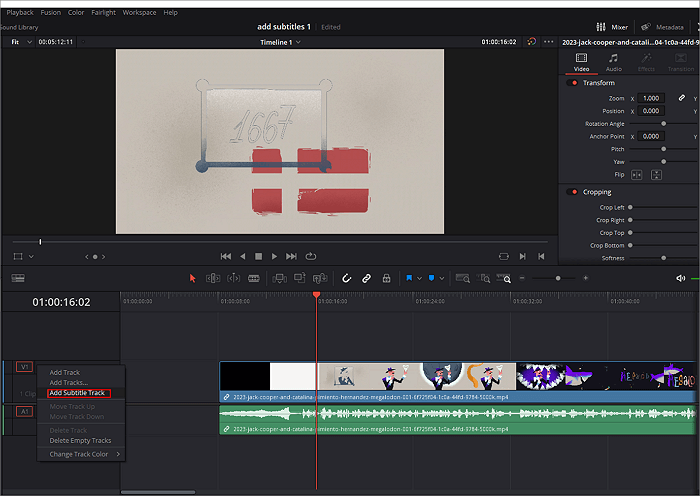
Move the cursor to the starting point of your dialogue, right-click on the subtitle track, and choose "Add Subtitle" to insert your first subtitle. A new panel labeled "Inspector" will appear in the top right corner of the interface, allowing you to input your subtitles.
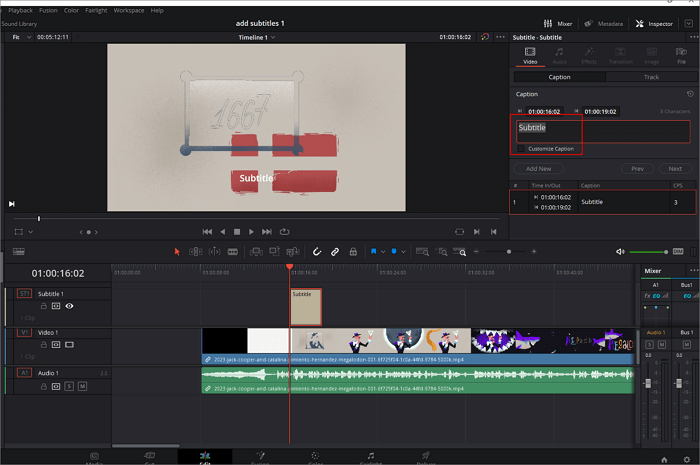
To personalize the appearance of your subtitles, click on "Custom Caption" located below the subtitle editing area. Here, you can adjust the font, color, outline, size, background, and other elements.
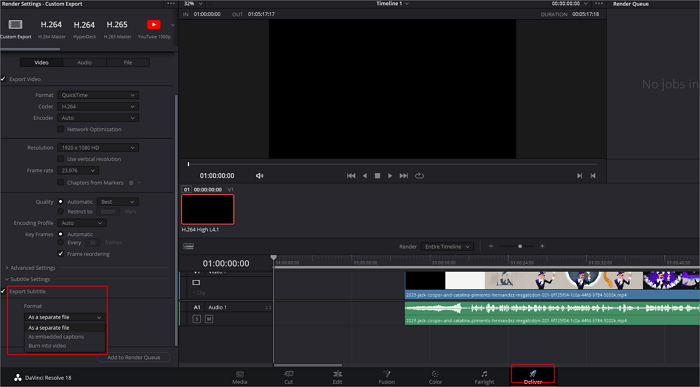
Step 4. Export Subtitles
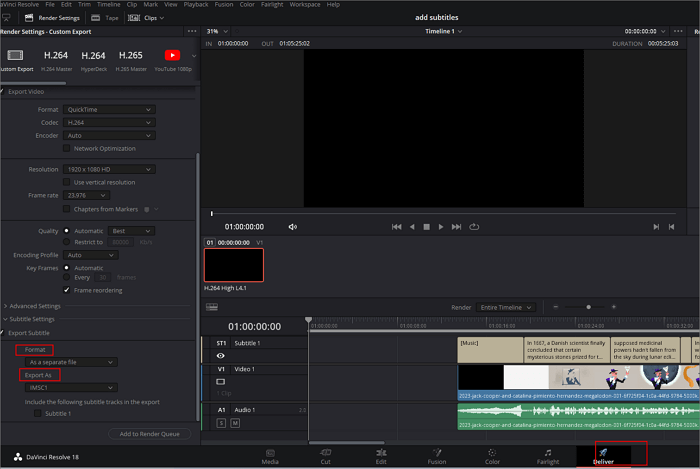
Go to the Delivery page, and choose your export format and all the settings you require for exporting your final video.
To add subsequent lines of subtitles, simply move the cursor to the beginning of the next audio segment, right-click on the subtitle track, and select "Add Subtitle" to include another subtitle entry.
📺Below is a vivid video tutorial on how to add subtitles in DaVinci Resolve 16:
- 0.12: add your first subtitle
- 0.52: editing your first subtitle position the playhead
- 1.15: export your video with your new subtitles
- 1.22: subtitle settings
- 1.49: include the subtitle
Method 2: Import SRT Subtitles
Compared to manually recognizing and adding subtitles track by track, importing SRT subtitles is a faster process. However, if you don't have an SRT file, you can upload your video on YouTube as a private video and use its built-in subtitle addition features to export the subtitle file. Then download YouTube videos on Mac or Windows first, and then extract subtitles. Alternatively, you can also use EaseUS to export your subtitle file.
By following the below steps, you can seamlessly add and customize subtitles in DaVinci Resolve:
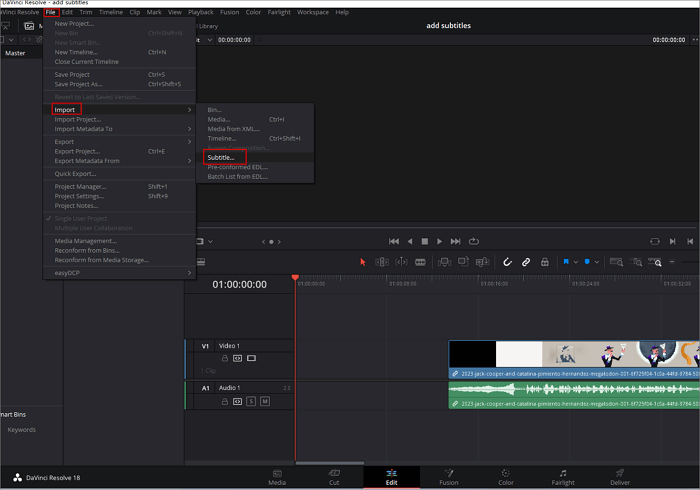
Step 1. Go to the "File" menu and select "Import," then "Subtitle." Choose the subtitle file from your device and drag it onto your timeline.
Step 2. Drag the subtitle file and place it where the dialogue starts to ensure perfect synchronization.
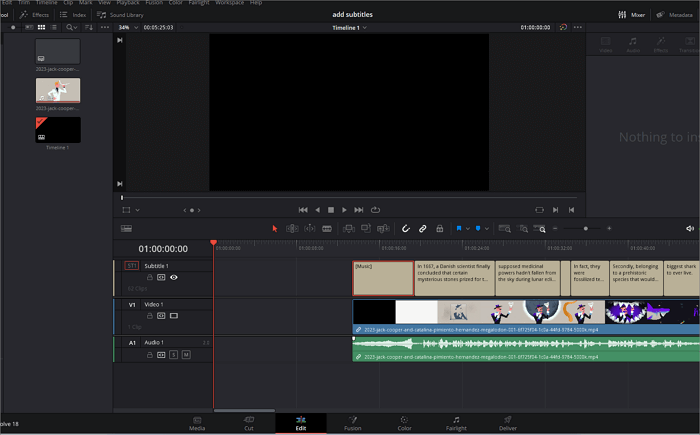
Step 3. Click the subtitle, and you'll see a panel below "Inspector" on the right side of the interface, you can edit SRT file, and adjust the subtitles and their font, size, and color by clicking the "Customize Caption" below the "Caption."
Step 4. Head to the Delivery page and choose one of the following options to export your subtitles: As a separate file, Burn into video, or embed into video. Select the option that best suits your needs and export your video with subtitles.
Bonus Tip: Best Alternative to DaVinci Resolve
From the information above, we can see that manually adding subtitles can be quite cumbersome, especially for longer videos. Importing subtitle files directly might not be suitable for every content creator. In such cases, EaseUS VideoKit, a tool that can automatically recognize speech and generate subtitles with incredibly high accuracy, fits the needs of most content creators.
EaseUS VideoKit supports over 100 mainstream languages and boasts an accuracy rate of up to 90%. It does not impose any limitations on video size or format. Whether you are a beginner or an experienced user, anyone can efficiently create subtitles using this tool, and it supports exporting subtitles in both SRT and TXT formats.
Features of EaseUS VideoKit:
- Process videos rapidly with AI
- Support more than 100 languages
- Generate subtitles with high precision and accuracy
- Capable of extracting audio from video
If you find this tool more suitable for your needs, click the button below to give it a try.
To Conclude
To conclude, in the above content, we presented two methods for adding subtitles to your videos in DaVinci Resolve and provided detailed step-by-step instructions. Whether you choose manual entry or importing subtitles, you can refer to the information in this article.
If you need to add subtitles to longer videos or lack subtitle files, we recommend using EaseUS VideoKit. It not only generates highly accurate subtitles for you but also allows you to export subtitle files.
If you find this article helpful, consider sharing it with more of your friends.
FAQs About How to Add Subtitles in DaVinci Resolve
If you still have doubts or questions about this topic, we have compiled a list of frequently asked questions (FAQs) that users often inquire about.
1. How to add subtitles to a video?
To add subtitles to a video, you can manually type the subtitles in the subtitle track, or use a subtitle generator to analyze and generate subtitles automatically.
2. How do I permanently add subtitles to a video?
You can use video editing software like EaseUS VideoKit to permanently add subtitles to a video. You can follow these steps:
Step 1. Open EaseUS VideoKit and find the "Subtitle Generator" panel. Then "Choose File" or drag the YouTube video file to the interface.
Step 2. Wait for the AI analysis, and click the "Text" button to change the text, or customize font, background, and position under the "Style" menu.
Step 3. Click "Export Subtitle" to select exported subtitle format, "Save to" to change location, and press "Export" to export the video with subtitles.
3. How to format SRT subtitles?
Formatting SRT subtitles follows a specific structure to ensure proper synchronization and readability. Here are the guidelines for formatting SRT subtitles:
- The format of the timecode is "hh:mm:ss,sss" (hours:minutes:seconds,milliseconds)
- The subtitle text should be clear, concise, and easy to read.
- Line Breaks: Limit each subtitle to two lines.
- Keep each line within 40-60 characters
- Use plain text without any special styling.
- Each subtitle entry should contain only one complete thought or sentence.
4. How can I add subtitles to a video without any software?
You can add subtitles to a video without using any software by using online tools like Kapwing or Clideo.
Step 1. Upload your video and subtitle file.
Step 2. Then merge them together.
Step 3. After merging, download the video with embedded subtitles.
Additionally, some social media platforms, like YouTube, offer built-in subtitle addition features for uploaded videos.