How to Speed up a Clip in Final Cut Pro in 2 Ways ⏩
Dawn Tang updated on Mar 25, 2025 to AI Article
How to speed up and slow down a video or audio clip in Final Cut Pro on your Mac? This article will show you the step-by-step tips. Read on.
▶️In Final Cut Pro, select the part of your timeline you want to adjust. Click the Retime menu below the viewer, choose "Slow," "Fast," or "Custom," select a value and press Enter.
In Apple Final Cut Pro, mastering the art of speeding up a song can transform your video editing capabilities. Whether you're looking to add dramatic slow-motion effects for emphasis or speed up footage to create a sense of urgency, Final Cut Pro provides powerful tools to achieve these effects with precision.
Understanding how to manipulate clip speed allows you to enhance storytelling, emphasize key moments, and craft visually dynamic sequences that captivate your audience. This guide will walk you through the steps to effectively speed up and slow down clips in Final Cut Pro, empowering you to unleash your creative vision with ease.
You can bring your video clips in the timeline and toggle it forward or backward manually. Dragging the clip to the right creates a slow-motion effect and changes the Retime indicator orange. Dragging to the left creates a fast-motion effect and changes the Retime indicator blue.
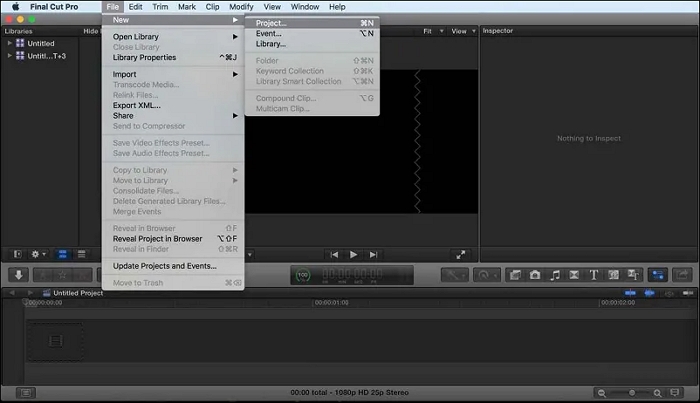
Step 1. Open Final Cut Pro and start a new project. Go to "File" > "Import" > "Media" to add your clip. Brind it to the timeline.

Step 2. Select the part of your clip and hit the shortcut key Command + R to bring up the Retime control.

Step 3. Drag the Retime handle backward to increase the speed or forward for the slow-motion clip.
Step 4. Click the downward icon and choose from "Slow," "Fast," or "Normal" to adjust the speed. This causes a ripple edit through the timeline, which means the tools move other clips to make room automatically. You can also select "Automatic Speed" to speed up the frame rate increase automatically.
Step 5. To keep the clip duration unchanged, select "Custom" from the Retime menu and unselect the "Ripple" option.
Set a new speed and press return. Press Shift + N super speedy shortcut to speed up a lot.
Step 6. Export the video.
See also:
In Final Cut Pro, the J, K, and L keys on your keyboard are essential for controlling playback speed and navigating through your project or clips. These keys allow you to accelerate playback up to 32 times normal speed. When positioned at the playhead in the timeline or the skimmer in the browser:
These shortcuts also control external video devices like camcorders or cameras, with playback speeds (L for forward, J for reverse) potentially varying based on your specific video equipment capabilities.
Feel inspired by these powerful editing techniques? Share this article on social media and empower others to unleash their creativity with Final Cut Pro's speed-changing capabilities!
To speed up MP3, MP4, WAV, FLAC, MOV, and more files with a few clicks, you cannot miss EaseUS Online Speed Changer. It is a web-based audio editing tool without login or registration. Users are allowed to upload unlimited files without a size limit and change the speed from 0.5 to 1.5x.
It is also a multipurpose MP3 volume booster that increases and lowers video volume, changes pitch, and extracts instruments like piano, guitar, bass, and drums from clips. Backed by the advanced AI algorithm, it delivers high-quality results without distortion.
Key Features
Step 1. Enter the main interface of EaseUS Online Speed Changer. The left sidebar shows new functions of this online tool. Find "Pitch changer" and click it.
Step 2. Then, drop the audio/video file in the blank. It supports multiple file formats, including MP3, MP4, WAV, M4A, and FLAC.
Step 3. The website will analyze your file with AI. You can drag the little dot in the "Speed" section to slow down or speed up with a range of 0.5X to 1.5X.
Step 4. Click "Save and Export" to download the processed file to your local file location.
Changing the speed of a clip in Final Cut Pro opens up a world of creative possibilities. Whether you're slowing down to highlight a crucial moment or speeding up to create a sense of urgency, Final Cut Pro's intuitive tools provide precise control over your footage.
For those seeking an alternative or additional tool, EaseUS Online Speed Changer offers a convenient option to adjust video speed effortlessly.
Position the playhead over the clip in the timeline so that the clip's video is displayed in the viewer. To access the Crop controls, you can either click the pop-up menu in the lower-left corner of the viewer and select "Crop" (or press Shift-C), or control-click in the viewer and choose "Crop."
Click the "Retime" pop-up menu below the viewer and select "Blade Speed" (or press Shift-B). This will bring up the retime editor above the clip (if it wasn't already displayed), and the clip will be split into two speed segments.
Click on the Retime menu located below the viewer and select "Speed Transitions" from the options. Ensure that a checkmark appears next to this menu item. This action applies speed transitions to all segments where speed changes occur within the clip. To delete a transition between speed segments, double-click on the last frame of the segment where the speed change ends in the retime editor.
Related Articles
How to Speed up Video in After Effects without Changing Pitch➢
How to Remove Background Noise in Adobe Audition [7 Ways]
How to Turn on or off Subtitles on YouTube on TV [8 Ways 2025]
Best Vocal Remover Online Free Top 7 | You Must Know