Troubleshooting YouTube Audio Renderer Error
Sasha updated on Mar 10, 2025 to AI Article
Sasha updated on Mar 10, 2025 to AI Article
Open a YouTube video and only to be told, "YouTube Audio Rendered Error," you must be frustrated. If you are searching for ways to fix YouTube audio renderer error issues, read this article and try these ways to have a smooth watching experience.
YouTube is undeniably a platform that attracts millions of creative users. Reports show that 1.3 billion individuals watch nearly 5 billion videos on YouTube daily. With such a massive load on the platform, occasional glitches may occur. Imagine opening a YouTube video only to be greeted by a message saying, "Audio Renderer error, Please restart your computer." Naturally, your first reaction would be to restart your computer. However, this error could be caused by a variety of factors. This article aims to help you fix this issue on your PC.
Rendering means decoding and encoding the video. If this procedure is not performed correctly, you may encounter an error known as a YouTube Audio Rendering Error. While restarting the computer usually resolves the issue, in some cases, simply restarting the browser may not be enough to correct audio rendering errors on YouTube. To provide more insight, here's a brief list of potential causes that could lead to such issues:
1. Issue on Youtube's side
2. Temporary glitch in the plugged audio device
3. Driver issues, missing audio drivers
Restarting your computer is the most direct solution to resolve this issue, as indicated by the error message.
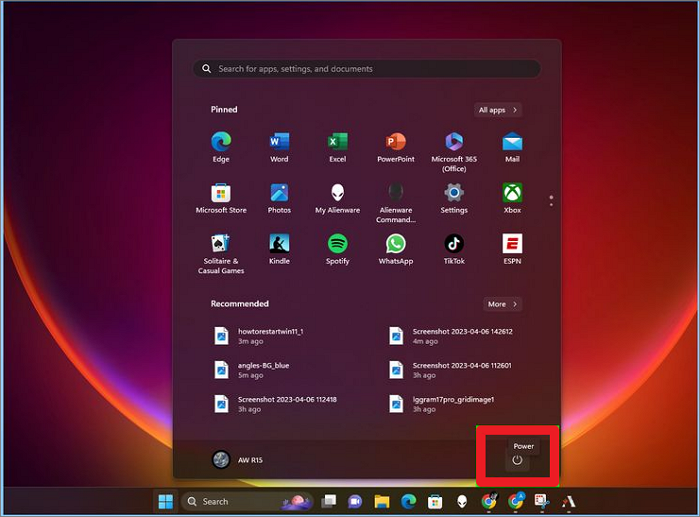
Step 1. To open the Start menu, click on the Windows icon at your screen's bottom-left corner;
Step 2. Choose the power option and then select "Restart";
After the system has restarted, verify if you can view YouTube videos without encountering the blank screen issue. If the problem persists, proceed with the troubleshooting steps below.
The most effective way to fix audio rendering errors on YouTube is to clear your browser's cache and cookies. By doing so, you can resolve the issue without losing any of your personal data. Follow these precise steps to accomplish this task:
Step 1. Launching your browser (for instance, Chrome) and locate the three dots situated in the top right corner;
Step 2. Proceed by choosing "Settings" from the drop-down menu;
Step 3. Navigate to "Privacy and security";
Step 4. Opt for "Clear browsing data";
Step 5. Ensure to check all the boxes;
Step 6. Finally, click on "Clear data".
🎬Here is also a video showing details about "Audio Render Error."
Related Reading:
In some cases, outdated web browser might be partly responsible for this issue. To find out if it's the cause, it is recommended to update your browser.To do so, follow the steps below.
Step 1. Expand your browsing options by selecting the three dots at the top right corner of your Chrome browser;
Step 2. Navigate to "Help" from the drop-down menu;
Step 3. Select "About Chrome" from the pop-up menu. Your browser will then check for updates and inform you accordingly;
After updating, restart Chrome and check if the YouTube video plays properly.
While it may be hard to believe, there is a possibility worth exploring. I recommend replugging your external device and ensuring a secure connection with the system.
In certain cases, a new driver update can introduce bugs into the driver. In cases like these, it is recommended to revert back to the previous driver version. To accomplish this, kindly adhere to the steps provided below.
Step 1. Right-click on the "Windows" start button to reveal a list of options;
Step 2. Click on the "Device Manager" button, which will open the Device Manager window;
Step 3. Choose any driver from the list and right-click on it, as shown in the accompanying image. Then, select the "Properties" option;
Step 4. A window will appear, and click on the "Driver" option;
Step 5. Choose the "Roll Back Driver" option from the available list;
Subsequently, a window will appear, prompting you to select the reason for rolling back;
Step 6. Finally, click on the "Yes" button to proceed.
Ensure you have the latest drivers for your audio devices by adhering to these simple guidelines for updating any audio driver seamlessly.
Step 1. Follow step 1, as listed in fix 5.
Step 2. Open the "Device Manager" and go to "Sound, video and game controller" by right-clicking on it;
Step 3. Select the audio driver you are going to update;
Step 3. You will see a window pop up, giving you the option to select either automatic updates or manually search for updates. Here we select the automatic update option.
Upon completion of the update process, a notification window will confirm the successful update.
The Audio Troubleshooter is an integrated feature designed to address minor issues related to various aspects of the system. Since the problem pertains to audio playback, it is recommended to use the audio troubleshooter to identify and resolve the issue.
Step 1. Clicking the Windows icon located at the bottom left corner of your computer screen. Then, type "Settings" in the search bar and open it;
Step 2. Within the "System" tab, select the "Troubleshoot" option;
Step 3. Proceed by clicking on "Other troubleshooter";
Step 4. Click on "Run" next to "Audio";
Step 5. Select the appropriate audio device that is connected and click on "Next";
Then, an error detection process will begin.
The resolution of the YouTube audio renderer error is not a complex task. The article provides a comprehensive list of 7 methods to help you fix the issue. It is recommended to attempt each method until both the audio can be played without any disruptions. If you find the information beneficial, feel free to share it with your acquaintances.
📣Share with more people!
An audio renderer refers to a component responsible for processing and outputting audio data from various applications or media players. When an audio file, video with sound, or any other form of audio data is played, the audio renderer takes the digital audio stream and converts it into analog signals that can be sent to speakers or headphones for playback.
To update your audio driver,;
Step 1. Open the Setting app;
Step 2. Navigate to Windows Update located in the left sidebar;
Step 3. Should updates be available, simply click on "Install all" to automatically update any audio drivers that are ready to be updated.
To restart your audio driver.
Step 1. Begin by pressing the Win + X keys and selecting "Device Manager" from the menu that appears;
Step 2. Locate and double-click on "Audio inputs and output" in the Device Manager window;
Step 3. Right-click on the audio device that is currently connected and select "Disable Device" from the dropdown menu;
Step 4. After a few moments, right-click on the same device again and choose the "Enable device" option to re-enable it.
Related Articles
How to Remove Background Noise from Video [Desktop & Online]
Ableton Pitch Shift: How to Change Pitch in Ableton Live 11/12 𝄞
Basic Guide to AMD Noise Suppression
3 Effective Ways to Remove Audio Popping Noise | 2025
