
-
Jane is an experienced editor for EaseUS focused on tech blog writing. Familiar with all kinds of video editing and screen recording software on the market, she specializes in composing posts about recording and editing videos. All the topics she chooses are aimed at providing more instructive information to users.…Read full bio
-
![]()
Melissa Lee
Melissa is a sophisticated editor for EaseUS in tech blog writing. She is proficient in writing articles related to screen recording, voice changing, and PDF file editing. She also wrote blogs about data recovery, disk partitioning, and data backup, etc.…Read full bio -
Jean has been working as a professional website editor for quite a long time. Her articles focus on topics of computer backup, data security tips, data recovery, and disk partitioning. Also, she writes many guides and tutorials on PC hardware & software troubleshooting. She keeps two lovely parrots and likes making vlogs of pets. With experience in video recording and video editing, she starts writing blogs on multimedia topics now.…Read full bio
-
![]()
Gloria
Gloria joined EaseUS in 2022. As a smartphone lover, she stays on top of Android unlocking skills and iOS troubleshooting tips. In addition, she also devotes herself to data recovery and transfer issues.…Read full bio -
![]()
Jerry
"Hi readers, I hope you can read my articles with happiness and enjoy your multimedia world!"…Read full bio -
Larissa has rich experience in writing technical articles and is now a professional editor at EaseUS. She is good at writing articles about multimedia, data recovery, disk cloning, disk partitioning, data backup, and other related knowledge. Her detailed and ultimate guides help users find effective solutions to their problems. She is fond of traveling, reading, and riding in her spare time.…Read full bio
-
![]()
Rel
Rel has always maintained a strong curiosity about the computer field and is committed to the research of the most efficient and practical computer problem solutions.…Read full bio -
![]()
Dawn Tang
Dawn Tang is a seasoned professional with a year-long record of crafting informative Backup & Recovery articles. Currently, she's channeling her expertise into the world of video editing software, embodying adaptability and a passion for mastering new digital domains.…Read full bio -
![]()
Sasha
Sasha is a girl who enjoys researching various electronic products and is dedicated to helping readers solve a wide range of technology-related issues. On EaseUS, she excels at providing readers with concise solutions in audio and video editing.…Read full bio
Page Table of Contents
Dawn Tang
Updated on May 22, 2024
0 Views |
0 min read
Quick Answer
▶️Step 1. Play your file in DaVinci Resolve.
▶️Step 2. Click on L to speed up the forward playback.
▶️Step 3. Click Shift + L to accelerate the playback speed in reverse.
▶️Step 4. Press Shift + K to slow down.
Undoubtedly, DaVinci Resolve is the best software for video editing because of its multiple features. Professionals use it for various tasks, such as editing video colors and changing playback speed.
However, many users are still unaware of the steps to speed up MP3 in the software. If you are also one of those, you should read this guide to learn how to speed up playback in DaVinci Resolve.
1. Use the JKL Shortcut Keys
Knowing how to speed up a song in DaVinci will be easy if you know how JKL shortcut keys work. These specific keyboard keys can be used alone or combined with other keys to adjust the speed of the playback.
The best advantage of using these keys is the ease of use. Whether you are a professional editor or just learning the functions of this software, you can easily use these keys. However, the major drawback is that you might be focused on whether you want to increase the forward speed or reverse speed.
To help you learn how to use these shortcut keys better, let us share the steps with a description.
Step 1. Open DaVinci Resolve and play your track.
Step 2. Click on the "L" key or use it by combining the "Shift" key.
Step 3. Use the "Shift + J" keys to speed up the playback in reverse motion.
Step 4. Hold the "Shift + K" keys to slow down the speed.
Keep in mind that the use of "Shift + K" is dependent on the previous keys you have used. For example, if you have used the "L" key to speed up the forward playback, the "Shift + K" will slow down the track in the same direction. Similarly, this key will work in the reverse direction if you have used "Shift + J" previously.
See also:
2. Adjust Timeline Resolution
No denying that resolution plays an important role in the formatting and editing of a video. However, the higher resolutions can be difficult to use as they can slow down MP3. You can drop the timeline resolution for a particular project to adjust the speed of the playback and give relief to your system.
It is useful when dealing with higher resolutions like 4K. However, if you want to get output in the same format, you should switch the timeline resolution back to the track before rendering. This can be the only drawback of this method, as not every beginner can switch back to the track nicely.
Here, we have listed the steps to adjust the timeline resolution to speed up YouTube videos or others in this software.
Step 1. Browse the DaVinci Resolve software and go to "Project Settings."
Step 2. Look for "Timeline Format" and click on it to select "Timeline Resolution."

Step 3. Click on the box named "Use Custom Settings" before editing the track.

Be mindful that you have to adjust the timeline resolution again before exporting the clip. If you don't do this, you will be able to end up with lower-resolution videos and clips.
3. Change Timeline Proxy Resolution
Only a few editors know that adjusting timeline proxy resolution can also help them while learning how to speed up playback in DaVinci Resolve. This method can help you speed up the track easily if you are aware of the Adobe Audition playback speed, as this method is familiar with that.
This method is easy to follow if you are aware of the software's interface. You only need to follow a few simple steps to complete the task. However, the problem comes when you render your clip after changing the proxy resolution. Let us first show you the steps to change the proxy resolution.
Step 1. Open "Playback" in the DaVinci Resolve and select it.
Step 2. Go to "Proxy Mode" from the options.

Step 3. Choose from the two options named "Half Resolution" & "Quarter Resolution".
By doing this, you will either be able to change the resolution up to half level or quarter level of the original timeline resolution. This change will not affect the final Render of your video clip.
4. Bypass Color Grades and Fusion Effects
If nothing has worked for you till now to speed up the playback in DaVinci Resolve, you can also try bypassing or removing color grades. By removing it and other effects applied to the clip, you may be able to smooth playback speed.
Keep in mind that this method will remove all the effects and colors you have applied to the clip. So, you should be careful while following this and bypassing this setting.
Step 1. Browse the "Edit Page" in the DaVinci Resolve.
Step 2. Look for the "Bypass Color Grades and Fusion Effects" option that will look like a "Rainbow" symbol.

Step 3. Tap on that icon to accomplish the task.
Following this method is much easier, like with Audacity playback speed adjustment. You don't need to look for hidden options in the software's timeline and menu bar.
We hope you have found this blog informative. Kindly share it on Facebook and other social channels for the benefit of your friends and colleagues.
5. Render in Place
If the playback isn't running smoothly after following the above methods, you can also try the "Render in Place" option available in DaVinci Resolve. This approach is good for clips with heavy effects and color grading that make it difficult for the system to manage the playback speed.
However, the problem with this method is that you have to access the original clip whenever you want to edit it after rendering it from this option. Let us share the methods to "Render in Place" the video clip to streamline the playback speed.
Step 1. Go to track/clip and select it.
Step 2. Right-click on the clip to get the list of options and choose "Render in Place" from them.

Step 3. Set the "Type of File" and "Location to Save" from the opened window.
By doing this, you will be able to streamline the software's playback speed. Keep in mind that this option will not work if you are looking to learn how to speed up a video on iPhone.
Change Playback Speed Quickly Online
Using DaVinci Resolve and other software isn't easy for every task. It might be possible you are looking for an online solution to quickly change pitch of song or its speed. In this regard, you must try the EaseUS Speed Changer that we have found the best.
Using this advanced online speed changer, you can perform different actions on a specific audio track. Whether you are looking to learn how to find the key of a song or changing its speed, you will find this tool effective.
Using EaseUS Speed Changer, you can separate tracks, change a track's speed and pitch, and perform related changes. Moreover, it can also be used as an MP3 volume booster, which means that you can increase the audio's volume more than the level of the original sound.
Key Features
- You can increase or decrease the audio of the original track easily.
- It supports multiple file formats, including MP3, MP4, and others.
- No registration is required to use this online speed changer.
- This online tool has multiple tools in its collection, making it suitable for various users.
With these effective features, EaseUS Speed Changer online is the best pick for speeding up playback. We suggest browsing this tool in your browser and using it to get an idea of how it works.
Powered by Advanced AI
To speed up playback online:
Step 1. Enter the main interface of EaseUS Online Speed Changer. The left sidebar shows new functions of this online tool. Find "Pitch changer" and click it.

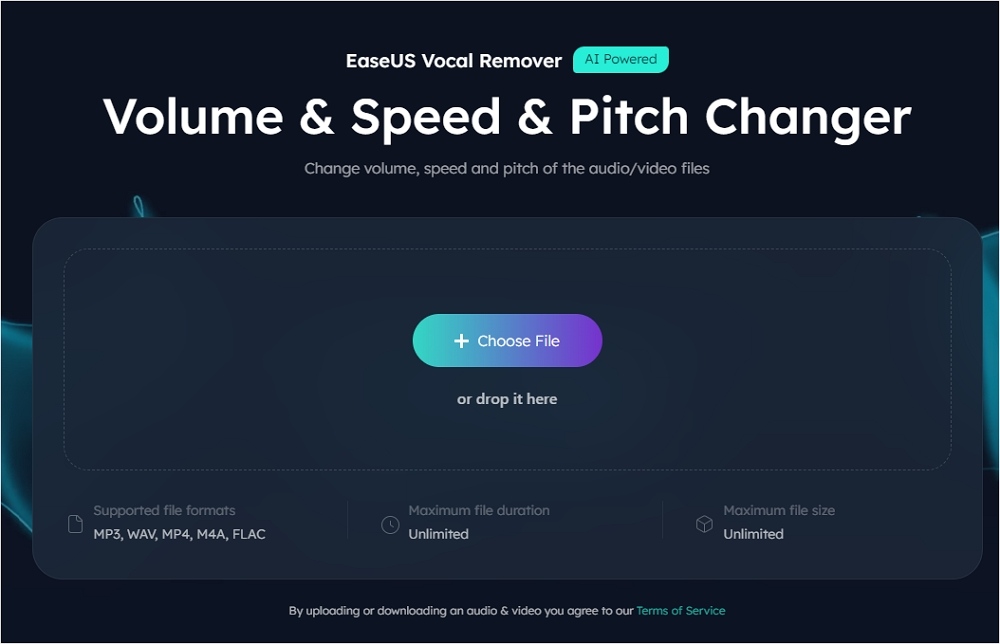
Step 2. Then, drop the audio/video file in the blank. It supports multiple file formats, including MP3, MP4, WAV, M4A, and FLAC.
Step 3. The website will analyze your file with AI. You can drag the little dot in the "Speed" section to slow down or speed up with a range of 0.5X to 1.5X.
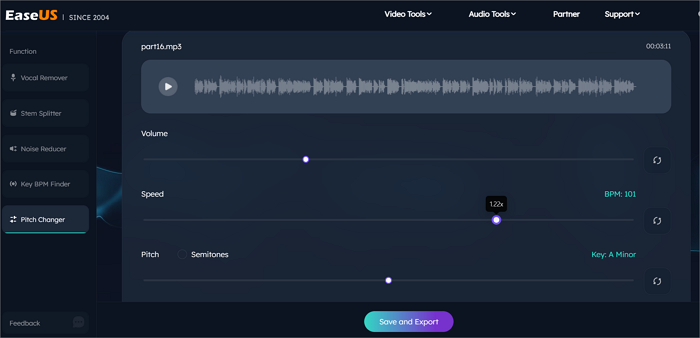
Step 4. Click "Save and Export" to download the processed file to your local file location.
Final Words
From the above sections, you must have learned how to speed up playback in DaVinci Resolve. We have shared the methods that we have found effective in this process. You can follow any of those to your comfort to adjust the playback speed.
If you want to access an online speed changer quickly, we suggest you browse EaseUS Online Speed Changer. It offers an all-in-one toolkit that lets you quickly perform various actions on an audio/video file.
Powered by Advanced AI
FAQs About How to Increase Playback Speed in Davinci Resolve
For those who have quick questions and are looking for the answers, we are here with the list of queries with their brief answers.
1. What is the shortcut for playback speed in DaVinci?
The shortcut keys to speed up playback in the forward direction in DaVinci are "Shift + L," and in the reverse direction, they are "Shift + J."
2. Why is DaVinci Resolve's playback speed too fast?
Sometimes, you may have linked specific plugins to a particular clip, which is making it too fast in the DaVinci Resolve. By removing that plugin or any effect you have applied previously, you will be able to normalize the playback speed.
3. Why is DaVinci Resolve's playback speed too slow?
It is possible that the color grading and advanced effects of DaVinci are slowing the playback speed. To resolve this issue and streamline the playback, you must try bypassing color grading and fusion effects by accessing the option.
4. How do I speed up Render in DaVinci?
You can speed up Render in DaVinci Resolve by enabling Render Caches. Here is what you have to do for this task:
- Go to "Playback" and then "Render Cache".
- Choose "Smart" and save the settings.


